- BuildMaster
- Getting Started with BuildMaster
- Builds and Continuous Integration
- What is a "Build" in BuildMaster?
- Git and Source Control
- Git Pipelines and Workflows
- Build Scripts & Templates
- Packages & Dependencies
- Build Artifacts
- Automated Testing & Verification
- Deployment & Continuous Delivery
- What is a “Pipeline” in BuildMaster?
- CI Server (Jenkins, TeamCity, etc.) Integration
- Deployment Scripts & Templates
- Automatic Checks & Approval Gates
- Manual Deployment Steps and Tasks
- Databases
- Configuration Files
- Rollbacks
- Advanced CD Patterns
- Applications & Releases
- Connecting to your Servers with BuildMaster
- Scripting in BuildMaster
- Configuring for Your Team
- Docker/Containers
- Development Platforms
- Deployment Targets
- Tools & Service Integrations
- Reference
- BuildMaster API Endpoints & Methods
- Extending BuildMaster
- Built-in Functions & Variables
- Applications
- Builds
- Configuration Files
- Containers
- Credentials
- Databases
- Deployables
- Environments
- Executions
- Files
- General
- JSON
- Linux
- Lists
- Maps
- Math
- Nuget
- Packages
- Pipelines
- PowerShell
- Python
- Releases
- Servers
- Strings
- XML
- Built-in Operations
- Batch
- BuildMaster
- Configuration Files
- Databases
- DotNet
- Files
- Firewall
- General
- Apply-Template
- Attach Package
- Build
- Checkout-Code
- Close-Issue
- Concatenate-Files
- Copy-Files
- Create-Directory
- Create-File
- Create-Issue
- Create-Issue
- Create-IssueComment
- Create-Package
- Create-ZipFile
- Delete-Files
- Download-Asset
- Download-Http
- Ensure-Directory
- Ensure-File
- Ensure-HostsEntry
- Ensure-Metadata
- Ensure-Milestone
- Ensure-Package
- Ensure-Release
- Ensure-Tag
- Exec
- Execute Python Script
- Execute VSTest Tests
- Get-Http
- Install-Package
- OSCall
- OSExec
- Post-Http
- Push-PackageFile
- PYCall
- PYEnsure
- Query-Package
- Remediate-Drift
- Rename-File
- Repackage
- Replace-Text
- Send-Email
- Set-FileAttributes
- Set-Variable
- SHEnsure
- Sleep
- Transfer-Files
- Transition-Issues
- Upload-Assets
- Upload-Http
- Upload-ReleaseAssets
- Git
- IIS
- Nuget
- PowerShell
- ProGet
- Python
- Registry
- Servers
- Services
- Shell
- Windows
- Administration
- Installation & Upgrading
- ProGet
- Getting Started with ProGet
- Packages: Managing & Tracking
- Feeds Types & Third-Party Packages
- What is a "Feed" in ProGet?
- What is a "Connector" in ProGet?
- NuGet (.NET)
- Universal Feeds & Packages
- PowerShell
- Chocolatey (Windows/Machine)
- RubyGems (ruby)
- Visual Studio Extension (.vsix)
- Maven (Java)
- npm (Node.js)
- Bower (JavaScript)
- Debian (Apt)
- Helm (Kubernetes)
- PyPI (Python)
- Conda (Python)
- RPM (Yum)
- Alpine (APK)
- CRAN (R)
- pub (Dart/Flutter)
- Cargo (Rust)
- Terraform Modules
- Conan (C++)
- Composer (PHP)
- Other Feed Types
- Asset Directories & File Storage
- Docker and Containers
- Replication & Feed Mirroring
- Software Composition Analysis (SCA)
- Security and Access Controls
- Cloud Storage (Amazon S3, Azure Blob)
- Administration
- Installation & Upgrading
- API Methods and CLI Commands
- Otter
- Getting Started with Otter
- Orchestration & Server Automation
- Connecting to your Servers with Otter
- Collecting & Verifying Configuration
- Drift Remediation / Configuration as Code
- Scripting in Otter
- Configuring for Your Team
- Installation & Upgrading
- Administration & Maintenance
- Reference
- Otter API Reference
- OtterScript Reference
- Built-in Functions & Variables
- Executions
- Files
- General
- JSON
- Linux
- Lists
- Maps
- Math
- PowerShell
- Python
- Servers
- Strings
- XML
- Built-in Operations
- Batch
- Docker
- DotNet
- Files
- Firewall
- General
- Apply-Template
- Collect Debian Packages
- Collect RPM Packages
- Collect-InstalledPackages
- Concatenate-Files
- Copy-Files
- Create-Directory
- Create-File
- Create-Package
- Create-ZipFile
- Delete-Files
- Download-Asset
- Download-Http
- Ensure-Directory
- Ensure-File
- Ensure-HostsEntry
- Ensure-Metadata
- Ensure-Package
- Exec
- Execute Python Script
- Get-Http
- Install-Package
- OSCall
- OSExec
- Post-Http
- Push-PackageFile
- PYCall
- PYEnsure
- Query-Package
- Remediate-Drift
- Rename-File
- Repackage
- Replace-Text
- Send-Email
- Set-FileAttributes
- Set-Variable
- SHEnsure
- Sleep
- Transfer-Files
- Upload-Assets
- Upload-Http
- IIS
- Otter
- PowerShell
- ProGet
- Python
- Registry
- Servers
- Services
- Shell
- Windows
- Installation & Maintenance
- Windows (Inedo Hub)
- What is the Inedo Hub?
- Configuring & Maintaining Inedo Products
- Offline Installation (no Internet access)
- HOWTO: Install on Windows
- HOWTO: Upgrade or Downgrade with the Inedo Hub
- HOWTO: Install Pre-release Product Versions
- HOWTO: Configure Your Inedo Product to Run As a Windows Domain Account
- Silent/Automated Installation Guide
- Legacy (Traditional) Installer
- Linux (Docker)
- Manual Installation
- High Availability & Load Balancing
- User Directories & Domains (LDAP)
- IIS & Web Hosting on Windows
- Logging & Analytics
- SAML Authentication
- Upgrading your Inedo Product
- Managing Agents and Servers
- Backing Up & Restoring
- Installation Configuration Files
- SQL Server & Inedo Products
- Windows (Inedo Hub)
- Inedo Agent
- What is the Inedo Agent?
- Installation & Upgrading
- Downloads & Release Notes
- Maintenance & Configuration
- Internal Architecture
- MyInedo
- OtterScript (Execution Engine)
- Reference
- OtterScript
- Inedo Execution Engine
- Operations & Functions
- Text Templating
- Resource Pools
- Runtime Variables
- Advanced Scenarios & Features
- Statements and Blocks
- Romp (Discontinued)
- Using Romp
- Installing, Configuring, and Maintaining
- Romp CLI Reference
- Package Layout
- Downloads & Source Code
- Extensibility
- Inedo SDK
HOWTO: Configure Your Inedo Product to Run As a Windows Domain Account

Inedo's products can be configured to run as a Windows Domain Account to ensure secure management of your infrastructure and applications.
This article will walk you through changing the user account for these products, ensuring proper permissions and security settings are applied. Since Inedo products are made up of a web application (whether it’s hosted through IIS or the Integrated Web Server) and a service that orchestrates builds and deployments, the user account must be changed in 2 places.
The example screenshots are from BuildMaster, but the process will be exactly the same no matter which one of our products you’re using.
Depending on which product you are using, enter the coinciding product name or abbreviation into each space:
| Inedo Product Name «NAME» | Abbreviation «XX» |
|---|---|
| BuildMaster | BM |
| ProGet | PROGET |
| Otter | OTTER |
During installation, you can select the user account that your product will run as:
- Local System
- Network Service
- Other
For evaluation purposes it’s generally easiest to select “Local System” as that prevents most permissions issues, but once you’ve determined the exact use case for your installation, you can lock down permissions granularly by changing the user account to a domain user following the least-privilege principle.
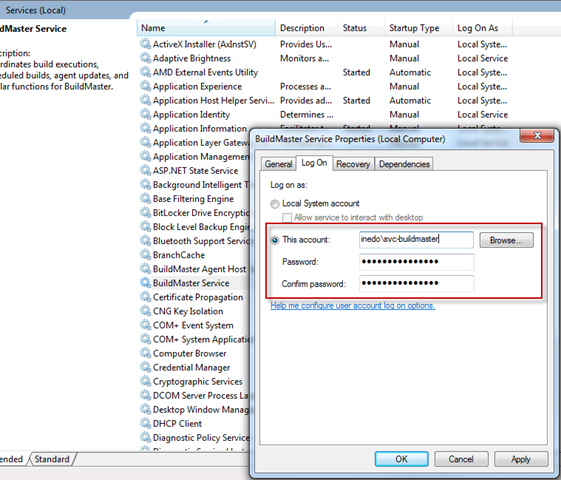
Step 1: Change the User Account for the Inedo Product's Service:
Open the Windows Services Management Console (Start > Run >
services.msc).Right-click on the "«NAME» Service (INEDO«XX»SVC)" and select "Properties".
Go to the "Log On" tab and enter the new user account credentials.
Step 2: Change the User Account for IWS or IIS
This step will depend on if you are using Integrated Web Server or IIS
Step 2a: Integrated Web Server
- Follow the same steps as for the Windows Service, but locate the "«NAME» Web Server" service (INEDO«XX»WEBSRV).
- If you are changing to an account that is not a machine administrator, add a URL reservation for the user account/for this user account to be able to host a web site on the integrated web server, following these instructions.
Note: Explicit URL reservations are only required when using a non-administrator account and hosting with the integrated web server.
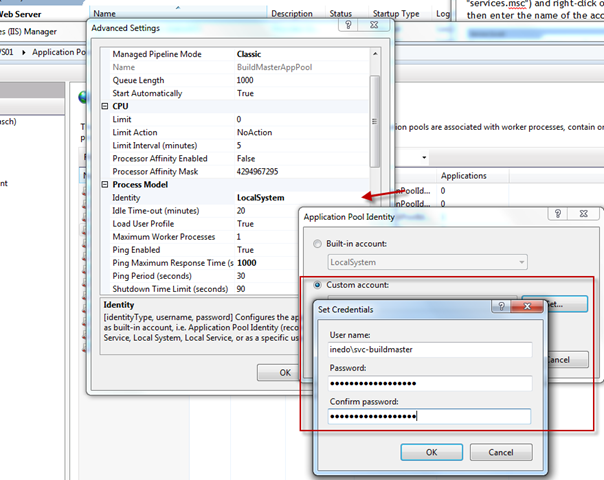
Step 2b: IIS
- Open IIS Manager
- Select "Application Pools".
- Right-click on the "«NAME» AppPool" and choose “Advanced Settings…”.
- Under Process Model, change the identity to the new user account.
Step 3 (Optional): SQL Server
If using integrated SQL authentication, ensure the new user account has permission to access SQL Server and is assigned the "«NAME» User_Role" role.
Managed Service Accounts
Inedo products support being run as a Managed Service Accounts. However, this requires that your database and application pool also have the ability to run as and accept logins from these accounts.