PowerShell (.ps1) Scripting
PowerShell is the standard scripting language for Windows servers. BuildMaster is designed to integrate seamlessly with PowerShell—whether by using your existing scripts to deploy applications to dozens of servers, using scripts created by the community, or a combination of both.
You don't have to be a scripting guru to use BuildMaster, but if you learn how to include scripts in BuildMaster, you can control virtually every aspect of Windows with a few lines of code.
Adding Existing Scripts to BuildMaster
The easiest way to add your existing scripts to BuildMaster is to navigate to your Application > Scripts > Add Script, and then select PowerShell (.ps1) under Create New Script or Upload Script Assets under Create Script Asset.
Running PowerShell Scripts in BuildMaster
Once you've added a PowerShell script to BuildMaster, you can run that script in a pipeline stage as a deployment target.
By default, PowerShell will prefer using Windows PowerShell 5.1 when available. Starting with v2.4.0 of the Scripting extensions, this functionality can be changed to prefer PowerShell Core by setting the configuration value $PreferWindowsPowerShell to false. This can be set globally at the extension/system level or scoped to a server, application, environment, release, etc...
If you are executing PowerShell from OtterScript, all the PowerShell operations have a PreferWindowsPowerShell parameter that can be set also. This parameter will default to use $PreferWindowsPowerShell.
You can also use OtterScript to run these scripts on different servers, whether sequentially, in parallel, or even with branching and iterating (looping) logic.
Using PSCall to Run PowerShell
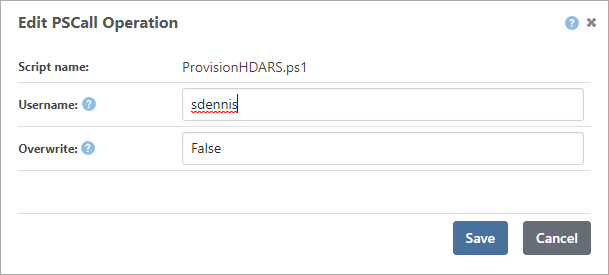
You can call your scripts using the PSCall Operation. If you use PowerShell's comment-based help, you get descriptions for script arguments in OtterScript's visual editor:

In text mode, the OtterScript will look something like this:
PSCall ProvisionHDARS.ps1
(
    Parameters: %(Overwrite: False, Username: sdennis)
);
Inline Execution of PowerShell
With the PSExec Operation, you run PowerShell code directly with your OtterScript.
psexec >>
  # delete all but the latest 3 logs in the log directory
  Get-ChildItem "E:\Site\Logs\$ApplicationName" |
     Sort-Object $.CreatedDate -descending |
     Select-Object -skip 3 |
     Remove-Item
>>;
BuildMaster automatically replaces variables within the script. In the example above, $ApplicationName would be replaced with the name of the application being built or deployed.
Using PowerShell Parameters & Inputs
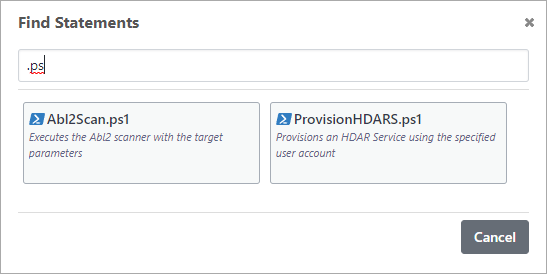
BuildMaster uses Comment-based Help to generate descriptions and inputs for your PowerShell scripts. This makes it easy to find and use your scripts in the OtterScript editor:

For example, the following PowerShell script is displayed in the statement finder (in the screenshot above):
<#
.SYNOPSIS
Provisions an HDAR Service using the specified user account

.PARAMETER Username
Username to provision the service for

.PARAMETER Overwrite
Indicates that the service should be overwritten if already provisioned
#>

param ([string]$Username, [bool]$Overwrite)

« --- snip actual PowerShell code --- »
After selecting the statement, you'll also see the input parameters as follows:

BuildMaster expands upon PowerShell's .SYNOPSIS and .PARAMETER keywords with Augmented Help, allowing you to add more details, like default values, restricted values, etc.—all of which improve the GUI generated for the OtterScript Visual Editor.
Evaluating PowerShell Literals
OtterScript is not a general-purpose programming language, so it has no built-in support for things like arithmetic. You could, of course, write a custom variable function to support this, but using the $PSEval() Variable Function is much easier.
For example, if you wanted to convert the value stored in one variable ($minutes) to milliseconds, you could $PSEval the simple expression $minutes * 60 * 1000:
set $milliseconds = $PSEval($minutes * 60 * 1000);
$PSEval executes the expression on the server that is currently in context. So use it inside an if/else block to perform different operations depending on the results of the expression on that server.
Technical Implementation & Advanced Options
BuildMaster runs PowerShell scripts through a custom PowerShell host that runs within the agent's process. While this generally leads to performance improvements, it can lead to memory leaks or worse if PowerShell scripts are created improperly.
Process Isolation
Instead of using the agent's process to run the PowerShell script, you can use OtterScript's with isolation feature. This creates a new process that runs the script.
Here is an example of an OtterScript plan that runs the same PowerShell script in different processes, even though it is the same script and runs on the same agent:
for server targetsv
{
    with isolation
    {
        PsExec >>Write-Host "Process ID: $pid">>;
    }
    with isolation
    {
        PsExec >>Write-Host "Process ID: $pid">>;
    }
}

