What is a "Release" in BuildMaster?
In BuildMaster, a Release is used to model and visualize a software release, that is, to create, test, and deliver code changes to a production environment in a consistent process.
Releases group related builds together under a common release number and deployment pipeline. For example, you may create twelve different builds of Release 4.2.7 before the code changes are tested, accepted, and deployed to the production environment. Throughout the release, these builds are in different stages and environments.

Releases are an optional feature, and the added complexity may not be helpful for smaller, simpler applications—especially those you don't already manage with release numbers.
Using Releases in Applications
You can configure release settings on an application-by-application basis under the Settings tab.
- Release Usage can be set to Required, Optional, or Disabled
- Release Number Scheme can be Major.Minor.Patch, Major.Minor, or Date-based
These primarily affect what users see on the user interface. Example:
- if Release Usage is disabled, you will no longer see a Releases tab or an option to select a release when creating a build
- if Release Usage is set to Required, users must select a release when creating a new build
These settings do not affect existing or previous builds.
Builds & Releases
In general, the release to which a build is associated is selected when the build is created. When a build is associated with a release, there are some behavioral changes to consider:
- Build numbers are unique to the release; by default, applications use a "sequential per release" build numbering scheme, meaning that the first build created for a release will be # 1 and increments as new builds are created. This makes it easier to keep track of builds within a release.
- Builds from different releases can share a pipeline stage; by default, pipelines reject an earlier build if a newer build is deployed in the same environment and that build belongs to the same release
- The release pipeline is used; instead of selecting a pipeline for the build, the pipeline associated with the release is used
Creating a Release
There are several ways a release can be created in BuildMaster:
- using the Web UI (described below)
- automatically, with a Resource Monitor or Scheduled Job
- using the Release & Build Deployment API
- with the Ensure Release Operation in OtterScript
Creating a Build in the UI
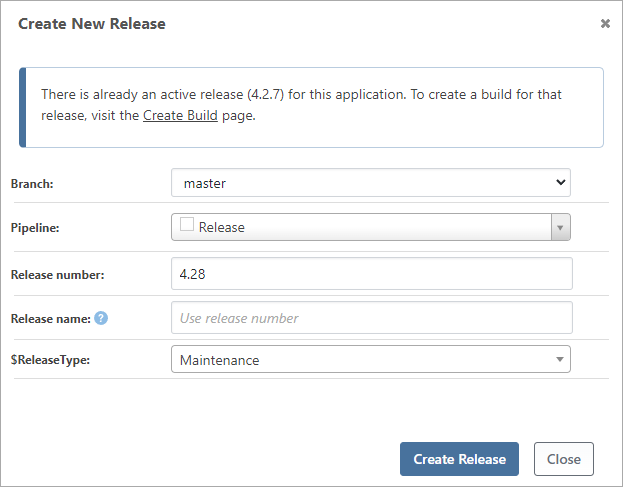
When creating a build of your application on UI, you will be presented with a few options depending on how the application is configured. For example:

- Branch is discussed below, in Git Branches & Repository Monitors
- Pipeline will be a list of global and application-scoped pipelines
- Release number is an application-unique number to identify the release; it should follow the scheme you configured, but doesn't have to
- Release name allows you to override the release number in the UI, to display a different value; this does not need to be unique
- Variables; any "Release"-type variable prompts you configured in the pipeline will appear here
If you've integrated with a CI server that supports project scopes (such as a Build Configuration in TeamCity or a branch in a multi-branch Jenkins project), you'll be able to select the scope that the release will use.
Git Branches & Repository Monitors
A release can be linked to a branch in the Git repository.
The main benefit is branch and release visibility, so when a release is displayed on UI, you also see the Git branch associated with the release. By default, when a user creates a build in UI, it's created in the release branch.
Another benefit is monitoring new commits in different branches. For example, if you create a Git repository monitor for the releases/* branch pattern, when BuildMaster finds a new commit on such a branch (e.g. releases/4_2 or releases/1.2.5), it would automatically create a build for all active releases (e.g. 4.2.0 or 1.2.5) associated with that branch.
Issue Tracking & Issue Statuses
Releases allow you to integrate your application with an issue tracker like JIRA, YouTrack, etc. so that your issues are automatically synchronized with the release.
This allows you to browse issues, associate them with specific releases, and block releases if there are untested or unresolved issues in BuildMaster.
Configuration Files & Rollbacks
Releases let you view the specific versions of configuration files that have been deployed with an application and select the versions you want to deploy.
By default, an "active" release uses the latest version of a configuration file, but you can change this to a specific version. When a release is deployed, the configuration file version is automatically associated with the release. This makes it much easier to roll back that release.
Status and Lifecycles
A release can be in one of three statuses that reflect the state of development:
- Active - builds are being created and deployed through pipelines
- Deployed - a build has been deployed in the final stage of its pipeline
- Canceled - no build has been deployed in the final stage and no more builds are being created or deployed; all builds are also rejected
Target Dates
Release target dates can be configured to specify a milestone or time window during a release along with a description. These dates can be added to a calendar view for easy reference. Common examples are:
- indicating the future release date
- expected range of dates when UAT can expect a build that they can test

