.NET Console Applications
BuildMaster can help build and distribute your .NET console applications, providing your team with a consistent and repeatable processes that won't be forgotten between releases.
Console applications are designed to be used by tech-savy users through a text-only, command-line interface. They're also commonly deployed to servers and executed as part of a script or another automation tool.
This article will walk through how to automate the build and deployment of a .NET console application.
CI/CD for .NET Console Applications
.NET Console Applications are generally easy to create and build but distributing them within your organization in a consistent manner can be challenging. This is because they tend to not be changed very frequently and are often manually deployed to a share drive, published to an internal website, posted in Slack or even send via email.
This is where an automated, repeatable process (i.e. a pipeline) will help. BuildMaster includes several pipeline templates, but you'll likely want to customize one to have fewer stages.
For example, a two-stage, "Build > Distribute" pipeline may be all that you need.
This type of pipeline might be appropriate for simple console applications that you would otherwise just email or put on a share drive.
To see an example of building a .NET console application in BuildMaster, create a new application using the ProfitCalc Tutorial sample application. This sample will get source code from https://github.com/Inedo/ProfitCalc.git, capture an artifact, then deploy to a share drive.
Creating a Build Script
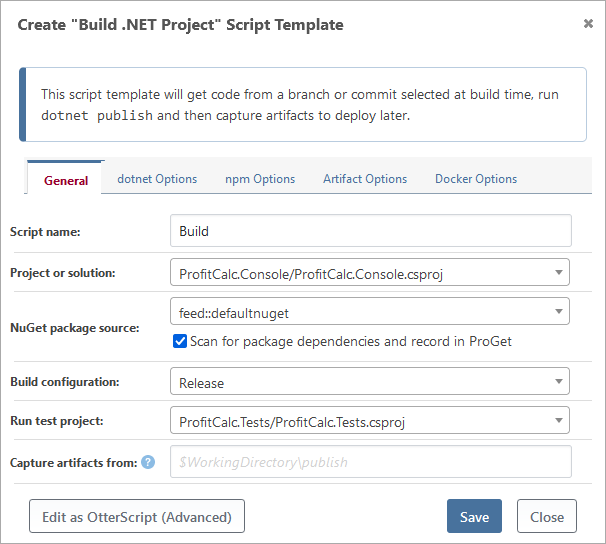
BuildMaster includes a number of script templates that offer a simple, no-code solution for performing common build or deployment operations and can be converted to OtterScript to allow more advanced solutions. The Build .NET Project Script Template contains the most common operations needed to pull the source code, build, test (optional), and create an artifact of your .NET console application.

You can also convert this script template to OtterScript, or write a Build Script from scratch.
How to Build a .NET Console Application in OtterScript
At a high level, your OtterScript should follows the general pattern:
- Get source code from the source control repository
- Compile project with MSBuild or dotnet publish
- Capture artifact for deployment
Getting the code from source control is often as simple as using Git::Get-Source; see our Git & Source Control documentation to learn more.
To build a .NET console application, the first step is to acquire the source code from your SCM of choice, . Once the source code is obtained, simply run the MSBuild::Build-Project or the DotNet::Publish operation.
For .NET Framework projects:
MSBuild::Build-Project ~\Source\ProfitCalc.Console\ProfitCalc.Console.csproj
(
    To: ~\Output
);
For .NET 5+ projects:
DotNet::Publish ~\Source\ProfitCalc.Console\ProfitCalc.Console.csproj
(
    Configuration: Release,
    Output: ~\Output
);
If you are using Operating System dependant code and/or libraries, you may also need to specify a runtime parameter like win-x64.
Testing the Build
Once your project or solution is compiled, BuildMaster can run unit tests or other automated tests against the build using VSTest, NUnit, or any other testing framework.
Capturing the Build Output for Deployment
After compilation of a console application is completed, the output is usually an .exe file on Windows. This .exe file can be captured into a file for future deployment using the Create-Artifact operation.
See Build Artifacts to learn more.
Creating a Deploy Script
The most common way to distribute a console application is by deploying it to a network drive. This can easily be done with a Deployment Script Template or by using OtterScript operations directly.
For example, to depoy to a network drive, you would simply need to use this script:
Deploy-Artifact
(
    To: \\hdars-share-us-east\$d\apps\myConsoleApp\$ReleaseNumber
);
There are many other ways to distribute console applications:
- deployed to a network drive
- uploaded to a web site with a download link
- emailed to users as an attachment
All of these can be automated using OtterScript.

