Docker/Containers
There are a lot of benefits to containerizing your application, such as improved portability, easier scalability, enhanced isolation, and simplified deployment and management processes. Using containers to run build scripts for your applications also offers a lot of benefits, primarily around simplifying build server configuration.
This article will walk through...
- How BuildMaster Helps with Docker/Containers
- Docker CI/CD Pipeline
- Docker Repository Connections
- Browsing Builds, Repositories, and Tags
How BuildMaster Helps with Docker/Containers
Docker mastery is generally required to realize the benefits of containers, but even the basics of Docker have a steep learning curve for most development team members:
- The architecture/model of container images is complex and unintuitive
- The "Dockerfile syntax" is a new scripting language to learn
- Nearly everything is done with a Command-Line Interface with lots of options
In addition, deploying applications across multiple testing and production environments also means managing sensitive, environment-specific configuration. Not doing this correctly can lead to "leaked" secrets like database connection strings and API keys.
Containerize without Docker
BuildMaster lets you can containerize your applications as part of the build/deploy process without everyone on the team needing to become a Docker expert.
This means that developers can:
- Use their preferred tools to code, build, test, and debug applications
- Not worry about installing a Docker Engine on their desktop, which is often resource-intensive and slows things down
- Work with Windows without having to context-switch to Linux tools
Simplify Docker Deployment
BuildMaster's Docker Run Config feature lets you:
- Visually edit runtime configuration like environment variables, port/volume mappings, CPU/memory resource usage, etc.
- Maintain different values across testing and production environments
- Track who changed which configuration values over time
- Restrict which users can view or edit configuration based on environment
A Docker Run config can be edited visually or in text mode:
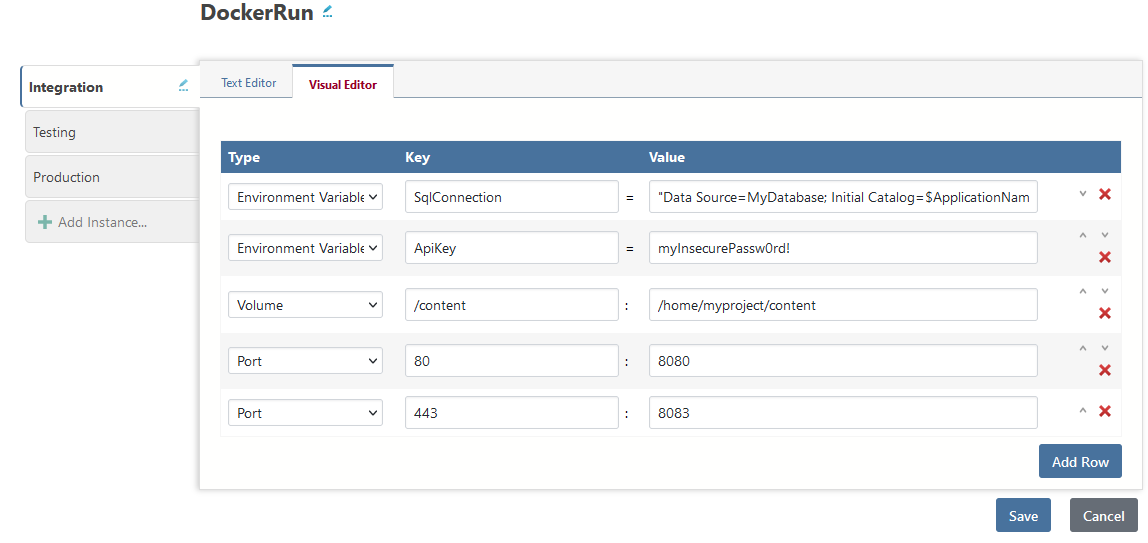
These work hand-in-hand with BuildMaster's deployment pipelines to give you a balance of automated and manual control.
Code, Container Images, Tags, and Hosts in One Place
BuildMaster shows you a history of how container images are built and deployed across applications and releases. You'll be able to see
- What tags are in your registry, and which were created in BuildMaster
- Which servers container images were deployed to
- Where your container images are currently running
In addition, once you integrate your application with Git, you'll be able to:
- See which commits were used to build your container image
- Compare code across different containers images
- Keep Git and Docker tags consistent
Getting Started with Docker
After integrating BuildMaster with Docker Engine, the easiest way to configure an application to build and deploy container images is by simply creating a new application.
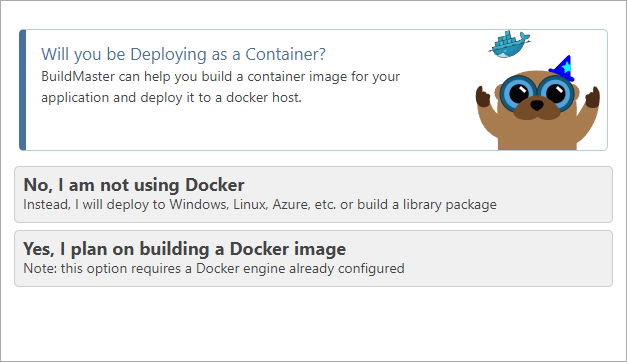
While creating the application, you'll be asked if you plan to deploy your application as a Docker image. Clicking "Yes" will prompt for additional configuration to help you configuration your application.
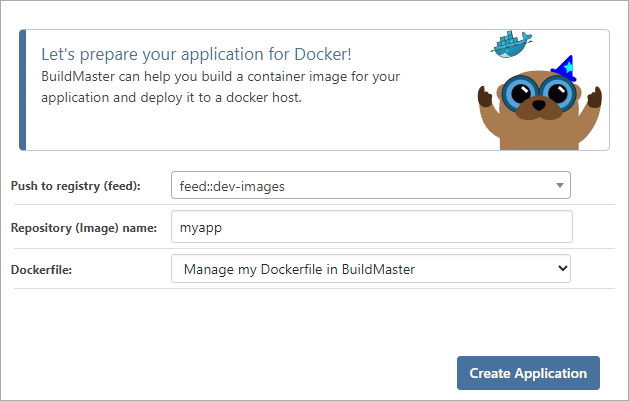
You can also add a Docker Repository to your existing application by navigating to the Settings > All Settings and then add a new connection. Once you add a Docker Repository to your applicaiton, you will then see the Docker drop down menu in your application.
Docker CI/CD Pipeline
BuildMaster includes a Docker CI/CD Pipeline template that will help you get started. You can customize any aspect of the pipeline you need, or even create the same pipeline from scratch.
The Docker CI/CD Pipeline template includes 5 stages:

Of course, you can also customize this template to what best fits your deployment process.
The Build and Containerize stages work together to containerize your applications:
- Build runs your build script to create build artifacts
- Containerize uses your build artifacts and a Dockerfile to build and push a container image to a Docker registry
The Integration, Testing, and Production stages will deploy your containerized application by pulling the container image from a Docker registry and then running it on the target Docker host. The production stage will also retag your image using the Docker::Tag operation to match your release number prior to deploying your application to your production server.
Docker Repository Connections
If you selected "Yes, I plan on building a Docker image" when creating your application, then your application will already be connected to a Docker Repository. You can see this connection or create a new connection under the Settings tab of your application.
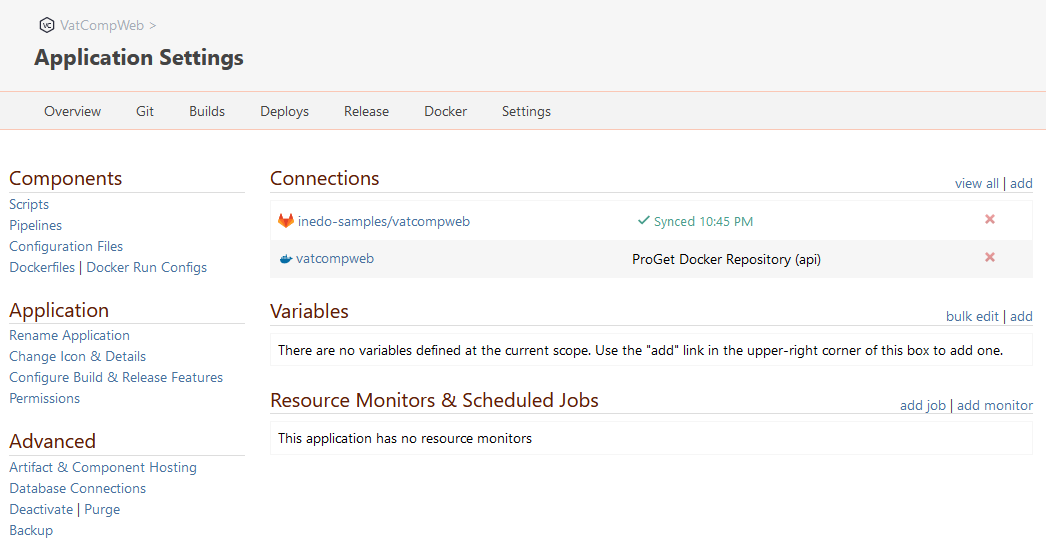
Once your application is connected to a repository, you'll be able to easily build/push and pull/deploy container images in that Docker repository. You'll also be able to see which builds are associated with which Repositories and Tags, and where those container images are currently running.
In general, we recommend having one Docker Repository per application in BuildMaster, and one image per build, but you can connect as many repositories to your application as needed, and build as many images as you'd like. However, with multiple images per build, you won't be able to rely on values of $DockerRepository and $DockerTag in your build and deployment scripts.
Docker Repository Resources
Behind the scenes, a Docker Repository connection is a type of secure resource that references a Docker repository and secure credentials that are used to authenticate to the associated Docker registry.
There are multiple Docker Repository Resource types that you can choose from when connecting to a Docker repository. These different types make it easier to work with different repositories in your scripts; you can use simpler names and not worry about server/host addresses or authentication.
Docker terminology can be confusing, especially when working with private Docker registries like ProGet that offer multiple feeds, etc.
- Docker registry: web server that hosts container images, such as
proget.mycorp.local:8625. - Docker repository: set of container images in a registry that always includes the server address, such as
proget.mycorp.local:8625/dev-images/mycorp/myapp - Namespace: the "middle parts" of a Docker repository, such as
dev-images/mycorp - Tag: a human-readable name of a container image in a Docker repository
See ProGet's guide on Docker Terminology & Concepts for even more.
In scripts and operations, you'll need to use the resource's name as opposed to the repository name. However, we recommend these be nearly identical, depending on the resource type.
Generic Docker Repository
A Generic Docker Repository resource is directly aligned with how Docker works, and has three fields:
- Repository name is the full repository name, and includes the registry server address (e.g.
cr.mycompany.local:8855/mycompany/myapp) - Credentials is a Username/Password secure credential that will be used to authenticate to the Docker registry referenced in the Repository name
- Resource name is the name you'll use in BuildMaster to reference this repository; it defaults to the Repository name without the address (e.g.
mycompany/myapp)
ProGet-hosted Docker Repository
An ProGet-hosted Docker Repository has the following fields:
- Docker Feed is the name of a feed in ProGet instance, such as
feed::dev-images - Repository name is the Repository name as displayed in ProGet; i.e. without the server address or feed name (e.g.
mycompany/myapp) - Resource name is the name you'll use in BuildMaster to reference this repository; it defaults to the Repository name (e.g.
mycompany/myapp)
Azure-hosted (ACR) Docker Repository
An Azure-hosted (ACR) Docker Repository has the following fields:
- Azure connection is the name of an Azure connection that you've created in BuildMaster
- Azure registry is a registry that the connection's service principal has access to (e.g.
mycompany.acr.io) - Repository name is the repository name without the server address or feed name (e.g.
mycompany/myapp) - Resource name is the name you'll use in BuildMaster to reference this repository; it defaults to the Repository name (e.g.
mycompany/myapp)
Builds, Repositories, and Tags
Docker Repositories are associated with builds in BuildMaster and can be referenced in OtterScript using the $DockerRepository build variable. The Docker Repository will be set when you create When an image is built using Docker::Build-Image or tagged using Docker::Tag, an image and tag will then be attached with your build. After an image has been attached to your build, the tag of the most recently attached image will be stored in the $DockerTag build variable.
If you are using a Docker Repository stroed in ProGet, the attached image will be linked directly to your image in ProGet.
See our Containerizing your Application documentation for more information.
Attached Containers
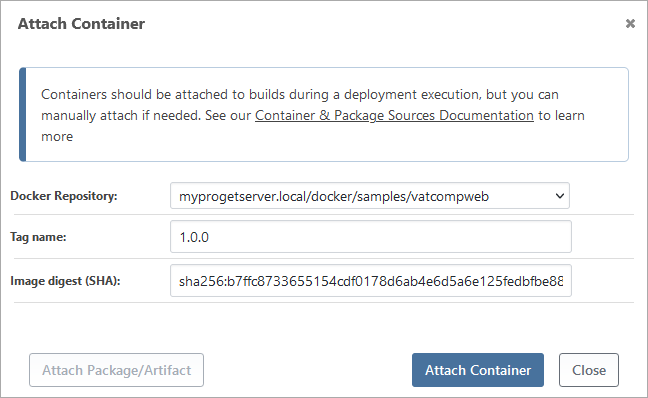
Containers can be "attached" to a build using the Docker::Build-Image or Docker::Tag operations, or the "Build Docker Image" script template. Attached containers are then displayed under the "Artifacts" tab, and are used to determine the value of $DockerTag.
You can also manually attach an image to a build on the build's the "Artifacts" tab and then click manually add.
Browsing Repository Tags
Browsing repsoitory tags will only work when using a Docker Repository that is stored in ProGet.
Docker Repository tags may also be viewed within your application by navigating to Docker > Docker Tags.

Repository tags will show a list of all tags stored in ProGet and link them to their related builds, git commits, and any servers the images are running on.

