Using SVN, TFS, Etc.
Although BuildMaster makes it really easy to connect to Git servers and repositories, not all of your applications or projects may use Git for source control.
You can also work with other source control systems such as Subversion (SVN) and Team Foundation Version Control (TFVC) and get many of the same benefits as with Git:
- Retrieving code from a specific target (such as a branch or a source folder)
- Capturing the revision number of that code
- Monitoring specific targets for changes (continuous integration)
- Automatically tagging (or labeling) released code
In this article, you will learn how to connect your application to other source control systems and how to apply best practices for build and deployment automation.
Connecting Your Application to Source Control
Unfortunately, Rakko (the cute otter that guides users through new applications and other configurations) can only help you with Git repositories. But if you follow these steps, you can connect to Subversion (SVN), Team Foundation Version Control (TFVC), and other source control systems almost as quickly.
1. Install the Required Extension
Before you can use SVN or TFVC, you must install the respective extension. You can install the extension by simply navigating to the Admin > Extensions page and locating the Subversion (for SVN) or TFS (for TFVC) extension in the "Available Extensions" section, clicking the extension name, and then clicking the "Install" button.
If your instance doesn't have Internet access, you can install/upgrade/downgrade it by manually installing the required extension after downloading the Extension Package.
2. Create a New Application
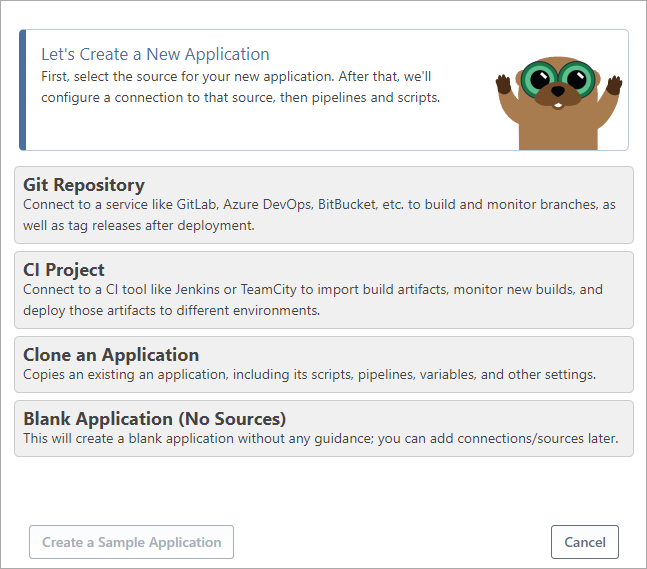
When creating a new application, select "Blank Application (No Sources)"
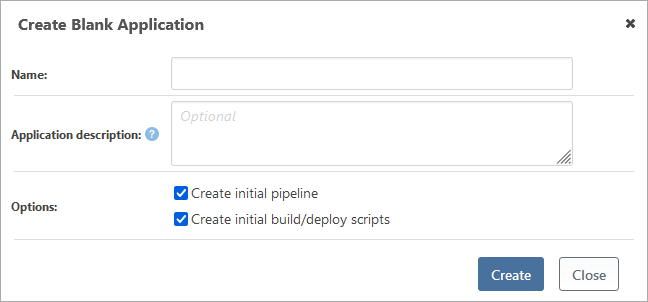
You'll be prompted to enter an application Name, Description, and select Options.
3. Add a Source Control Connection
BuildMaster uses a combination of Secure Resources and Secure Credentials to connect to source control repositories.
The Secure Resource contains information about your repository (such as the SVN URL or your TFVC Team Project Collection url), while the Secure Credentials contain your account information (such as a username and password or authorization token).
You can create a Secure Resource as follows:
- Navigate to your Application > Settings > All Settings
- Click "Add" to the right of Connections
- Click on "Show other..." in the bottom left corner
- Then select the appropriate type: "Subversion Repository" for SVN, "Team Foundation Server" for TFVC, etc.
You can then enter the repository information.
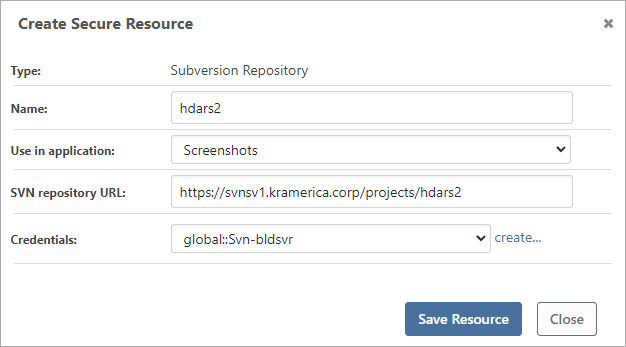
The name should be the name of your project or repository. You will use it later in your scripts to connect. While you can create a secure resource with global scope by selecting "(global)" from the "Use in applications:" drop-down menu, we recommend limiting source control repositories to a single application.
Using Secure Credentials
The "Credentials" field is optional and if you don't select one, BuildMaster will connect anonymously. In the drop-down list, you can see global credentials that you have already created, as well as application-specific credentials. You can also click the "New" button to create a new Secure Credential.
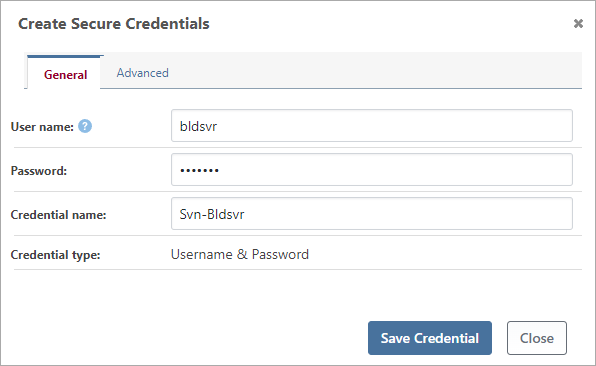
There are a few things to consider when creating a new secure credential.
- Azure DevOps (TFVC) requires a Personal Access Token (PAT) to be used as a password; other tools may require this as well
- Credentials can be global; "if no application is associated with the credential on the Advanced tab, it's considered global and can be used for all applications
- You should name the credentials so that you can identify them later, for example, "Subversion-Username"
4. Edit Your Build Script
If your created a blank application, your Build script will be a basic template that you can edit.
Right now, you just want to edit the "Get Source" section of the script to test if your connection is working. To do this, navigate to Settings > Scripts and then click on the "Build" script.
Add three operations to the "Get Source" section:
- Get code ('Svn-Export' or 'Tfs-GetSource') from the default target ('trunk' or '$/MyApp')
- 'Set-BuildVariable' to capture the revision number of the retrieved code
- 'Create-Artifact' to capture the files retrieved from source control
For example, if you're using Subversion, your operations would look like this:
Subversion::Svn-Export
(
    From: SvnResource,
    SourcePath: trunk,
    RevisionNumber => $svnRevision
);

Set-BuildVariable RevisionNumber
(
    Value: $svnRevision
);

Create-Artifact();
Or, if you're using TFVC, they could look like this:
TFS::Tfs-GetSource
(
    From: TfsResource,
    ChangeSet => $tfsChangeSet
);

Set-BuildVariable ChangeSet
(
    Value: $tfsChangeSet
);

Create-Artifact();
5. Test Your Build Script & Source Control Connection
To run the build script, Navigate to Builds > Create New Build. Once the build is complete, your build artifacts should mirror the files in the path you selected in your source control repository.
6. Add a Tag/Label Script (Optional)
After your code has been deployed to production, it's a good idea to "tag" "the deployed code (i.e. revision, change set, etc.) with the release and build number. This makes it easier to find the exact code that is in production and to compare it to previous production deployments.
On the Scripts page, create a script named Tag or Label, depending on what source control system you're using.
In Subversion, "tagging" is done with a copy command, and you can use this script to tag.
Subversion::Svn-Copy
(
    From: SvnResource,
    Source: trunk,
    RevisionNumber: $RevisionNumber,
    To: tags/$ReleaseNumber,
    Message: Tagged by BuildMaster
);
In TFVC, you can use this operation to label.:
TFS::Tfs-Label
(
    From: TfsResource,
    Label: $ReleaseNumber-ci.$BuildNumber,
    ChangeSet: $ChangeSet
);
Note that the operations above rely on the build variables created in the Build script with the Set-BuildVariable operation.
The best way to run this script is with "Build Completed" pipeline event listener.
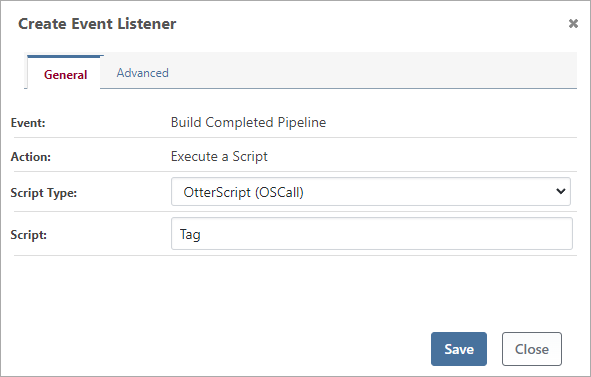
You can test the Tag or Label script in the same manner; just deploy the earlier created build to Production.
7. Modify Build and Deploy Scripts
From here, you can set the application up like any other:
- Modify your build script to compile and test your code
- Modify your deployment script (or use a new script template) to deploy your artifacts
- Modify your pipeline to model your process
If you use branches (or different subfolders) in your source control repository, you can add variable prompts that users will have to select at build time.
Using Repository Monitors
Repository monitors allow BuildMaster to monitor your repository for changes and execute an action when a change is detected. See our Resource Monitors & Scheduled Jobs documentation for more information.
To create a repository monitor:
- Navigate to your Application > Settings > All Settings
- Click "add monitor" to the right of Resource Monitors & Scheduled Jobs
- Select your monitor (Subversion or TFVC)
- Select Resource and click "Set Monitor Properties"
From there, you'll be able to enter the source paths you would like to monitor, as well as an action to initiate:
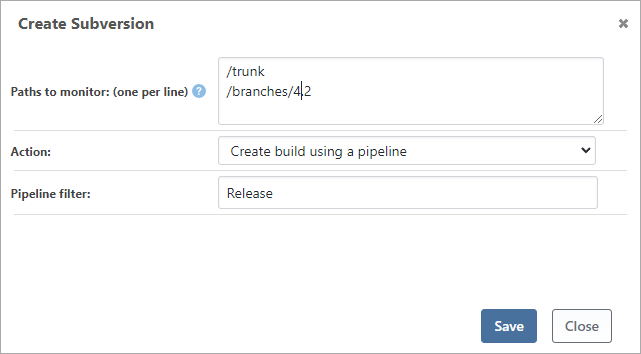
The Action determines what happens when a change is detected, and can be:
- Create a build using a pipeline
- Create a build using a release
- Create a build using a script
- Execute a custom script
See the resource monitor documentation to learn more about how these actions work.
Other Source Control Providers
Earlier versions of BuildMaster had integrations with many other source control tools: Plastic SCM, Mercurial, Source Gear Vault, Perforce, CVS, Rational, etc. However, as Git became the industry standard, we stopped updating these extensions to work with newer versions of BuildMaster.
If you're still using one of these older source control tools, please let's know. We may be able to "revive" one of the old extensions, or at least give you some guidance on how to do the same things in BuildMaster with the Execute Process Operation and other features.

