Customizing How Variables are Displayed (Rendered)

Sometimes, the variables that you'll add to your builds or releases may have long and obscure values that are difficult for people to read.
Variable Prompts (Templates) allow you to control how the values are displayed (rendered) on these pages so that you can better support use-cases such as:
- Linking to another page within BuildMaster
- Linking to an external tool
- Displaying a subset of properties of a map
- Adding customized styles or images to a value
- Cleanup of names that are too long or unreadable
Example: How to Link to an External Tool
If you're using an external ITSM tool to manage certain approval processes, you may wish to add a $RelatedTicket variable to your builds or releases so that BuildMaster can interact with that tool using the API.
However, "$RelatedTicket=7d0501a5-09fc-4cc3-ac33-0d1ccf03bc18" is going to be ignored by nearly everyone who sees it and doesn't realize that 7d0501a5... refers to the internal identifier of your ITSM tool.

To control the rendering of this variable, go to the associated Releaste Template, and add a variable named RelatedTicket, select Customize under Display Options, then enter the HTML you'd like to render in the Display Option.
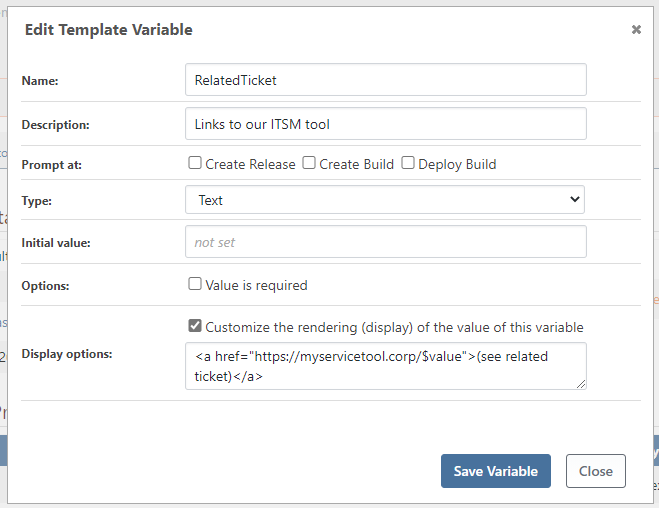
Once you save your release template, you'll see "$RelatedTicket = (see related ticket)", which is a lot more useful for humans, as they will want to click to see the ticket in the IT Service Desk tool.

Custom Renderer Format
A value renderer is specified as HTML. The rendered HTML also considers variable functions in context, including, for example: $BuildNumber, $Substring(...), and $ApplicationName. To access the variable's value within the renderer itself, use $Value (or @Value/%Value depending on type).
Because values are rendered as HTML, BuildMaster administrators (i.e., you) are responsible for ensuring that values are either fully trusted (i.e., only trusted parties create safe values), or that they are properly sanitized to prevent Cross Site Scripting attacks, malformed HTML, and more. A number of helpful functions are included in the InedoCore extension to mitigate these risks such as $HtmlEncode(), $UrlEncode(), and $JsEncode().
Custom Rendering Examples
Simple Substring
$Substring($Value, 0, 10)...
Initial value: This value is too long to fit on the page
Rendered as: This value...
3-Property Map
<a href="%Value.Href?queryData=$UrlEncode(%Value.Data)">$HtmlEncode(%Value.Text)</a>
Initial value: %(Text: Some link text..., Href: https://example.org, Data: "some string")
Rendered as: Some link text...
Custom Image
<img style="max-width: 150px;" src="/resources/images/logos/proget-logo.png" alt="ProGet Logo" title="$HtmlEncode($Value)" />
Initial value: Some text that appears on hover
Rendered as: ![]()
Value Renderer Icons
BuildMaster has several icon classes that can be used to quickly distinguish and identify links to your branches, builds, or pipelines. When creating your variable value renderer use any of the following in your renderer HTML:
| Logo/Icon | HTML Class |
|---|---|
| Git (generic) | class="ci-icon git" |
| GitLab | class="ci-icon gitlab" |
| GitHub | class="ci-icon github" |
| BitBucket | class="ci-icon bitbucket" |
| ProGet | class="ci-icon proget" |
| Otter | class="ci-icon otter" |
| Jenkins | class="ci-icon jenkins" |
| Travis CI | class="ci-icon travis" |
| Circle CI | class="ci-icon circle-ci" |
| AppVeyor | class="ci-icon appveyor" |
| Bamboo | class="ci-icon bamboo" |
Icon Examples
ProGet Package
<a class="ci-icon proget"
   href="{pg-host}/feeds/{feedName}/$ApplicationName/$UrlEncode($Value)">
$Value
</a>
GitHub Commit
<a class="ci-icon github"
   href="https://github.com/{orgName}/$ApplicationName/commit/$Value">
$Substring($Value, 0, 7)
</a>
GitLab Branch
<a class="ci-icon gitlab"
   href="https://gitlab.com/{orgName}/$CustomAppVariable/tree/$Value">
$Substring($Value, 0, 8)
</a>
BuildMaster 6.2 and Earlier
Prior to BuildMaster 7.0, a different feature called Variable Value Renderers was used to accomplish this functionality. This is still available in BuildMaster 7.0 but it is considered a legacy feature.
A value variable may be specified at the system, application group, or application level, and applies to variables displayed on the following pages: build overview, release overview, application settings, and pipeline details.
To add a custom renderer, visit the Administration > Variables > Value Renderers tab, and enter the name and scope of the variable that will use the custom renderer. Variables denoted as sensitive in the UI will be rendered as (hidden) regardless of whether a value renderer matches or not.