- BuildMaster
- Getting Started with BuildMaster
- Builds and Continuous Integration
- What is a "Build" in BuildMaster?
- Git and Source Control
- Git Pipelines and Workflows
- Build Scripts & Templates
- Packages & Dependencies
- Build Artifacts
- Automated Testing & Verification
- Deployment & Continuous Delivery
- What is a “Pipeline” in BuildMaster?
- CI Server (Jenkins, TeamCity, etc.) Integration
- Deployment Scripts & Templates
- Automatic Checks & Approval Gates
- Manual Deployment Steps and Tasks
- Databases
- Configuration Files
- Rollbacks
- Advanced CD Patterns
- Applications & Releases
- Connecting to your Servers with BuildMaster
- Scripting in BuildMaster
- Configuring for Your Team
- Docker/Containers
- Development Platforms
- Deployment Targets
- Tools & Service Integrations
- Reference
- BuildMaster API Endpoints & Methods
- Extending BuildMaster
- Built-in Functions & Variables
- Applications
- Builds
- Configuration Files
- Containers
- Credentials
- Databases
- Environments
- Executions
- Files
- General
- JSON
- Linux
- Lists
- Maps
- Math
- Nuget
- Packages
- Pipelines
- PowerShell
- Python
- Releases
- Servers
- Strings
- XML
- Built-in Operations
- Batch
- BuildMaster
- Configuration Files
- Databases
- DotNet
- Files
- Firewall
- General
- Apply-Template
- Attach Package
- Build
- Checkout-Code
- Close-Issue
- Concatenate-Files
- Copy-Files
- Create-Directory
- Create-File
- Create-Issue
- Create-Issue
- Create-IssueComment
- Create-Package
- Create-ZipFile
- Delete-Files
- Download-Asset
- Download-Http
- Ensure-Directory
- Ensure-File
- Ensure-HostsEntry
- Ensure-Metadata
- Ensure-Milestone
- Ensure-Package
- Ensure-Release
- Ensure-Tag
- Exec
- Execute Python Script
- Execute VSTest Tests
- Get-Http
- Install-Package
- OSCall
- OSExec
- Post-Http
- Push-PackageFile
- PYCall
- PYEnsure
- Query-Package
- Remediate-Drift
- Rename-File
- Repackage
- Replace-Text
- Send-Email
- Set-FileAttributes
- Set-Variable
- SHEnsure
- Sleep
- Transfer-Files
- Transition-Issues
- Upload-Assets
- Upload-Http
- Upload-ReleaseAssets
- Git
- IIS
- Nuget
- PowerShell
- ProGet
- Python
- Registry
- Servers
- Services
- Shell
- Windows
- Administration
- Installation & Upgrading
- ProGet
- Getting Started with ProGet
- Packages: Managing & Tracking
- Feeds Types & Third-Party Packages
- What is a "Feed" in ProGet?
- What is a "Connector" in ProGet?
- NuGet (.NET)
- Universal Feeds & Packages
- PowerShell
- Chocolatey (Windows/Machine)
- RubyGems (ruby)
- Visual Studio Extension (.vsix)
- Maven (Java)
- npm (Node.js)
- Bower (JavaScript)
- Debian (Apt)
- Helm (Kubernetes)
- PyPI (Python)
- Conda (Python)
- RPM (Yum)
- Alpine (APK)
- CRAN (R)
- pub (Dart/Flutter)
- Cargo (Rust)
- Terraform Modules
- Conan (C++)
- Composer (PHP)
- Other Feed Types
- Asset Directories & File Storage
- Docker and Containers
- Replication & Feed Mirroring
- Software Composition Analysis (SCA)
- Security and Access Controls
- Cloud Storage
- Administration
- Installation & Upgrading
- API Methods and CLI Commands
- Otter
- Getting Started with Otter
- Orchestration & Server Automation
- Connecting to your Servers with Otter
- Collecting & Verifying Configuration
- Drift Remediation / Configuration as Code
- Scripting in Otter
- Configuring for Your Team
- Installation & Upgrading
- Administration & Maintenance
- Reference
- Otter API Reference
- OtterScript Reference
- Built-in Functions & Variables
- Executions
- Files
- General
- JSON
- Linux
- Lists
- Maps
- Math
- PowerShell
- Python
- Servers
- Strings
- XML
- Built-in Operations
- Batch
- Docker
- DotNet
- Files
- Firewall
- General
- Apply-Template
- Collect Debian Packages
- Collect RPM Packages
- Collect-InstalledPackages
- Concatenate-Files
- Copy-Files
- Create-Directory
- Create-File
- Create-Package
- Create-ZipFile
- Delete-Files
- Download-Asset
- Download-Http
- Ensure-Directory
- Ensure-File
- Ensure-HostsEntry
- Ensure-Metadata
- Ensure-Package
- Exec
- Execute Python Script
- Get-Http
- Install-Package
- OSCall
- OSExec
- Post-Http
- Push-PackageFile
- PYCall
- PYEnsure
- Query-Package
- Remediate-Drift
- Rename-File
- Repackage
- Replace-Text
- Send-Email
- Set-FileAttributes
- Set-Variable
- SHEnsure
- Sleep
- Transfer-Files
- Upload-Assets
- Upload-Http
- IIS
- Otter
- PowerShell
- ProGet
- Python
- Registry
- Servers
- Services
- Shell
- Windows
- Installation & Maintenance
- Windows (Inedo Hub)
- Linux (Docker)
- High Availability & Load Balancing
- User Directories & Domains (LDAP)
- Logging & Analytics
- SAML Authentication
- When to Upgrade your Inedo Product
- Managing Agents and Servers
- Backing Up & Restoring
- Installation Configuration Files
- PostgreSQL & Inedo Products
- SQL Server & Inedo Products
- Inedo Agent
- What is the Inedo Agent?
- Installation & Upgrading
- Downloads & Release Notes
- Maintenance & Configuration
- Internal Architecture
- MyInedo
- OtterScript (Execution Engine)
- Reference
- OtterScript
- Inedo Execution Engine
- Romp (Discontinued)
- Using Romp
- Installing, Configuring, and Maintaining
- Romp CLI Reference
- Package Layout
- Downloads & Source Code
- Extensibility
- Inedo SDK
HOWTO: Proxy Terraform Modules from the Hashicorp Registry in ProGet

With ProGet, teams can set up "Feeds" to use as private registries for Terraform modules, proxied from external registries like the Hashicorp registry using "Connectors".
These feeds also cache modules locally, so if an external registry goes offline, your team can still access the versions they've used before. ProGet also provides visibility into which modules are being consumed, helping teams identify popular or potentially risky dependencies.
On this page, we’ll cover how to create a Terraform feed in ProGet, set up connectors to pull in modules from one or more upstream sources, and configure your local Terraform setup to use the feed as a module registry.
Step 1: Create a New Feed
We'll start by creating a Terraform feed that will proxy packages from the Hashicorp registry.
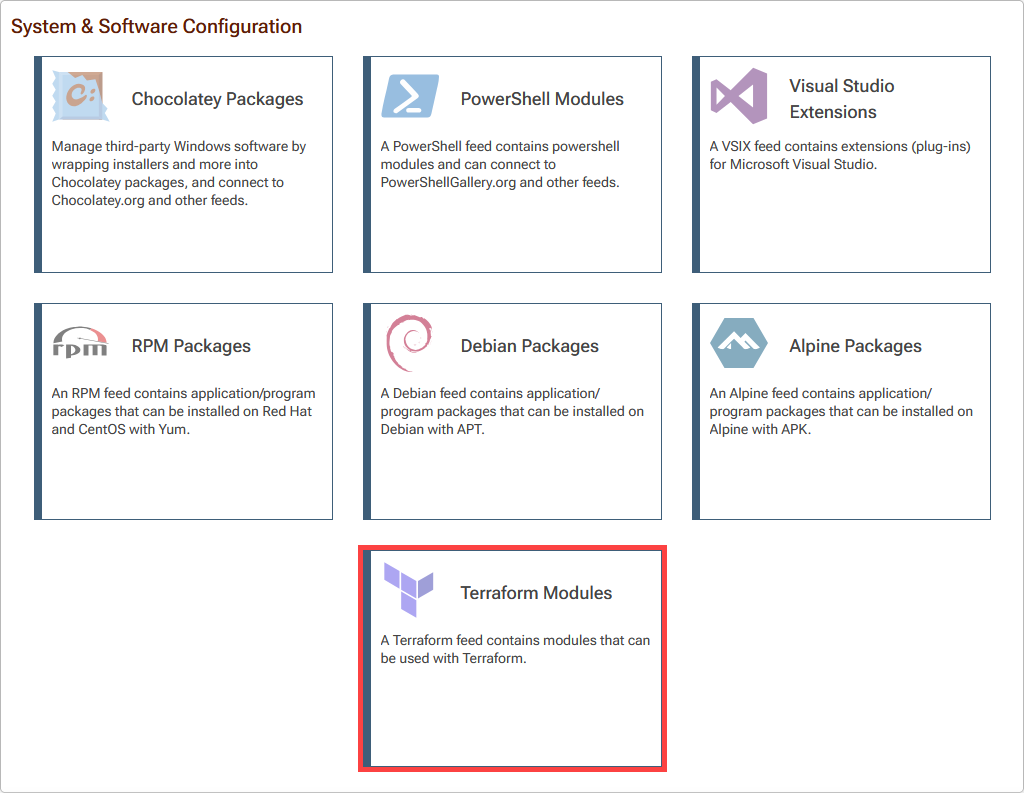
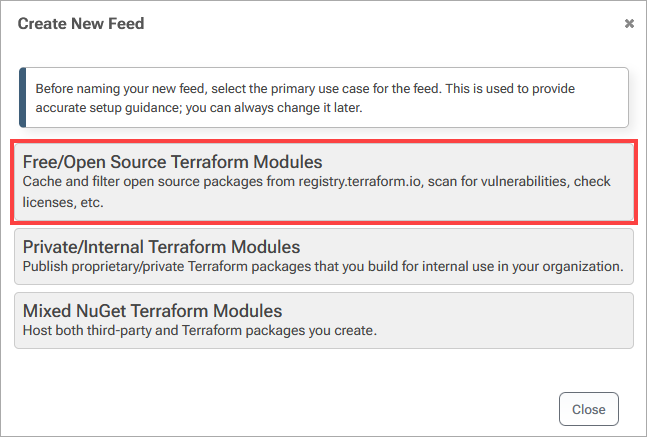
Navigate to "Feeds" and select "Create New Feed". Then select "Terraform Modules", listed under "System & Software Configuration".
Then select "Free/Open Source Terraform Modules".
Step 2: Connect to the Hashicorp Registry
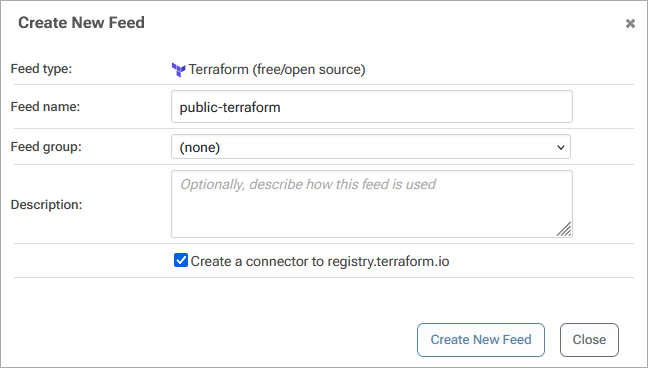
Next, name your feed. For the example, in this guide we will call our feed public-terraform. Make sure that the "Create a connector to registry.terraform.io" checkbox is selected, and select "Create New Feed".
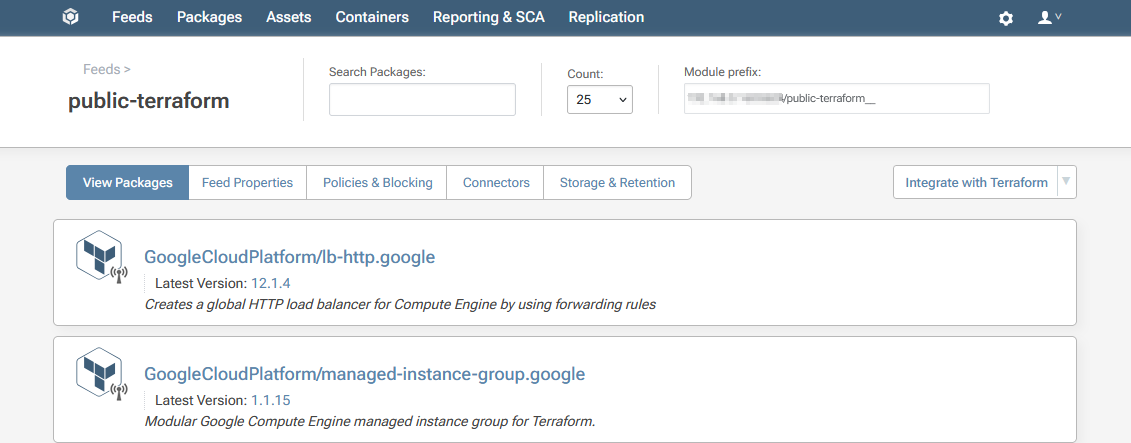
Your public-terraform feed will then be created, populated with proxied Terraform Modules from the Hashicorp Registry.
Step 3: Edit your Terraform .tf File
Now, you'll need to update your Terraform .tf file to specify module sources and versions, directing Terraform to fetch the module from your public-terraform feed instead of the public Hashicorp Registry. Edit this block in your .tf file (e.g., main.tf):
module "«module-name»" {
  source  = "«proget-host-name»/«feed-name»__«namespace»/«module-name»/«provider»"
  version = "«version»"
}
To fetch the the vpc module for the aws provider you would enter:
module "my_vpc" {
source  = "proget.corp.local/public-terraform/vpc/aws"
version = "1.0.0"
}
You'll then need to run terraform init in your project directory to authenticate your ProGet feed and download the specified module. You can also run terraform plan to make sure the module is correctly referenced.
(Optional) Authenticating to Your Terraform Feed
By default your public-terraform feed does not require authentication and can be viewed anonymously by anyone. However, you may want to make your feed private and configure it to require authentication to access. For example, when also hosting your own internal packages.
(Optional) Creating a Package Approval Flow
On this page, we discussed how to proxy packages from the Hashicorp Registry. However, this approach allows developers to fetch any OSS module without oversight for quality or compliance. It's advisable to integrate an approval process in both development and production environments. You can establish this by implementing a "Package Approval Flow".
For instructions on setting up a package approval flow, refer to HOWTO: Approve and Promote Open-source Packages. While this guide focuses on NuGet feeds, the steps are identical for creating Terraform package feeds.
Once you've created the "approved" feed for promoting your Terraform modules, proceed to integrate it into your local Terraform environments by following the steps in "Update Terraform Configurations".