Containzerizing your Application

There are a lot of benefits to containerizing your application, such as improved portability, easier scalability, enhanced isolation, and simplified deployment and management processes.
This article will discuss how to containerize your applications in BuildMaster, how to use the Docker::Build-Image operation, and provides guidance on advanced scenarios.
Containerizing Applications in BuildMaster
The first step to containerizing applications is connecting to a Docker Repository. This will allow BuildMaster to push container images that you can deploy to testing and production environments.
To build these container images, our recommended approach is to use two separate stages: Build and Containerize.
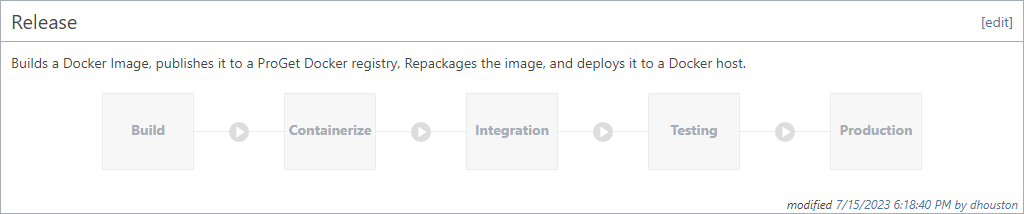
This approach greatly simplifies the scripts in your pipeline, and helps keep the platform-specific knowledge (.NET, Maven, etc.) separate from the Docker-specific knowledge. This is only our recommendation, and you could combine everything into one script or even use advanced approaches like multi-staged builds if you'd prefer.
Build Stage
This is an "ordinary" build stage that you'd use for any non-containerized application. It mostly involves creating build artifacts for your application using a simple build script/template like Build .NET Application or Build Maven Project. This build script can also run unit tests or static analysis as needed.
Containzerize Stage
This stage creates a container image using build artifacts from the previous stage and a Dockerfile. The container is then pushed to a repository in a container registry like ProGet where it can be pulled/deployed later.
Dockerfile Options
A Dockerfile is a special script that instructs Docker how to build a container image for your application. If you haven't worked with Docker before, the Dockerfile syntax can be a bit intimidating - which is why we recommend keeping Dockerfiles as simple as possible.
Your application's Dockerfile can be stored directly in your BuildMaster application, under Docker > Dockerfiles. There are several advantages to this:
- Leverage BuildMaster's variable replacement directly in the file
- Allow only your Docker experts to modify the file
- Keep a clean separation of "application code" and "containerization code"
- Modify Dockerfile scripts without changing repository codebase
You can also store the Dockerfile in your source code repository if you'd prefer.
Creating the Container Image
The easiest way to create a Docker image using your Dockerfile is with the "Build Docker Image" script template.
This script template uses your build artifact and your Dockerfile to build your Docker image, which will then push the new image to your Docker registry and associate it with your build.
The build logic is as follows:
- Deploy your build artifact to the working directory
- If your Dockerfile is stored in BuildMaster, write the Dockerfile to the working directory
- Use
docker loginto authenticate your registry - Use
docker buildto build your image - Use
docker pushto push your image to your registry - Associate the container image with your build
- Log out of your registry using
docker logout
Like all build script templates, you can convert to OtterScript and customize/adapt as needed.
This script template uses the Deploy-Artifact and Docker::Build-Image operations.
Docker Repositories and BuildMaster Builds
When creating a new build in BuildMaster, the Docker Repository in your application will be associated with the build. The script template will default to using the values of $DockerRepository and $DockerTag when creating the image.
In general, we recommend having one Docker Repository per application in BuildMaster, and one image per build, but you can connect as many repositories to your application as needed, and build as many images as you'd like. However, with multiple images you won't be able to rely on values of $DockerRepository and $DockerTag in your build and deployment scripts.
Docker::Build-Image
The Docker::Build-Image operation is designed to work with a Docker Repository that you've connected to your application. It will build an image using a Dockerfile and then push it to the associated Docker registry.
The following logic is used:
docker loginto the registry where the repository is hosteddocker buildthe Docker imagedocker pushthe image to your registrydocker logout
You can set the following parameters on the operation:
| Category | Parameter | Notes |
|---|---|---|
| General | From | directory used to build your image; should contain your application files |
| Repository | name of the Docker Repository connected to the application; defaults to $DockerRepository | |
| Tag | Tag to pull from the repository, defaults to $ReleaseNumber-pre.$BuildNumber | |
| Dockerfile (template) | Dockerfile | optional; the Dockerfile stored in BuildMaster to use |
| DockerfileVariables | additional variables to pass to your Dockerfile | |
| Advanced | DockerfileName | the name of the Dockerfile sotred in your Git repository to use |
| AttachToBuild | attach the image to your build, defaults to true | |
| RemoveAfterPush | removes the image from your server after it is pushed to your registry, defaults to true | |
| AdditionalArguments | Additional parameters to pass to `docker run` | |
| DockerExePath | Override the detected docker executable path | |
| UseWsl | On Windows, force usage of "Docker on WSL" |
Working with other repositories
There are also three Connection-related parameters you can set: FullRepositoryUrl, Username, and Password. These parameters can be used to work with repositories that are not associated with your application, and require that AttachToBuild is set to false, and Repository is not set.
(Deprecated) Docker::Assemble-Image
BuildMaster 2022 and earlier included a Docker::Assemble-Image that would allow you to create a Docker image without a Dockerfile. This is operation is deprecated, and we no longer support it or recommend using it.
(Advanced) Multi-staged Builds
Docker's Multi-stage build feature is primarily used as follows:
- Build a container image based on a development platform like
dotnet/sdkormaven - Run that container with commands to compile/build your code
- Build a second container image that copies build artifacts from the first
For example, here is a Dockerfile from Microsoft's containerize a .NET app tutorial:
FROM mcr.microsoft.com/dotnet/sdk:7.0 AS build-env
WORKDIR /App

# Copy everything
COPY . ./
# Restore as distinct layers
RUN dotnet restore
# Build and publish a release
RUN dotnet publish -c Release -o out

# Build runtime image
FROM mcr.microsoft.com/dotnet/aspnet:7.0
WORKDIR /App
COPY --from=build-env /App/out .
ENTRYPOINT ["dotnet", "DotNet.Docker.dll"]
That Dockerfile uses Microsoft's dotnet/sdk container image to build the application code, and then creates a container based on dotnet/aspnet to run your application.
You can certainly use this approach in BuildMaster if you'd like; it simply involves running the Docker::Build-Image operation without deploying an artifact first.
However, as mentioned earlier, we recommend splitting these into two separate stages. You can always use an Image-based Service to build/compile your code inside of a container instead.