Build .NET Project Script Template

A script template is a simple, no-code solution for performing common build or deployment operations and can be converted to OtterScript at any time.
The Build .NET Project Script Template will:
- check out out code from Git
- optionally build an npm based front-end
- compile a .NET project or solution
- optionally run tests
- capture build artifacts for later deployment
This article will detail the options for these steps, as well as how they're performed.
Using This Script Template
A synchronized Git repository is required for this template, and if your application does not have one, you will not be able to add or edit this script template.
To add this script template to your application, navigate to Scripts, click Add Script, and then select Build .NET Project from the list of Build Script Templates. After doing so, you'll see a dialog like this:
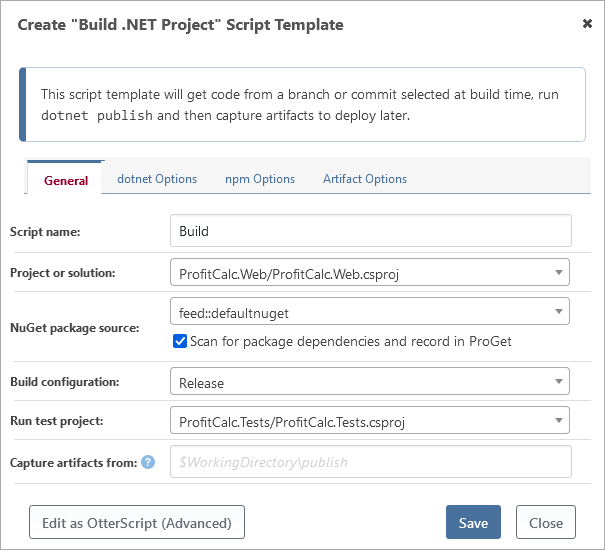
There are a lot of options available, and this article will discuss how these options are used in different steps of the build process.
Note that the dotnet SDK is required on the server you'll run this script on (i.e. your build server). However, you can check the "Ensure dotnet SDK is installed" box in the "dotnet Options" tab to automatically install the required SDK as part of the build process.
Checking Out from Git
First, the script template checks out code from a Git repository. The branch (or specific commit) is selected when the build is created, before the script is even run. The script will then check out code from that exact commit.
This step uses the Git::Checkout-Code operation without any parameters.
Building npm Front-Ends
If a .NET web application uses npm to build or enhance its front-end pages, there is an option provided to enable building an npm project on the "npm Options" tab. Once enabled, the script template will set an npm version (optional), install npm packages (npm install), and run the build script (npm run build).
When enabled, the script template will add the following operations to the script:
npm:Set-ProjectVersion(optional)npm::Installnpm::Build
npm Package Source
Select where to fetch the npm packages needed to build your project. This list will typically contain npm feeds from your connected ProGet instance, and an option for Not Specified, which will use the public npmjs.com repository. When a ProGet feed is selected, a temporary .npmrc will be created in the Source Directory and --userconfig= will be passed to the npm install command.
Allow ProGet feeds using a Self-Signed certificate
When npm handles certificate validation, it will use an internal certificate source. This will error when using invalid certificates like self-signed and internal CA generated certificates even if they are trusted in the Windows certificate store. If ProGet is configured to use a self-signed or internal CA generated certificate, you will need to bypass npm's certificate validation by checking the "Allow ProGet feeds using a Self-Signed certificate" option.
Source Directory
Enter the source directory for where the package.json file can be found. By default, the script template will search your Git repository for the package.json file and prepopulate the path. If a package.json file is not found, the default value is $WorkingDirectory.
Additional Build Arguments
When specified, these arguments will be passed to the npm::Build operation using the AdditionalArguments parameter. When the npm::Build operation is run, these are then passed directly to the npm run build commmand.
Project Version
This sets the project version for the npm project. The default value is to not update the version, but you have the choice to use the assembly version you specified for your .NET application, or to enter a custom version number for your project.
When this option is selected, the npm::Set-ProjectVersion will be used with the Version parameter.
Building/Compiling .NET Project
Next, the script template will use the .NET CLI to build/compile your project.
Project or Solution
Select either a solution (.sln) file or a project file (.csproj) from your source repository that will be built. In most cases, it won't make a difference which one you select—but for this template, it's generally recommended to use the project file to keep things simple.
NuGet Package Source
Select where to fetch the NuGet packages needed to build your project. This list will typically contain NuGet feeds from your connected ProGet instance, and an option for Not Specified, which will use the public NuGet.org repository.
You can also enter in a custom URL to a feed, though this isn't recommended, as you can create a NuGet feed resource and use that instead.
Build Configuration
By default, this is set to Release, which will perform a standard optimized build. You can set it to Debug or any other build configuration if needed.
Assembly Version
This ensures that the built .NET assembly has this version. The default value is the variable $ReleaseNumber, which will supply the release number associated with the current build.
When this option is selected, the DotNet::Set-ProjectVersion will be run with the AssemblyVersion parameter.
Command
You can select which dotnet command to use.
dotnet publishis Microsoft's recommended command for building an application you intend to deploy, as it includes third-party dependencies in the build outputdotnet buildmay produce the desired results for some applications (especially ASP.NET or .NET Framework applications)
See Microsoft's publish documentation to learn more.
Other Options
Settings for other common operations using dotnet build/publish are also included:
- Output directory: Build output will be copied here instead of the default output directory
- Framework: Framework version to build, typically only used for multi-targeted projects. Uses common .NET monikers such as net6.0, net452, netstandard2.0, etc.
- Runtime: When publishing an executable, specifies the runtime/platform to target such as win-x64, linux-x64, etc.
- Self-contained: When publishing, include the entire .NET runtime and all required dependencies in the output
- Additional arguments: These are passed to
dotnetexactly as specified
This step uses the DotNet::Build or DotNet::Publish operation, depending on the Command you selected. The parameters will depend on the options you've entered.
Building Using a Docker Container
By default, .NET projects will built by executing dotnet build or dotnet publish commands in a working directory on a target server. However, if you've enabled BuildMaster's Image-based Services feature, you can configure .NET projects to build inside of a Docker container instead.
To do this, select the "Docker" tab, check "Run in container" and then select the image you would like to use to build your project or solution. You can add or customize the images in this list under Admin > Image-based Services. When selected, the script will function mostly the same, except dotnet build or dotnet publish will be executed in the container using the working directory as a mounted volume.
This option adds the ImageBasedService parameter to the DotNet::Build or DotNet::Publish operation with the selected value.
Record Dependencies to ProGet
When a ProGet feed is selected for a NuGet package source, a checkbox to scan for package dependencies will appear. If checked, the NuGet, and optionally npm, dependencies for this build will be recorded in your ProGet instance.
This step uses the ProGet::Scan operation with the Project parameter set to the value of the "Project or Solution".
Running Unit Tests
If any unit test projects are detected, you can select one to run as part of your build script. You can also enter the name of a project if one wasn't detected.
Select a test project will call dotnet test and record the results in BuildMaster. See our unit tests documentation to learn more.
This step uses the DotNet::Test operation with the Project parameter set to the value of the "Test project".
Capturing Build Artifacts
As the last step, BuildMaster will capture artifacts from a path within the working directory that you specify. These are the files that you will deploy later.
The specific path within the working directory can be difficult to predict. For example, according to the dotnet publish documentation, the build's output directory will be:
[project_file_folder]/bin/[configuration]/[framework]/publish/for a framework-dependent executable and cross-platform binaries[project_file_folder]/bin/[configuration]/[framework]/[runtime]/publish/for a self-contained executable
That's just assuming you even want the output directory; for certain ASP.NET web applications, you may want the project root folder.
Finding the Right Subpath
Usually, the easiest way to find the path you want is:
- Create a build using this template
- Inspect the build's artifacts
- Find the subpath you want within the artifact
- Enter that in the "Capture artifacts from:"
Then, the build artifact going forward will contain only those files.
This step uses the Create-Artifact operation, with the parameters depending on the options you've entered.