Configuring High Availability & Load Balancing

The distributed architecture of ProGet, BuildMaster, and Otter allows you to configure an instance over any number of servers for both load-balancing and failover purposes. By doing so, any single server can take over the cluster in the event of server failure and outage. This can improve your Inedo product's performance in high-traffic environments.
Using the High Availability & Load Balancing feature requires an Enterprise-level license; i.e. ProGet Enterprise, BuildMaster Enterprise, or Otter Enterprise.
You can manage your cluster by using the Cluster Management page in your Inedo product.
Prerequisites
High Availability & Load Balancing requires the following components to be configured:
- Load Balancer
- Shared Storage
- Shared Database
- Inedo Product (Encryption Key & Settings)
Selecting a Load Balancer
Your Inedo product is built to be compatible with any load balancing platform, including both software-based (such as HAProxy, ARR (IIS), or nginx) and appliance-based (such as F5, A10, Citrix) platforms. Each load balancer can be configured differently, so please consult the manufacturer's documentation for configuring the load balancer to work with IIS.
Session Affinity (sticky sessions) is not required. While you can enable this, it may simplify your traffic and load balancer configuration not to use them.
Database Server
You will need a stand-alone SQL Server that all servers in your cluster can connect to. This could be as simple as SQL Express, but we recommend a database cluster so that there's no single point of failure within your High-availability setup.
Your Inedo product can work with any SQL Server Cluster installation, regardless of the failure detection mechanism and failover policy. SQL Server's Database Mirroring may also be used, but note that Microsoft has deprecated that feature in favor of AlwaysOn Availability Groups.
How to Create a Cluster
Any number of servers can be in a cluster to start, and more servers may be added later to distribute load and ensure rapid responses.
A ProGet Enterprise License allows for up to five servers per instance by default.
Step 1: Install Product on Each Server
Each server must be running the same version of an Inedo product. You can use the standard installation guides for each Inedo product to install the software on each server in the cluster.
The easiest method is usually the Inedo Hub.
When installing your Inedo product on each server, make sure to point each install to the same, shared database by using the same database connection string for each.
Step 2: Configure the EncryptionKey
After installation, make sure the EncryptionKey value is the same across all servers.
For Windows, see see Installation Configuration Files to find the configuration file and where to set the EncryptionKey value.
For Linux/Docker, this involves setting a PROGET_ENCRYPTION_KEYenvironment variable; see Supported Environment Variables.
An encryption key needs to be set and consistent across all servers in the cluster. This encryption key is required for cross-server sessions and removes the requirement for sticky sessions in your load balancer.
Step 3: Configure Shared Storage
Your Inedo product is compatible with any type of common storage that all services can access, whether software-based (e.g., SAMBA share, Windows Server Storage Spaces, etc.) or appliance-based (e.g., dedicated NAS). The only requirement is that the storage is readable and writeable by all servers.
Server-level Shared Storage
To configure server level shared storage, update the following:
| Inedo Product | Value |
|---|---|
| BuildMaster | Artifacts.BasePath value in Administration > Advanced Settings. |
| ProGet | Storage.PackagesRootPath value in Administration > Advanced Settings. |
| Otter | No configuration is required |
(ProGet) Feed-level Shared Storage
To configure storage at a feed level, first, navigate to the Manage Feed page for each feed. Click change on the right side of the Disk Path property. For cloud storage options, see Cloud Storage.
Step 4: Enable in Product
Once complete, from any web server, navigate to Administration, and click "More Info" under the "Cluster Overview" section. Clicking the "configure" link will open a dialog that allows you to check "Enable High-Availability (Automatic Fail-over)".
After saving configuration, restart the ProGet service on each of the nodes for the change to take effect.
Advanced Cluster Configuration Options
Clicking on the "Advanced" tab of the configuration will allow you to set additional values for your server cluster.
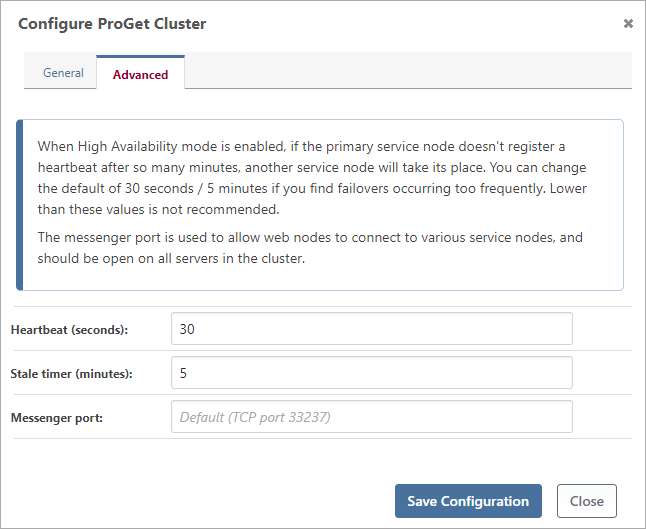
Note that changing these settings will also require a restart of both the ProGet service on each server in the cluster.
Step 5: Verify Health & Configuration
Once enabled, the Indexing Cluster Health box on the administration page will be shown above the Service Status box. Clicking on the More Info link will display the Indexing Cluster Status page. On this page, you can see the status of every server in your cluster.
If a server is no longer in your cluster, you may delete it by clicking the appropriate red X button.
For troubleshooting tips, see Managing your Cluster.
Versions 2024 and Earlier
This guide was written for Inedo products versioned 2025 and newer. See the previous version of this guide (github.com) for steps required for earlier versions.