- BuildMaster
- Getting Started with BuildMaster
- Builds and Continuous Integration
- What is a "Build" in BuildMaster?
- Git and Source Control
- Git Pipelines and Workflows
- Build Scripts & Templates
- Packages & Dependencies
- Build Artifacts
- Automated Testing & Verification
- Deployment & Continuous Delivery
- What is a “Pipeline” in BuildMaster?
- CI Server (Jenkins, TeamCity, etc.) Integration
- Deployment Scripts & Templates
- Automatic Checks & Approval Gates
- Manual Deployment Steps and Tasks
- Databases
- Configuration Files
- Rollbacks
- Advanced CD Patterns
- Applications & Releases
- Connecting to your Servers with BuildMaster
- Scripting in BuildMaster
- Configuring for Your Team
- Docker/Containers
- Development Platforms
- Deployment Targets
- Tools & Service Integrations
- Reference
- BuildMaster API Endpoints & Methods
- Extending BuildMaster
- Built-in Functions & Variables
- Applications
- Builds
- Configuration Files
- Containers
- Credentials
- Databases
- Environments
- Executions
- Files
- General
- JSON
- Linux
- Lists
- Maps
- Math
- Nuget
- Packages
- Pipelines
- PowerShell
- Python
- Releases
- Servers
- Strings
- XML
- Built-in Operations
- Batch
- BuildMaster
- Configuration Files
- Databases
- DotNet
- Files
- Firewall
- General
- Apply-Template
- Attach Package
- Build
- Checkout-Code
- Close-Issue
- Concatenate-Files
- Copy-Files
- Create-Directory
- Create-File
- Create-Issue
- Create-Issue
- Create-IssueComment
- Create-Package
- Create-ZipFile
- Delete-Files
- Download-Asset
- Download-Http
- Ensure-Directory
- Ensure-File
- Ensure-HostsEntry
- Ensure-Metadata
- Ensure-Milestone
- Ensure-Package
- Ensure-Release
- Ensure-Tag
- Exec
- Execute Python Script
- Execute VSTest Tests
- Get-Http
- Install-Package
- OSCall
- OSExec
- Post-Http
- Push-PackageFile
- PYCall
- PYEnsure
- Query-Package
- Remediate-Drift
- Rename-File
- Repackage
- Replace-Text
- Send-Email
- Set-FileAttributes
- Set-Variable
- SHEnsure
- Sleep
- Transfer-Files
- Transition-Issues
- Upload-Assets
- Upload-Http
- Upload-ReleaseAssets
- Git
- IIS
- Nuget
- PowerShell
- ProGet
- Python
- Registry
- Servers
- Services
- Shell
- Windows
- Administration
- Installation & Upgrading
- ProGet
- Getting Started with ProGet
- Packages: Managing & Tracking
- Feeds Types & Third-Party Packages
- What is a "Feed" in ProGet?
- What is a "Connector" in ProGet?
- NuGet (.NET)
- Universal Feeds & Packages
- PowerShell
- Chocolatey (Windows/Machine)
- RubyGems (ruby)
- Visual Studio Extension (.vsix)
- Maven (Java)
- npm (Node.js)
- Bower (JavaScript)
- Debian (Apt)
- Helm (Kubernetes)
- PyPI (Python)
- Conda (Python)
- RPM (Yum)
- Alpine (APK)
- CRAN (R)
- pub (Dart/Flutter)
- Cargo (Rust)
- Terraform Modules
- Conan (C++)
- Composer (PHP)
- Other Feed Types
- Asset Directories & File Storage
- Docker and Containers
- Replication & Feed Mirroring
- Software Composition Analysis (SCA)
- Security and Access Controls
- Cloud Storage
- Administration
- Installation & Upgrading
- API Methods and CLI Commands
- Otter
- Getting Started with Otter
- Orchestration & Server Automation
- Connecting to your Servers with Otter
- Collecting & Verifying Configuration
- Drift Remediation / Configuration as Code
- Scripting in Otter
- Configuring for Your Team
- Installation & Upgrading
- Administration & Maintenance
- Reference
- Otter API Reference
- OtterScript Reference
- Built-in Functions & Variables
- Executions
- Files
- General
- JSON
- Linux
- Lists
- Maps
- Math
- PowerShell
- Python
- Servers
- Strings
- XML
- Built-in Operations
- Batch
- Docker
- DotNet
- Files
- Firewall
- General
- Apply-Template
- Collect Debian Packages
- Collect RPM Packages
- Collect-InstalledPackages
- Concatenate-Files
- Copy-Files
- Create-Directory
- Create-File
- Create-Package
- Create-ZipFile
- Delete-Files
- Download-Asset
- Download-Http
- Ensure-Directory
- Ensure-File
- Ensure-HostsEntry
- Ensure-Metadata
- Ensure-Package
- Exec
- Execute Python Script
- Get-Http
- Install-Package
- OSCall
- OSExec
- Post-Http
- Push-PackageFile
- PYCall
- PYEnsure
- Query-Package
- Remediate-Drift
- Rename-File
- Repackage
- Replace-Text
- Send-Email
- Set-FileAttributes
- Set-Variable
- SHEnsure
- Sleep
- Transfer-Files
- Upload-Assets
- Upload-Http
- IIS
- Otter
- PowerShell
- ProGet
- Python
- Registry
- Servers
- Services
- Shell
- Windows
- Installation & Maintenance
- Windows (Inedo Hub)
- Linux (Docker)
- High Availability & Load Balancing
- User Directories & Domains (LDAP)
- Logging & Analytics
- SAML Authentication
- When to Upgrade your Inedo Product
- Managing Agents and Servers
- Backing Up & Restoring
- Installation Configuration Files
- PostgreSQL & Inedo Products
- SQL Server & Inedo Products
- Inedo Agent
- What is the Inedo Agent?
- Installation & Upgrading
- Downloads & Release Notes
- Maintenance & Configuration
- Internal Architecture
- MyInedo
- OtterScript (Execution Engine)
- Reference
- OtterScript
- Inedo Execution Engine
- Romp (Discontinued)
- Using Romp
- Installing, Configuring, and Maintaining
- Romp CLI Reference
- Package Layout
- Downloads & Source Code
- Extensibility
- Inedo SDK
HOWTO: Install on Windows

The easiest way to install ProGet, BuildMaster, or Otter on Windows is with the Inedo Hub, a lightweight installer that acts as a one-stop shop for downloading, installing, upgrading/downgrading, and maintaining your Inedo products.
Looking to install on Linux? Check out our Docker installation guide.
This article provides step-by-step instructions on using the Inedo Hub to install an Inedo product.
Step 1: Download the Inedo Hub
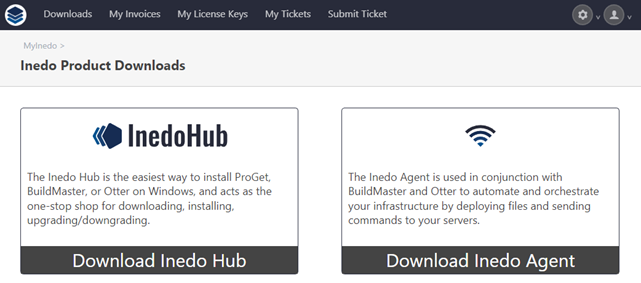
The latest version of the Inedo Hub can be downloaded from MyInedo. You can also download the Inedo Hub from the download page of any Inedo product.
Step 2: Install the Inedo Hub
Now that you have downloaded the Inedo Hub you will need to install it by running the InedoHubInstaller.exe file you downloaded.
You may get a security warning message depending on your Windows UAC Settings. Simply click "Run" after verifying that the publisher of the file is INEDO, LLC.
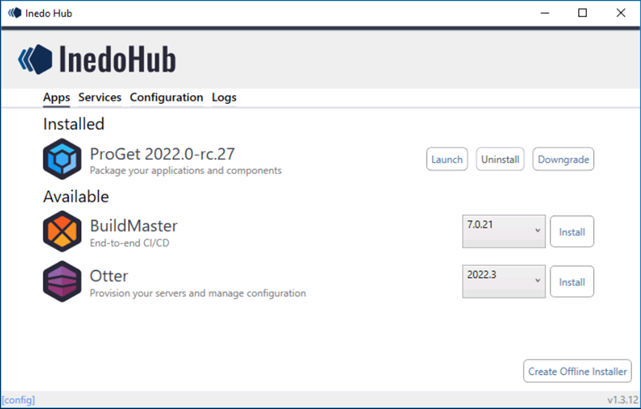
After the Inedo Hub installer downloads all necessary files to install itself, you will see the main screen of the Inedo Hub.
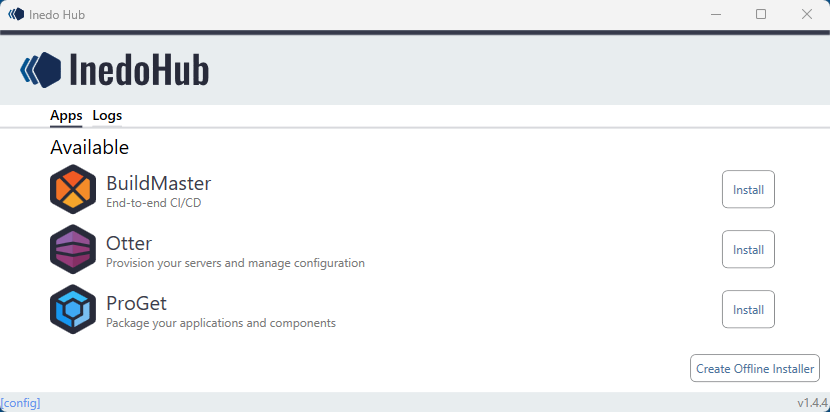
Step 3: Install a Product with the Inedo Hub
Any version of an Inedo product can be installed from the main screen of the Inedo Hub (pictured above). For the purposes of this tutorial, we will install ProGet via the Inedo Hub, but the instructions are identical for any Inedo product.
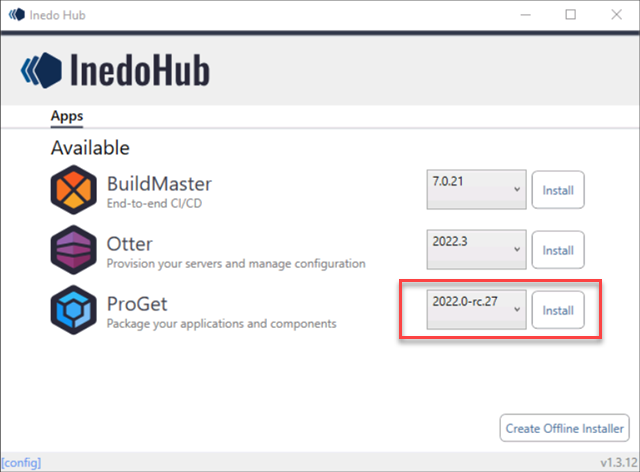
Select the version of the product you want to install by clicking on the version drop-down menu, followed by the "Install" button.
Next, you'll be able to customize your installation. Note that the options are identical for all Inedo products and you can change this configuration after installation.
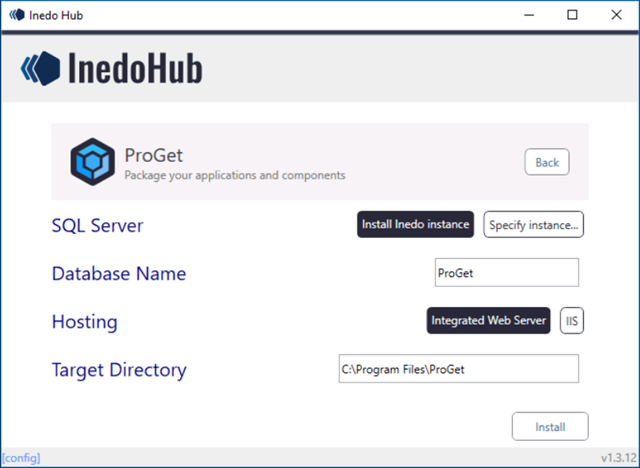
| Setting | Description |
|---|---|
| SQL Server | Choose between installing Inedo's SQL Server Instance or using an already installed instance on your server. Note: if you select the option to install Inedo's SQL server while you already have Microsoft SQL installed, the installer will simply check for updates to your existing server and install them if needed. It will then proceed to add the INEDO instance to the server. |
| Database Name | The name of the database that will be installed for your Inedo Product. |
| Hosting | Choose between using Inedo's integrated Web Server or configuring your Inedo product for use with Microsoft IIS. |
| Target Directory | The install path for your Inedo product. The default path is C:\Program Files\«Inedo-product» but it can be changed to match your desired location. |
Once your Inedo product is set up to match your desired configuration, click "Install".
The Inedo Hub will now automatically download and install your desired Inedo product. Once the installation is complete, you'll be returned to the home screen where your product will now display as Installed.
That's it! Follow these 3 easy steps to quickly install any Inedo product. You can also launch, uninstall, and upgrade or downgrade your installed Inedo product from the Inedo Hub.
Upgrading from the Inedo Hub
The "Upgrade" button will appear if an update is available. See HOWTO: Upgrade or Downgrade to learn more.
In offline Inedo Hub instances you won't be notified about updates so we recommend viewing our Detailed Change Log and Upgrade Guidance on MyInedo regularly to stay informed about new releases.