Git and Source Control

BuildMaster is tightly integrated with Git services such as GitHub, GitLab, Azure DevOps, and BitBucket. This allows you to:
- Browse branches/commits directly from BuildMaster to quickly create new builds
- Compare commits (code changes) between two builds/releases
- Tag commits upon release
- Create/merge pull requests
- Monitor repositories to create/deploy builds
This article explains how this integration works, which will help you set up your applications, create advanced scripts/workflows and troubleshoot issues.
Git Connections
When creating a new application, you'll be prompted to connect to a Git repository. You can also add Git connections from the application's Settings page.
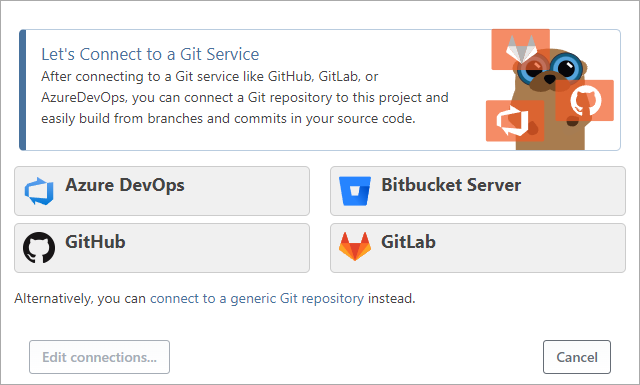
When you create a Git connection, BuildMaster guides you through connecting to a Git service such as GitLab, Azure DevOps, BitBucket, etc., and then selects a repository associated with your account.
Behind the scenes, a Git connection consists of two parts:
- Credentials: contains the account information of your Git service (e.g., personal access token) and is generally shared among all applications (global)
- Resource: this represents a single repository, is generally associated with a credential, and is not shared with other applications
You can edit these items directly to enable advanced scenarios (such as a shared repository) by clicking view all on the Settings page, or by going to Admin > Credentials & Resources. See Credentials & Resources to learn more.
Synchronizing Your Git Repository
When selecting a repository to add to an application, you can choose if the repository should be synchronized with BuildMaster. When selected, BuildMaster will clone the Git repository to a folder under the System.WebTempPath directory, then periodically synchronize (i.e. pull commits) from the remote repository.
This synchronization occurs in response to user actions, such as browsing branches or commits in the web application. While this means you're always seeing the most up-to-date code, it may yield occasional page loading delays (1–2 seconds) while new commits are downloaded.
Errors in Synchronized Repositories
You may occasionally see an error message when browsing a Git page:

This means that the synchronized repository is in an error state. This can happen for a variety of reasons, but the most common are:
- invalid credentials (access token expired, changed, etc.)
- invalid remote repository (URL changed, etc.)
- inconsistent state (remote repository object database rewritten, etc.)
- network error during synchronization
To fix this issue, just click More Details and synchronize the repository again. You can also try to delete and re-add it on the Settings page.
Synchronized Git Repositories
After adding a synchronized Git repository to an application, you can browse the branches, source code, and commitsof that repository—as well as changes between builds/releases—directly from the BuildMaster website at UI.
Viewing Changes Between Builds
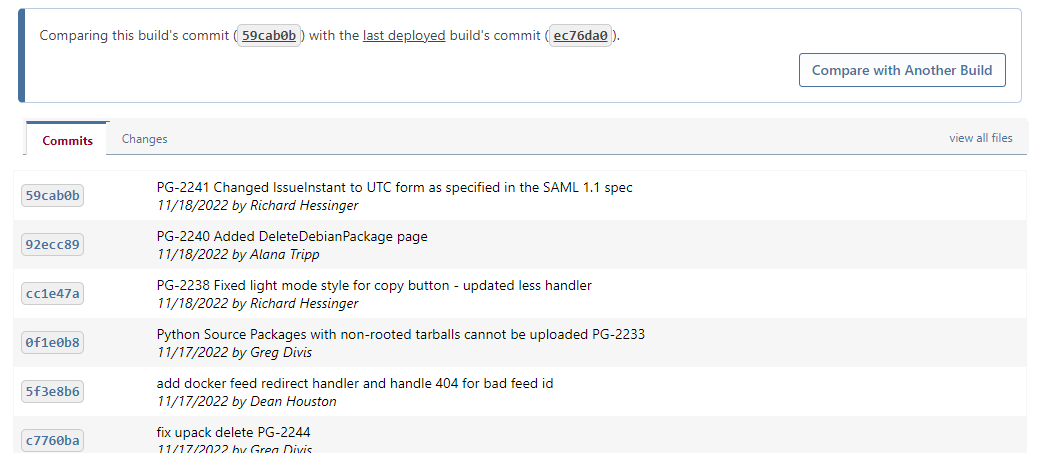
One of the biggest advantages of BuildMaster's Git integration is the ability to quickly compare changes between builds and navigate directly to individual commits or file changes.
When you navigate to the Code tab of a build, you can see all the commits made between that build and the previous build.
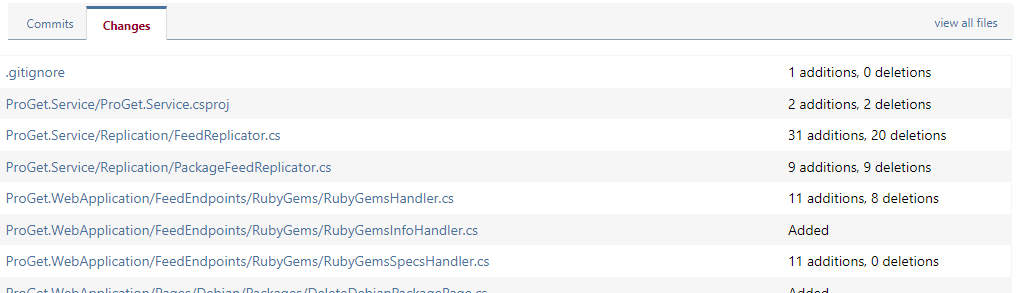
The Changes tab will show all the files that changed between builds. Here, you can see which parts of each file changed.
Browsing Git Branches
You can browse all branches in your repository by navigating to Git > Branches within an application. If you have multiple Git connections in your application, you can select the repository you want from the top navigation.
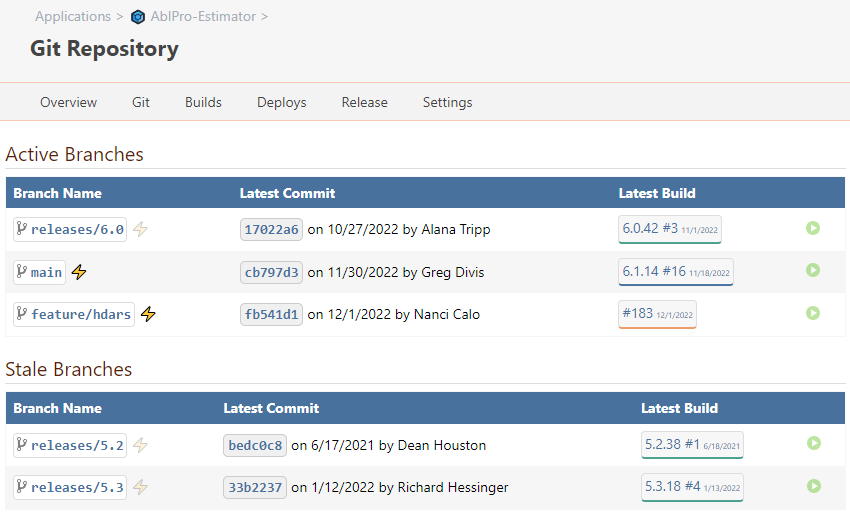
A branch is considered active if there's been a commit within the past 90 days or if it's configured as the default branch (e.g. main or master). Active branches are also displayed on the application's overview page.
The bolt symbol (⚡) is used to indicate that the branch is being monitored for changes, and clicking on it will either create or edit the associated monitor.
The green play button is a shortcut to create a new build from that branch.
A release can be associated with a branch, which means that builds will use that branch by default.
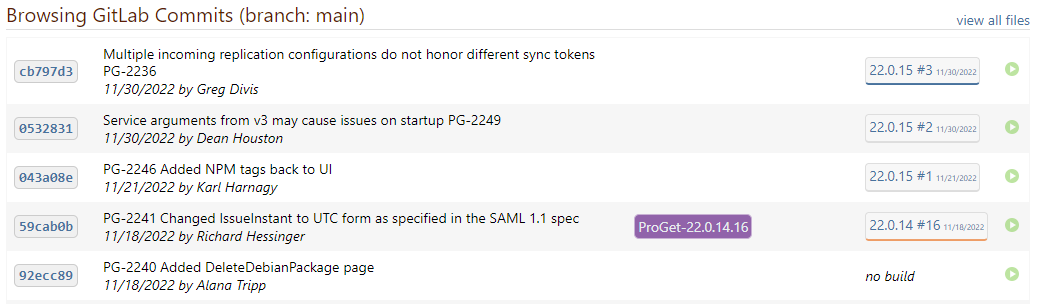
Browsing Git Commits
You can browse commits in your repository by navigating to Git > Commits within an application. If you have multiple branches or Git connections, you can select the repository you want from the top navigation.
In addition to the usual commit information, such as author information and tags, you can see and navigate to the builds associated with the commits:
Clicking on a commit will navigate to that commit's detail page:
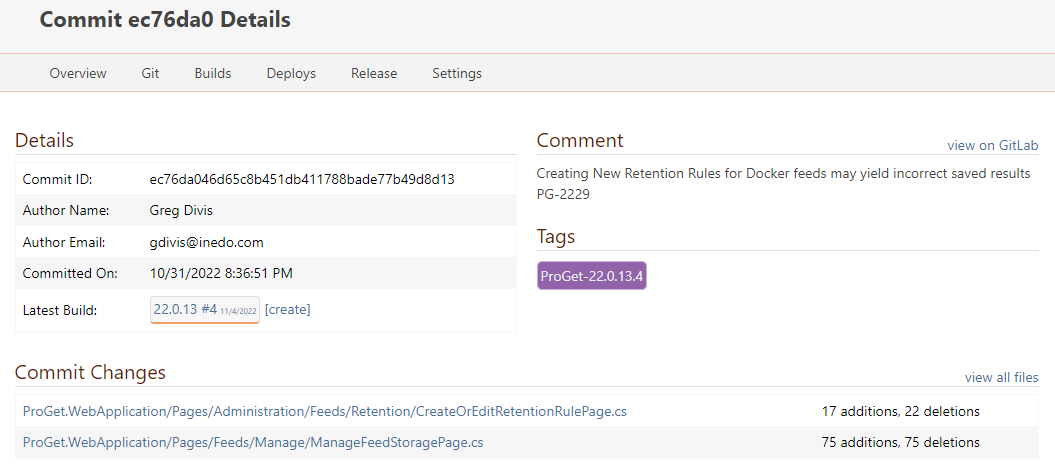
You'll also be able to browse the commit directly on your Git service (GitHub, GitLab, etc.) by clicking on the relevant link (view on GitLab in the above picture).
Browsing Git Files
You can browse files in your repository by navigating to Git > Files within an application. If you have multiple branches or Git connections, you can select the repository you want to browse from the top navigation, just like when viewing commits.
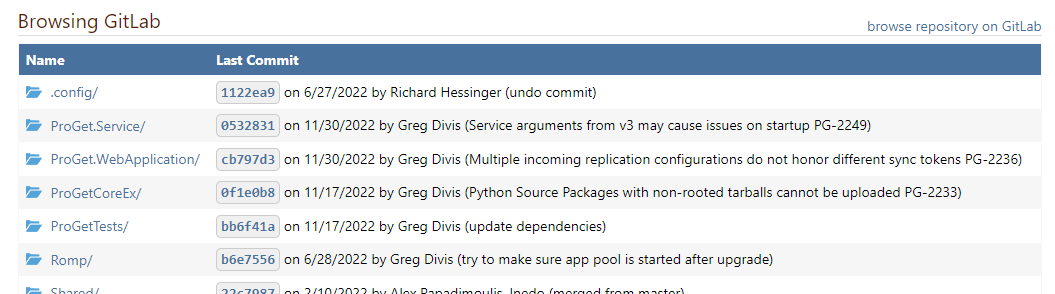
You can also view the repository at a certain point in time (i.e. at a particular commit) by finding that commit, then clicking view all files.
Git Commits & Builds
When your application uses a synchronized Git repository, you'll be able to create a build from any commit in the repository. Typically, this will be the "tip" (i.e. latest commit) from one of your branches.
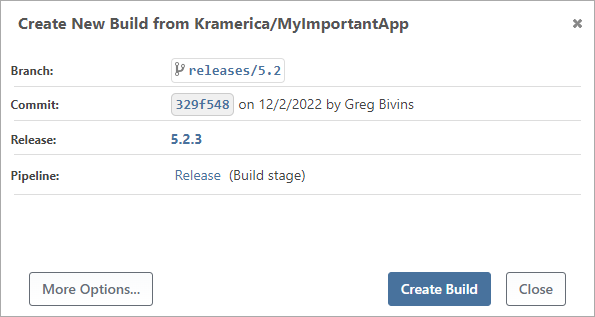
When creating a build in this manner, the selected commit—along with its branch and repository—will be associated with that build and displayed throughout the UI. You can access those values in scripts with the $Commit, $Branch, and $Repository variable functions.
Build Scripts & Operations
Under the hood, Build Script Templates use the Git::Checkout-Code operation before building your code. You can also use this—and other Git-based operations—when creating OtterScripts for more complex or advanced scenarios.
Git::Checkout Operation
The easiest way to get the associated code with your build is by simply using the operation with no parameters, like this:
Git::Checkout-Code;
When you don't specify any parameters, the operation will attempt to checkout $Commit from $Repository to the $WorkingDirectory. If the build is not associated with a commit (and you don't have a $Commit variable defined), the option will error.
There are some cases where you may not wish to associate your build with a commit, use branches, or Git repository resources at all. For example, if you use convention-driven design, then you may have everything specified by variables like $ApplicationName.
In a case like this, you can specify the input parameters you'd like.
Git::Checkout-Code
(
    RepositoryUrl: https://git.kramerica.corp/kramerica/my-repo,
    BranchOrCommit: master,
    To: c:\build\space\src,
    CommitHash => $CommitId
);
Log-Information Checked out at $CommitId from my-repo;
Git::Ensure-Tag Operation
Once code has been released to a production environment, it's a common practice to tag the released code with the release number. The easiest way to do this in BuildMaster is by using a Tag Git pipeline events listener.
You can also do this in OtterScript, by simply calling Git::Ensure-Tag with the tag name:
Git::Ensure-Tag $ReleaseNumber;
Like the Git::Checkout-Code operation, the operation will use $Commit and $Repository if you don't specify them as parameters.
Some teams prefer to constantly overwrite tags like latest-prod to indicate the current code deployed in an environment. You can do this by specifying the Force parameter like this:
Git::Ensure-Tag latest-prod;
(
    Force: true
);
Git::Set-CommitStatus Operation
Git servers such as GitHub, GitLab, Azure DevOps, and BitBucket allow you to set the status of a particular commit in relation to a successful build. This status is often displayed in UI when commits are listed.
To set this status in BuildMaster, you can simply call the operation with the desired status ( such as pending, success, error). In general, you'll want to use a try..catch statement as follows:
Git::Checkout-Code;

Git::Set-CommitStatus pending;
try
{
    ... perform build operations...
    Git::Set-CommitStatus success;
}
catch
{
    Git::Set-CommitStatus error;
    throw;
}
Like the Git::Checkout-Code operation, the operation will use $Commit and $Repository if you don't specify them as parameters. The operation can also automatically determine the status, but you can override that by specifying the Status parameter:
pending- a build is about to start or is runningsuccess- build completed successfullyfailure- execution didn't complete or there was an error unrelated to build compilation/testserror- execution completed but with a build errorauto- BuildMaster choosessuccessorerrorbased on current state
GitCreate-PullRequest & GitMerge-PullRequest
BuildMaster can automatically create or merge pull requests on Git servers such as GitHub, GitLab, Azure DevOps, and BitBucket. Automating these tasks can be helpful if you use advanced Git-based workflows such as Feature Branch or Hotfix.
To create a pull request, call the Git::Create-PullRequest with at least the pull request's title and target branch, like this:
Git::Create-PullRequest
(
    Title: My New Thing,
    Target: main
);
Like the other Git:: operations, if you don't specify additional parameters, the operation will use $Branch (as the source), $Commit (as the required head), and target $Repository.
This operation will also record the ID of the Pull Request on the Build, so that you can later access it with $PullRequestId.
The Feature Branch Workflow Pipeline will create a script with the Git::Create-PullRequest operation. Try it out to see this in action.
You may wish to extend your Feature Branch workflow and have BuildMaster perform the merge.
To merge a pull request, you can run the operation without any parameters:
Git::Merge-PullRequest;
This will use the $PullRequestId if you don't specify it as a parameter.
Git Workflows & Pipelines
BuildMaster can support a wide variety of Git-based workflows through the use of pipelines.
To help you implement these workflows in BuildMaster, the following templates are included. They'll be an option when you create a pipeline in your application.
- Main/Release Branch; builds an application from a main or release branch, deploys it to an Integration stage, then a Test, and finally a Production stage.
- Hotfix Branch; builds an application from a hotfix branch, deploys it to an Integration stage, then directly to a Production stage.
- Feature Branch; builds an application from a Git feature branch, deploys it to an Integration stage, and later creates a pull request and rejects the build to prevent further deployment.
- Develop Branch; builds from a development branch, deploys to an Integration environment, and later rejects the build to prevent further deployment.
These are just a starting point, and you can mix-and-match as needed. For example, you could create a pipeline that handles both Main, Hotfix, and Develop workflows by using a variable.
Git Repository Monitors
BuildMaster can detect new commits in one or more branches in your repository, then perform an action like creating a new build. To learn more, see Git Repository Monitors.
BuildMaster 7.0 and Earlier
In BuildMaster 7.0 and earlier, Git integration is handled
similarly to SVN and TFS version control:
- There are a series of service-specific operations such as
GitLab::Get-SourceandGitHub::Tagthat had nearly identical parameters - There is no support for synchronized repositories (or browsing)
- Variables are used for commit and branch tracking
Converting Old Applications to Use Git Integration
After upgrading to BuildMaster 2022, you can upgrade your applications on an as-needed basis. Assuming that you followed the patterns we recommended in BuildMaster 7.0 and earlier, you just need to:
- Synchronize Repository; existing repositories will be "remote-only", but you can simply click the synchronize button from Settings > Repository to convert it to a local repository
- Update Build script to use
Git::Checkout-Code - Remove variables that store or prompt for
$CommitIdor$Branch - Update pipeline tag release