Deploy IIS Site Script Template

The Deploy IIS Site Script Template is a is a simple, no-code solution for deploying your application to an IIS Site, Application, or Virtual Directory.
Or, if you don't have these IIS components already configured, this script template can optionally create them. It can also update existing settings during deployment.
The Deploy IIS Site script template will:
- Stop Application Pool to allow for the artifact to be deployed
- Deploy Artifact, which will synchronize the contents of the artifacts file and target directory by performing an incremental transfer
- Deploy Azure Web App, which will deploy a specified web
- optionally Make IIS Changes
- optionally Deploy an application configuration file, which can be either a built-in configuration file or a configuration transform
- Start Application Pool again.
This article will detail the deployment processes available, the scripts for each, and how they are performed.
Using this Script Template
To add this script template to your application, navigate to Scripts, click "Add Script", and then select "Deploy IIS Site" from the list of Deploy Script Templates. After doing so, you'll see a dialog like this:
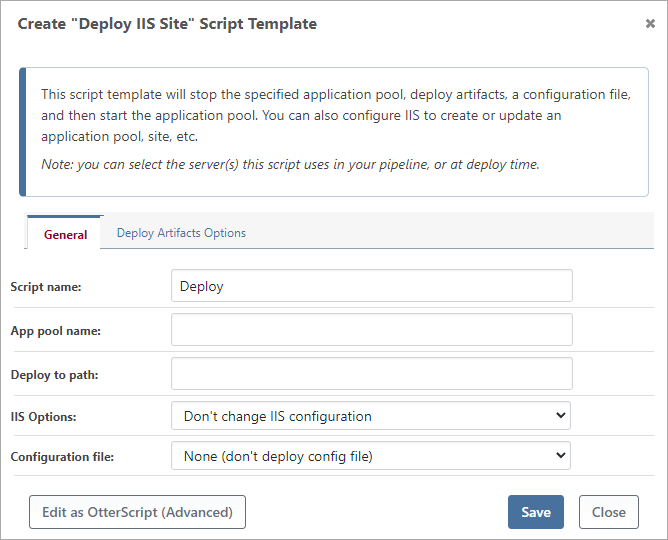
This article will discuss how these options work in the deployment process.
Stop Application Pool
First, the script template will stop the specified application pool, and waits for the application pool to be stopped. If the application does not exist, then a warning will be issued.
The IIS::Stop-AppPool operation will run with the application pool name as the default name parameter.
Configure IIS
Depending on your deployment process (see Microsoft's IIS Architecture), you will have several IIS options available to you, selected from the "IIS Options" box.
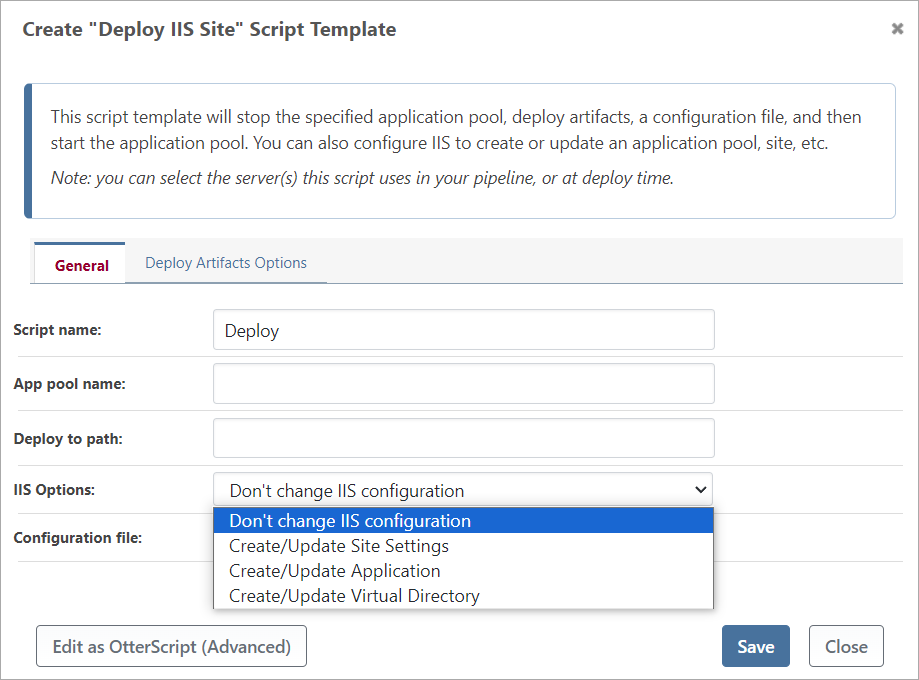
Change/Update IIS Site Options
This option will be made available when selecting "Change/Update IIS Site Options" from the "IIS Options" box.
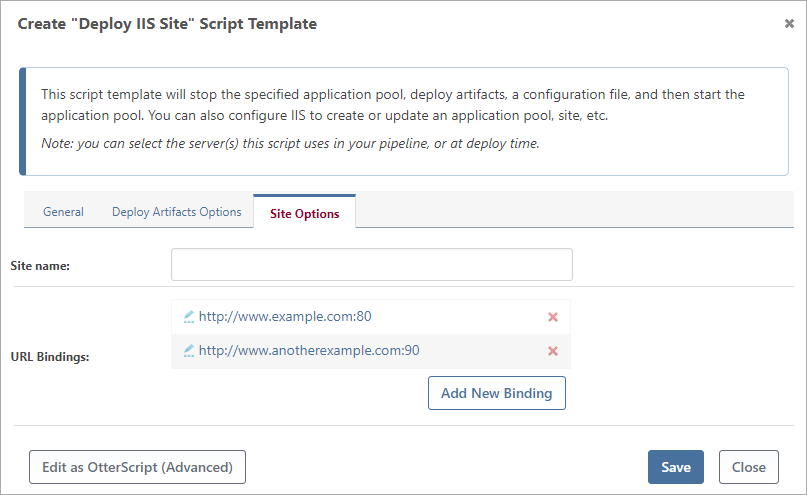
On the "Site Options" tab, there are two fields you can set:
- Site Name refers to the name given to the website you are deploying in IIS. This name is not used in the URL that users will access and is primarily a human-readable label for organizational purposes.
- URL Binding are configurations that determine how your website will respond to incoming requests based on the URL that the client uses to access the site, checked by IIS to determine which site should handle the request. You can have multiple bindings.
To add a URL binding you will be required to enter:
- Protocol (e.g. HTTP)
- IP Address (e.g. 192.168.1.100)
- Host (e.g. www.example.com)
- Port (e.g. 80)
If you select HTTPS as your protocol, you will be required to enter additional information:
- Lookup Certificate By (Friendly Name or Thumbprint)
- Friendly Name/Thumbprint (e.g. ExampleCertificate2023)
- Certificate Store Location (LocalMachine or CurrentUser)
- Certificate Store (e.g. Personal)
- Options: Require SNI (Strong Name Indication)
The IIS::Ensure-Site operation will be run with the site name as the default name parameter, the target path as the Path parameter, and the application pool name as the AppPool parameter, together with other parameters based on the information entered.
If multiple URL bindings are created, for the second URL Binding onwards, the IIS::Ensure-SiteBinding operation will be run with parameters based on the information entered.
Change/Update IIS Application Options
This option will be made available when selecting "Change/Update IIS Application Options" from the "IIS Options" box.
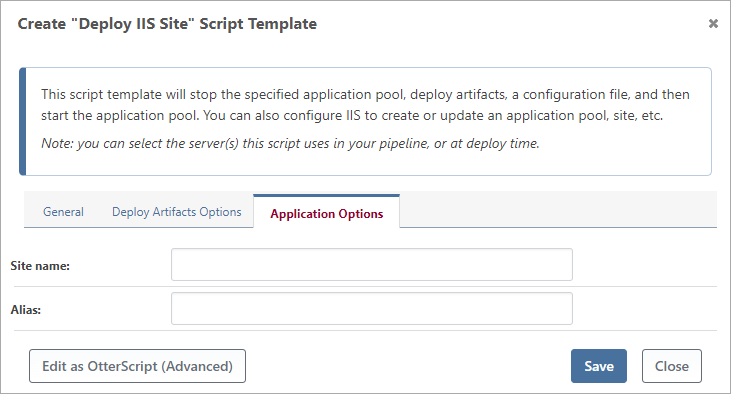
On the "Applications Options" tab, there are two fields you can set:
- Site Name refers to the main website or web application that is already hosted and running in IIS.
- Alias also known as the "Application Alias," is the name given to the application within the main website. It represents the virtual path where the application resides within the site.
The IIS::Ensure-Application operation will be run with the alias as the default Name parameter, the application pool name as the AppPool parameter, the site as the Site parameter, and the target path as the PhysicalPath parameter.
Change/Update IIS Virtual Directory Options
This option will be made available when selecting "Change/Update IIS Virtual Directory Options" from the "IIS Options" box.
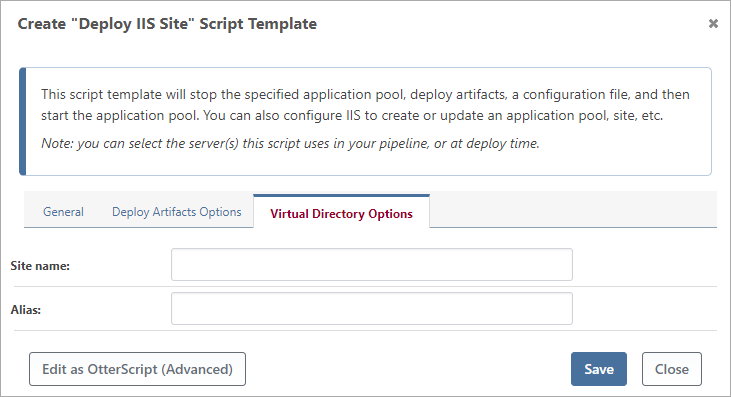
On the "Virtual Directory Options" tab, there are two fields you can set:
- Site Name refers to the main website or web application that is already hosted and running in IIS.
- Alias also known as the "Virtual Directory Alias" or simply "Virtual Directory," is the name given to the virtual directory within the main website. It acts as a virtual path or link to a different physical folder on the server's file system.
The IIS::Ensure-VirtualDirectory operation will be run with the alias as the default Name parameter, the site as the Site parameter, and the target path as the PhysicalPath parameter.
Change/Update Application Pool
When changing or updating IIS Sites or IIS Applications you also have the option of creating or updating an application pool. Checking this box will enable the "App Pool Options" tab, with four fields you can set:
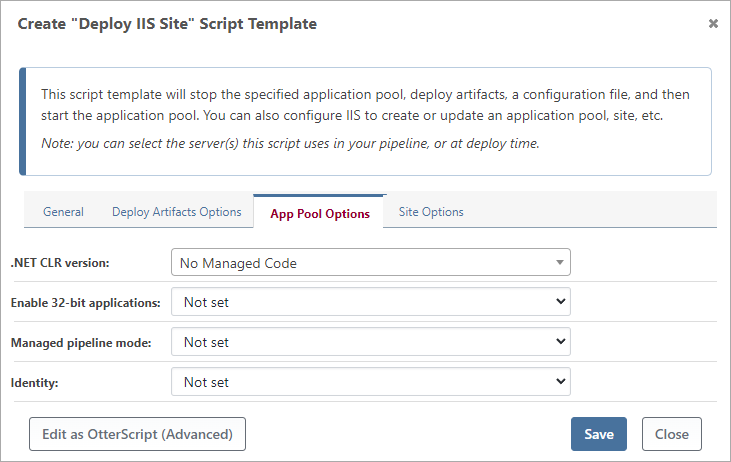
- .NET CLR version specifies which version of the .NET Common Language Runtime (CLR) the application pool will use to run managed code.
- Enable 32-bit applications will need to be enabled if your server is running a 64-bit version of Windows and you need to run a 32-bit web application. By default, IIS runs application pools in 64-bit mode, which means they can't load 32-bit assemblies.
- Managed pipeline mode defines how IIS handles requests and passes them to managed code. For new applications, it's generally recommended to use the "Integrated" pipeline mode.
- Identity defines the security context (user account) under which the application pool's worker processes (w3wp.exe) will execute. It determines the permissions that the worker processes have on the server and the resources they can access.
Selecting the appropriate identity is important when balancing security and functionality, and depends on the specific requirements of your web applications. If you need more information, see the IIS Documentation.
The IIS::Ensure-AppPool operation will be run with the options entered above as the Runtime, Enable23BitAppOnWin64, Pipeline, and IdentityType parameters respectively.
Deploying Artifact
Then, the script template will deploy an artifact to the specified path, such as C:\Apps\MyApp or /var/Apps/MyApp. To reduce deployment time, an incremental deployment approach will copy only the files that changed. A file is considered to be changed if the file size or last-modified-on date is different. To learn more, see Build Artifacts for more details.
Additional Artifact Options
On the "Artifact options" tab, there are two fields you can set:
- Artifact name is the name of the artifacts file attached to your build; the default name for this file is Default, but you may have named it something different when creating it
- Transfer all files will not use the incremental deployment method, and instead transfer all files; this may be helpful if your file has thousands of small files, and it's simply quicker to deploy them all instead of compare them
The Deploy-Artifact operation will be run with the target path as the To parameter, and other parameters based on the options selected.
Deploying Config Files
If you selected an option for the "Configuration file" field, the script template will deploy or transform a configuration file.
Deploy BuildMaster Configuration File
If "Deploy BuildMaster Configuration File" is selected, you must have first created a configuration file in your BuildMaster application. You may select this configuration file from the Config File Options tab to include it as part of your deployment.
The Deploy-ConfigFile operation will be run with the ConfigFile parameter set as the selected configuration file, the Instance parameter set as the selected instance, and the To parameter as the target path.
Transform Config File
If "Transform config file" is selected, the script template will use the Microsoft web.config transformation process to create a configuration file from a "base config file" and a "transform config file". Both the base and transform config files should be included in the artifact that was already deployed.
This feature can be used for any files that follow Microsoft's transformation format, even those that are not web.config files.
The DotNet::Transform-Config operation will be run with the BaseConfig and TransformConfig parameters set to the values you specify. The ConfigType and Target parameters will also match the values you specify.
Start Application Pool
Finally, the script template starts the specified application pool.
The IIS::Start-AppPool operation will run with the application pool name as the default name parameter.