Azure AD (Microsoft Entra ID) Single Sign-on

Overview
This documentation is specific to configuring SAML with Azure Active Directory (Microsoft Entra ID). Refer to the SAML Authentication Overview for more information.
Configuring Azure AD (Microsoft Entra ID)
Before you can use Azure AD (Microsoft Entra ID) in Inedo's products, you will first need to create an Enterprise Application in Azure.
- Navigate to Enterprise Applications and click "New application"
- Click "Create your own application"
- Enter a name (e.g. ProGet SAML)
- Select "Integrate any other application you don't find in the gallery (Non-gallery)"
- On the overview page, make note of the "Application ID", you will need this in the Inedo product configuration
- Click "Users and groups" on the left and add your users to this application in Azure
- Click "Single sign-on" on the left
- Select "SAML"
- Click "Edit" in the "Basic SAML Configuration" block
- Click "Add Identifier" and enter an identifier (e.g proget-saml)
- Click "Add reply URL" and enter "http:///saml-acs-callback"
- Click "Save"
- In the "SAML Signing Certificate" block, copy the "App Federation Metadata URL", this will be used in the Inedo product configuration
Inedo Product Configuration
Option 1: Configure using the Azure AD (Microsoft Entra ID) provider
Currently this is only supported in ProGet v6.0.11+ when v6.1 preview security features are enabled.
This is the simplest method for configuring Inedo Products to use Azure AD for SAML based single sign-on.
- Navigate to Administration -> Manage Security
- In the "Login Options" box, click "change" to the right of SAML
- Select "Azure AD SAML Provider"
- Create your Enterprise Application, if not already created
- Click "Next"
- Enter your Enterprise Application's "Application ID"
- This is commonly found on the Enterprise Application's Overview page
- Enter your "Federation Metadata URL"
- This is commonly found on the Enterprise Application's Single Sign-On page in the SAML Signing Certificate block
- Click Save
Option 2: Configuring using a Custom Provider
This is the only supported way in ProGet 5.3 or using 6.0 security features in ProGet 6.0.
When using v6.1 preview features:
- Navigate to Administration -> Manage Security
- In the "Login Options" box, click "change" to the right of SAML
- Select "Custom/Other SAML Provider"
When using ProGet 5.3 or 6.0 security features:
- Navigate to Administration -> Enable Single Sign-on (SAML)
Configuration Settings
- In the SAML Issuer, enter the Enterprise Application's Application ID
- This is commonly found on the Enterprise Application's Overview page
- In a web browser, navigate to the Federation Metadata URL and copy the XML output
- This is commonly found on the Enterprise Application's Single Sign-On page in the SAML Signing Certificate block
- In SAML Metadata, paste the XML from your federation metadata URL
- For the Display name attribute, enter
http://schemas.xmlsoap.org/ws/2005/05/identity/claims/givenname - For the Email attribute, enter
http://schemas.xmlsoap.org/ws/2005/05/identity/claims/emailaddress - Click "Save"
Connecting Azure AD (Microsoft Entra ID) to Your AD User Directory
While SAML authentication does require the Built-In User Directory to be enabled, you can update SAML claims to allow you to match to LDAP/AD User Directory users. If a match is found, it will use the permissions of hte LDAP/AD user. If a user is not found, it will create a new user in the Built-In User Directory.
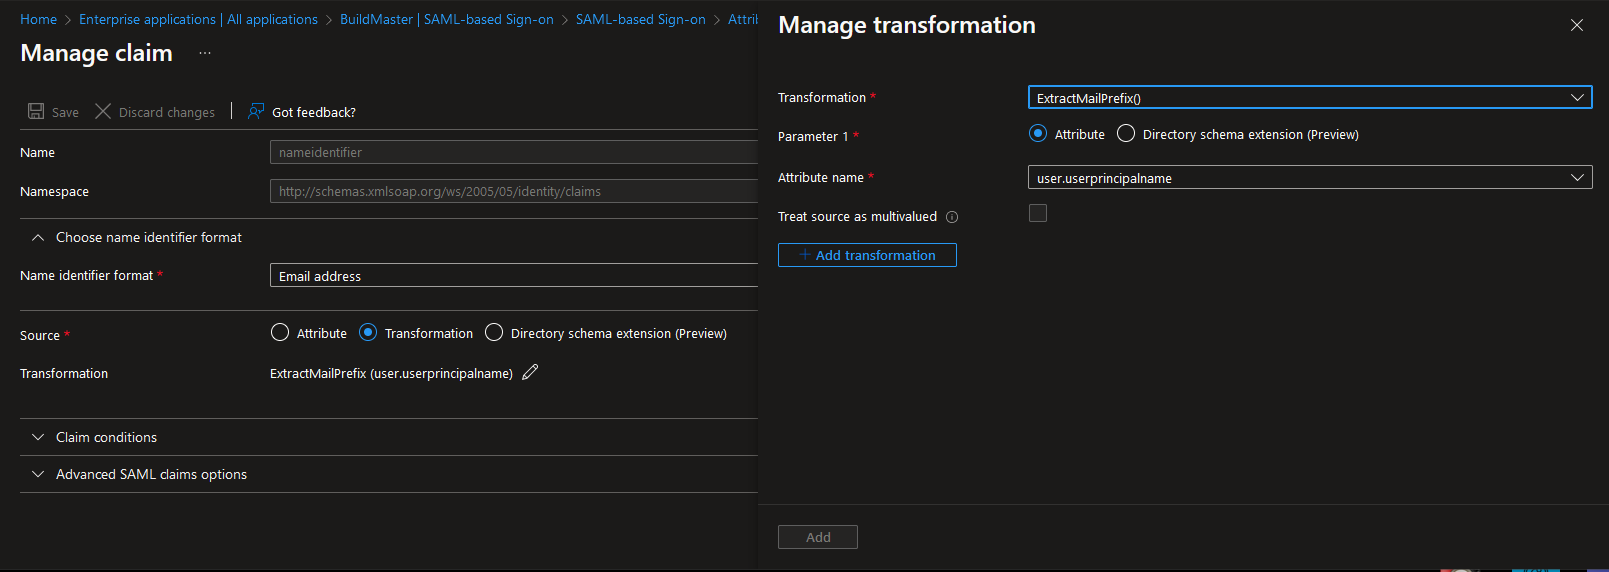
The claim that is used to match your username is the nameidentifier claim. A common way to map this to a User Directory user is to use the ExtractMailPrefix() transform on the user.userprincipalname attribute.
There are some cases where using just the User Name is not enough. The most common use cases are:
- The user name already exists in the Built-In User Directory
- You are using a multi-domain Active Directory Forest
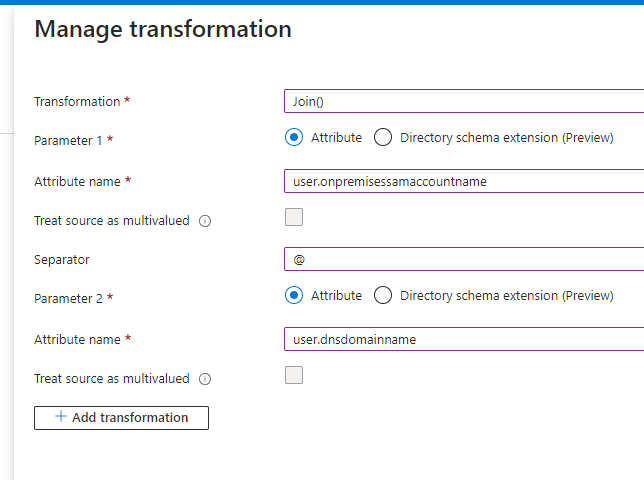
In these cases, you will need to also include the domain suffix. One way this can be done is by using the Join() transform. This requires the on-premise domain information for User Name and DNS Domain Name to exist in your Azure AD (Microsoft Entra ID).