Installing Otter on AWS Lightsail

One of the easiest ways to try Otter without having a dedicated server available or without using your desktop is to use a cloud-hosted Windows Server instance.
This tutorial will teach you how to set up an AWS Lightsail instance with Otter. Otter is automatically installed via a PowerShell script and you will not need a Remote Desktop Protocol (RDP).
Please note that this method is only recommended for evaluation purposes, as using Lightsail can cause additional costs for your business. Please refer to the AWS billing FAQ for the exact costs of using the service.
See how quick and easy it is to install Otter in this 3-minute video. The video is about installing ProGet but it works the same way.
Setting Up Windows Server and SQL Server 2019 Express Using Lightsail
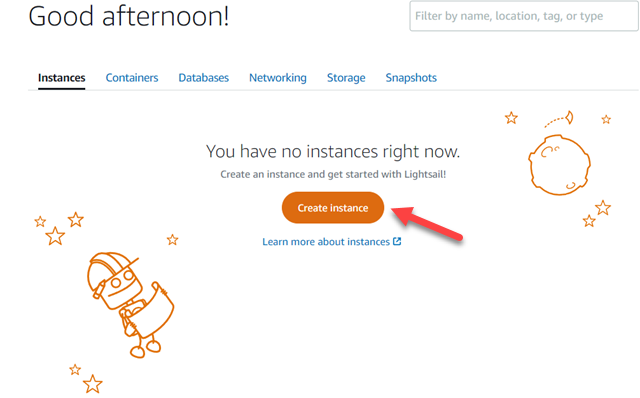
To begin, create a free Amazon Web Services (AWS) account using the “Sign in to the Console” on https://aws.amazon.com/account/.
Once you have created your account, go to https://lightsail.aws.amazon.com/, and click “Create Instance” to start setting up a Windows Server with SQL Server hosted on AWS.
On the “Create an Instance” page, you will be prompted to configure various settings:
- Select your instance location: You can choose any location, but it is advisable to choose one closest to you in order to reduce latency and speed up access times
- Pick your instance image: Choose “Microsoft Windows”
- Select a blueprint: Choose “Apps + OS” and “SQL Server 2016 Express”
- Click “+ Add launch script:” and paste in the following code:
<powershell>
New-NetFirewallRule -DisplayName "Otter" -Direction Inbound -LocalPort 8626 -Protocol TCP -Action Allow
mkdir C:\InedoHub
Set-Location -Path C:\InedoHub
Invoke-WebRequest https://proget.inedo.com/upack/Products/download/InedoReleases/DesktopHub?contentOnly=zip"&"latest -OutFile C:\InedoHub\InedoHub.zip
Expand-Archive -Path InedoHub.zip -DestinationPath C:\InedoHub
.\hub.exe install Otter -ConnectionString="Data Source=localhost;Integrated Security=True;Pooling=false"
$shell = New-Object -ComObject WScript.Shell
$shortcut = $shell.CreateShortcut("C:\Users\Administrator\Desktop\InedoHub.lnk")
$shortcut.TargetPath = "C:\InedoHub\InedoHub.exe"
$shortcut.Save()
</powershell>
- Choose your instance plan: Otter will run on any configuration, but we suggest selecting "Dual-Stack" and picking a plan with at least 8GB of RAM to ensure that Microsoft’s services run smoothly.
- Identify your instance: Especially if you are running multiple instances and need to keep track of which one is which, give your instance a unique name
- Tags: This allows you to enter additional tags to help you organize your instances, but it is unnecessary for this setup.
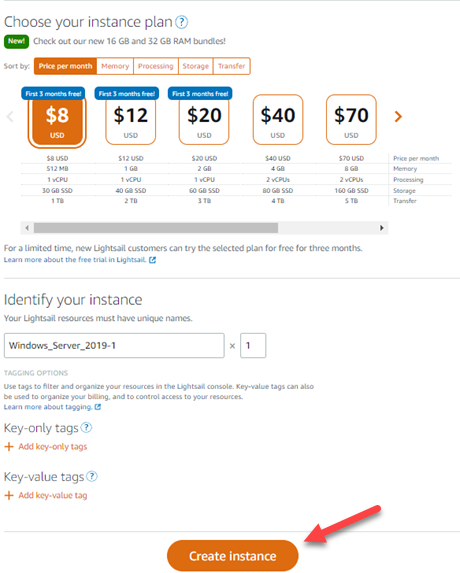
Once you added these settings, click “Create Instance.” It will only take a few seconds for AWS to create the instance, but it may take up to 30 minutes for it to be fully available. You'll know it's ready when clicking on "Retrieve default password" (under the "password" heading in the "connect" category) results in showing you a password instead of stating it's not ready yet.
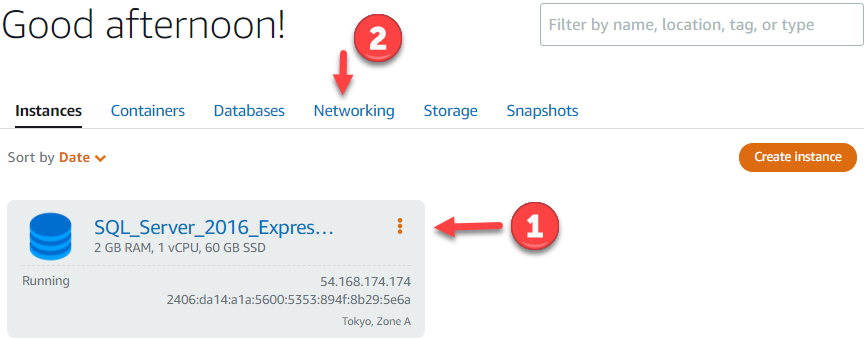
Once Lightsail has finished creating your instance, select your newly created instance for Otter to use.
Ensure that the service has started by checking for a “Running” Status message on the right of the page. If it isn’t “Running,” click the “Start” button.
Open Port 8626 on Lightsail to Access Otter
To access your Otter installation from any machine, you will need to open port 8626 to connect to your Lightsail instance. Port 8626 is the default firewall port Otter uses for communication. As only one application can use a port at any time, there is no security risk.
To open this port, select your instance and go to the “Networking” tab.
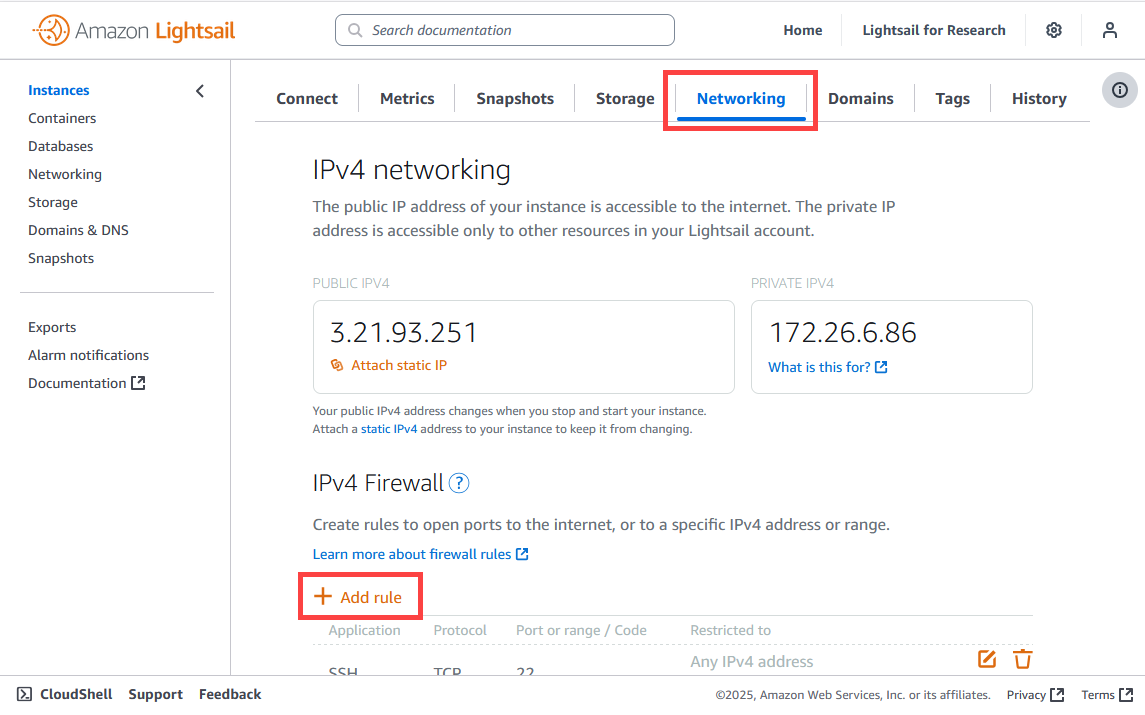
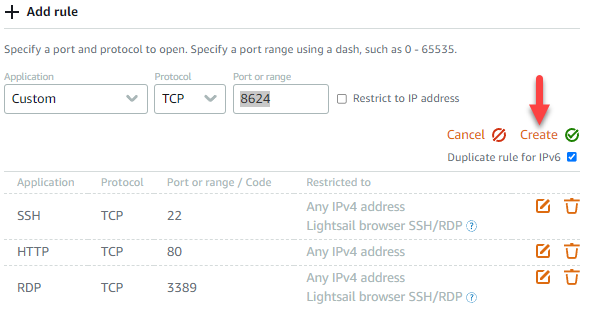
Under “IPv4 Firewall,” click “+ Add rule”, which will prompt you to configure several options:
- Application: Default is “Custom”—do not change
- Protocol: Default is “TCP”—do not change
- Port or range: Enter the port you would like to open. For this tutorial, enter
8626. - Restrict to IP address: Specify which IP addresses can connect to your instance. This provides additional security, though it isn’t strictly necessary.
Once you have entered your desired options, click “Create.”
Write down or copy the “Public IP” of your server. You will use this later to access Otter from any machine.
Access Otter from Your Browser
Open your preferred browser, and enter "http://" and the public IP address for your instance followed by “:8626” (e.g., 12.345.567.89:8626).
If Otter opens, everything is configured correctly. It may take up to 30 minutes for Lightsail to finish creating the instance and installing Otter. If you cannot connect to Otter from your browser, please wait a few minutes and refresh the page.
Congratulations, you are now ready to access your Otter directly from any machine.
What’s Next?
Once you’ve set up an Otter instance, it’s time to learn some of Otter’s basic features. Our documentation will teach you everything you need to get started.