TeamCity
TeamCity is a CI tool that TeamCity has a lot of features to help with complex, monolithic Java applications, including proprietary code analysis and IntelliJ Integration. However, it generally requires using a separate deployment tool.
This is where BuildMaster can help, and in this article we'll discuss how to import build artifacts from TeamCity (so that you can deploy them later) as well as how to automatically run build configurations on TeamCity. To learn more about how the tools compare, see BuildMaster vs. TeamCity on our main site.
Connecting to TeamCity
BuildMaster's TeamCity integration allows you to connect to TeamCity at application creation or through the application's settings page. To connect BuildMaster to TeamCity:
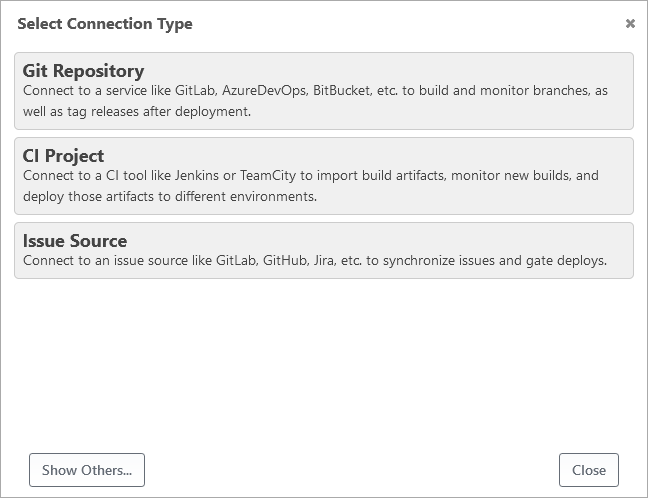
- Either create a new application or add a new connection on the application settings page, then select CI Project
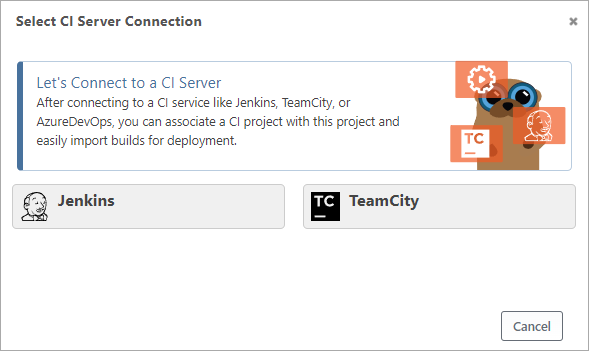
- Select the TeamCity connection type
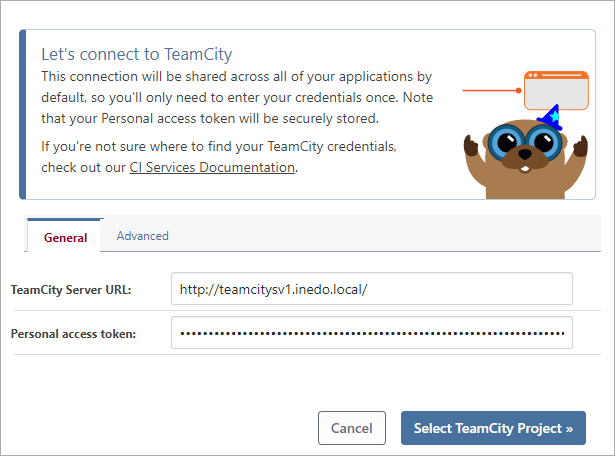
- Enter your TeamCity Server URL and Personal access token, then and click Select TeamCity Project
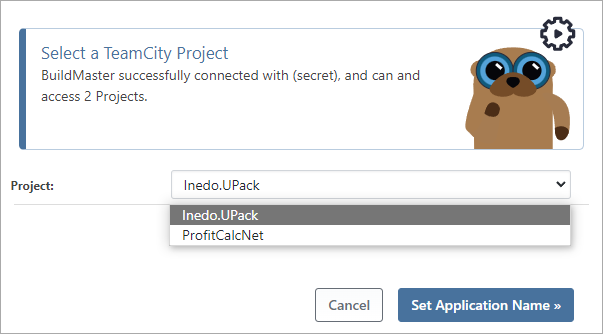
- Select your TeamCity Project then click Set Application Name.
After setting your application name, your TeamCity project will then be synchronized with your application, allowing you to browse TeamCity builds directly in BuildMaster.
Editing a TeamCity Connection
You can edit these items directly to enable advanced scenarios (such as a shared project) by clicking view all on the Settings page, or by going to Admin > Credentials & Resources. See Credentials & Resources to learn more.
Browsing TeamCity Builds
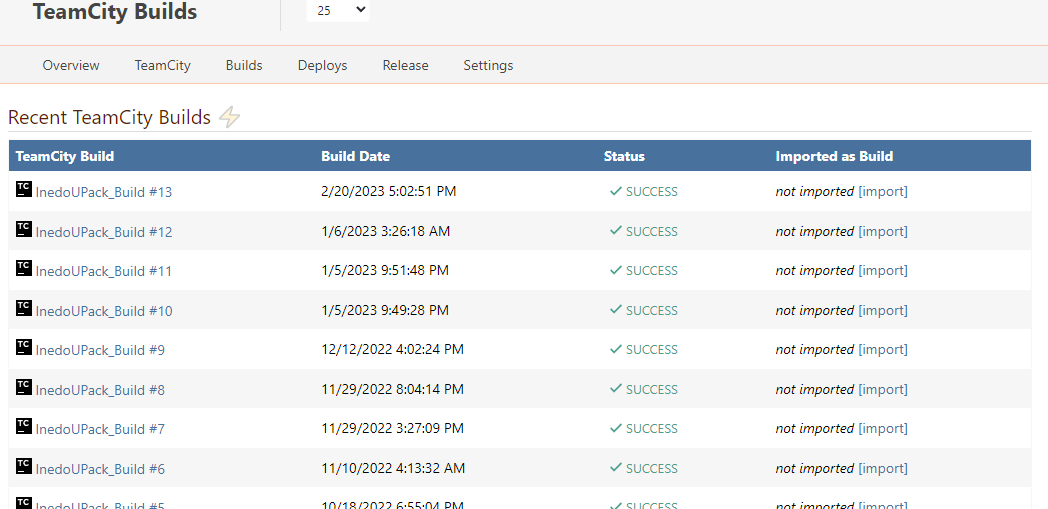
After adding a TeamCity project to an application, you will be be able to browse TeamCity builds and quickly import artifacts for later deployment. Simply click on the "TeamCity" tab to see recent builds and their status:
Clicking on an individual TeamCity build will display TeamCity's metadata about the build, including parameters and artifacts.
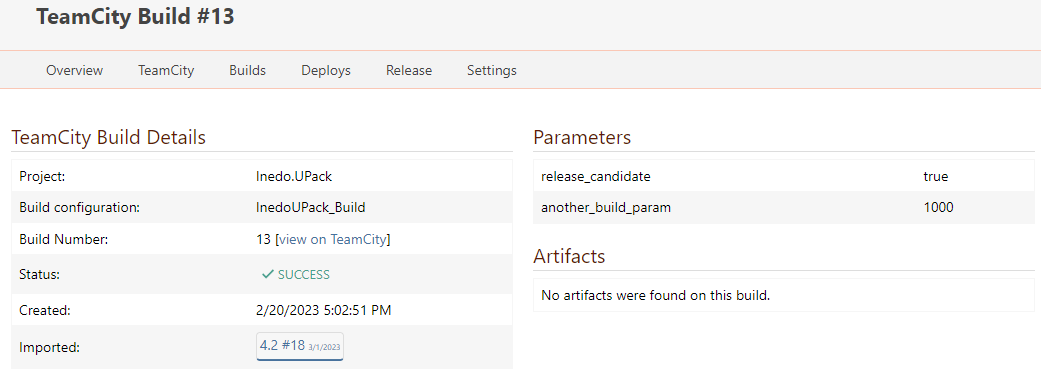
Click the "view on TeamCity" link to directly navigate to the build in TeamCity to see all of the details.
Build Configurations in TeamCity
Every TeamCity project has at least one build configuration, but some projects may have multiple.
Build numbers in TeamCity are scoped to a build configuration, which means that a single TeamCity project can have two different builds numbered #4: one under a build configuration named Build (the default value), and one for a configuration named Build-DotNetCore that was added to the project.
In lists, BuildMaster will prepend the scope name to the BuildNumber so that these builds can be distinguished as Build #4 and Build-DotNetCore #11. Internally, the build configuration is considered a "build scope" to BuildMaster.
Importing TeamCity Build Artifacts
When your application is connected to a TeamCity project, you'll be able to import artifacts by clicking the import button next to a build, or navigating to Builds > Import Build.
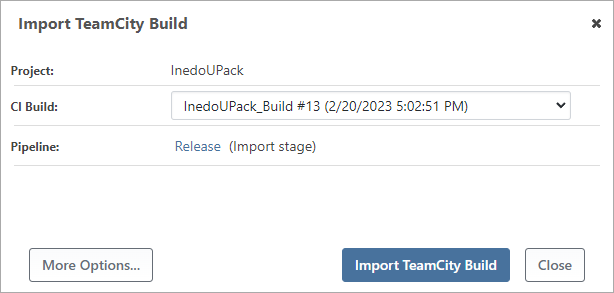
When importing a build in this manner, the selected TeamCity build number (along with the project and build configuration) will be associated with BuildMaster's build number and displayed throughout the UI.
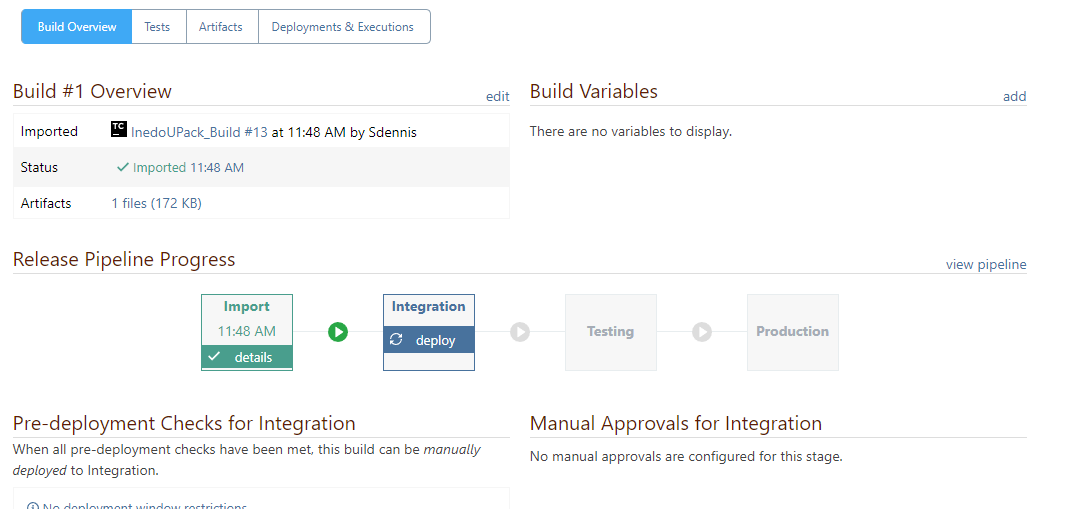
You can access these associated values in scripts with the $CIBuildNumber, $CIProjectScope, and $CIProject variable functions. The $CIProjectScope references the build configuration.
The $CIBuild variable function is BuildMaster's internal identifier and will be a concatenation of the build number and build configuration.
Import TeamCity Artifact Scripts & Operations
BuildMaster uses a script to import artifacts from TeamCity, and in most cases, you can simply use the Import CI Server Artifacts script template available under the Scripts tab of your application:
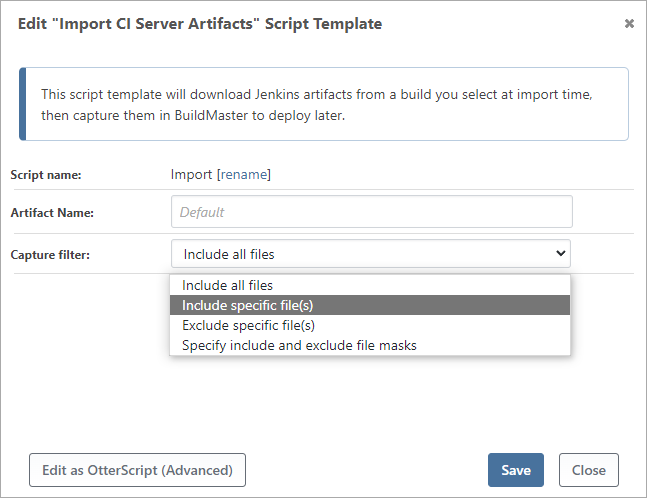
This template will attempt to download the artifacts from the associated TeamCity build ($CIBuildNumber) in the associated project ($CIProject) and then capture them as artifacts in BuildMaster for later deployment.
Under the hood, this script template uses OtterScript operations to import these artifacts. You can use these operations in your own OtterScript for more complex or advanced scenarios.
TeamCity::Import-Artifact Operation
When you don't specify any parameters, the operation will attempt to download artifacts from $CIBuild in $CIProject on the associated TeamCity server. If the BuildMaster build is not associated with a TeamCity build (and you don't have those variables defined), then the option will error.
However, there are some cases where you may not wish to associate your BuildMaster build with a TeamCity build, or use TeamCity resources at all. For example, if you use convention-driven design, then you may have everything specified by variables like $ApplicationName.
Here's how to import the artifacts from the last successful build within the ProfitCalc project (using the v8builds build configuration):
 TeamCity::Import-Artifact
 (
     Credentials: KramericaTeamCity,
     Project: ProfitCalc,
     BuildConfiguration: v8builds,
     BuildNumber: lastSuccessful,
     TeamCityBuildNumber => $TeamCityBuildNumber
 );

 Log-Information Imported artifacts from $TeamCityBuildNumber;
Note that the TeamCityBuildNumber is an output variable, which can be later used in OtterScript.
TeamCity::Queue-Build Operations
The TeamCity::Queue-Build can be used to queue/start new builds on your CI server. This can be useful in some cases like:
- Create different builds in TeamCity that are automatically triggered at check-in
- A Release Configuration build that instructs the compiler to optimize speed and does not include debugging symbols
- A Release Branch build that uses a different source control branch to create the build
- Inject contextual information from BuildMaster (release number, etc.) into the application code after it's checked-out but prior to being built by TeamCity; this information can be displayed when the application is running in an environment
- Link from TeamCity back to the application or build in BuildMaster, so you can have cross-links in both systems
Just as with the other operations, when you don't specify any parameters, the operation will use $CIBuild and $CIProject from the associated TeamCity project when queueing a new build.
By default, BuildMaster will queue the new build and continue executing your OtterScript. By setting WaitForCompletion to true, BuildMaster will wait until the queued build has completed prior to continuing its execution. When WaitForCompletion is enabled, BuildMaster will poll TeamCity every 2 seconds to check if the build has completed.
TeamCity::Queue-Build
(
    WaitForCompletion: true,
    Project: $ApplicationName,
    Branch: master,
    BuildConfiguration: RCBuild,
    AdditionalParameters: buildType=release,
    TeamCityBuildNumber => $TeamCityBuildNumber
);

TeamCity::Import-Artifacts
(
    Project: $ApplicationName,
    BuildConfiguration: RCBuild,
    BuildNumber: $TeamCityBuildNumber
);
This example will also pass the buildType=release as an additional parameter.
Pipeline: Import & Deploy TeamCity Artifacts
BuildMaster can support a wide variety of workflows through the use of pipelines. To help guide you through deploying your CI build, BuildMaster includes an Import & Deploy Artifacts pipeline.
To learn more about this, see Pipeline: Import & Deploy Artifacts.
TeamCity Project Monitors
BuildMaster can monitor your TeamCity project for new builds, then perform an action like importing artifacts into a BuildMaster build by creating a build using a script, pipeline, release, or a custom script. Builds can be triggered based on a TeamCity build status and, optionally, certain build parameters to be set.
You can add a CI project monitor by clicking on the ⚡ icon on the TeamCity page or on the application settings page.
BuildMaster builds can be triggered when a CI build has completed with a status of:
- Only successful builds
- Any build status
- A specific build status (e.g. SUCCESS, WARNING, etc.)
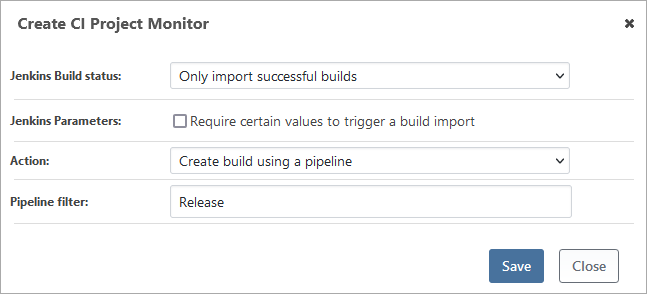
To learn more, see the Resource Monitors & Scheduled Jobs documentation.
Deploying TeamCity Artifacts
Once an artifact is captured via the optional queuing followed by import operations, future stages simply need to use the Deploy-Artifact operation to deploy to any number of servers or targets:
Deploy-Artifact archive.zip
(
    To: E:\Websites\ProfitCalc
);
See Deployment Scripts & Templates to learn more.
Special Build Names
BuildMaster can reference TeamCity builds with the following special build names instead of direct build numbers:
lastSuccessful- refers to the last build that was successfully completedlastPinned- refers to the last build that was pinnedlastFinished- refers to the latest build, regardless of whether it was successful or not (should rarely be referenced in BuildMaster)
Additionally, builds may be referenced by their underlying TeamCity ID as opposed to name/number by appending :id as the build number suffix. For example:
 TeamCity::Import-Artifact
 (
     Credentials: KramericaTeamCity,
     Project: ProfitCalc,
     BuildConfiguration: v8builds,
     BuildNumber: 1234:id,
     Artifact: profit-calc-web.zip
 );
In general, you should avoid using build numbers or TeamCity IDs directly in OtterScript as in the example above. Instead, you should capture the actual build number as a variable, and use that instead.
Branches in TeamCity
TeamCity supports builds created from feature branches, and both import and queue operations support the use of these branches.
For example, you can import artifacts from the last successful calculation-fix build on the ProfitCalc project by specifying the Branch parameter on the operation.
 TeamCity::Import-Artifact
 (
     Credentials: KramericaTeamCity,
     Project: ProfitCalc,
     BuildConfiguration: v8builds,
     Branch: calculation-fix,
     Artifact: profit-calc-web.zip
 );
The Branch parameter is generally only useful in conjunction with special build names because specific build numbers are already unique per branch.
While leaving the Branch property blank will refer to the <default> branch for the project, you may also specify one in the plan to limit the results of lastSuccessful, and optionally filter branch names with BuildMaster variables, for example: Branch: feature-$ReleaseNumber.
Automatically Importing to BuildMaster after a CI Build
Instead of monitoring a TeamCity project for the completion of a build, you may want to have TeamCity trigger the import. This can be done programmatically using the Release & Build Deployment API.
If you want to specify the build number to import from, simply specify it as a variable (e.g. $TeamCityBuildNumber) when making the API request. This will automatically create a build-scoped variable that can then be used in your OtterScript plans to import artifacts from that build.
Example: Triggering an Importing Artifact Build Using PowerShell
Invoke-WebRequest http://{buildmaster-server}/api/releases/builds/create `
  -ContentType "application/json" `
  -Method POST `
  -Body '{"applicationName": "hdars", "releaseNumber": "2.14.0", "$TeamCityBuildNumber": "88512" }' `
-Headers @{"X-ApiKey" = "<api-key>"}
In this article
- Connecting to TeamCity
- Browsing TeamCity Builds
- Importing TeamCity Build Artifacts
- Import TeamCity Artifact Scripts & Operations
- Pipeline: Import & Deploy TeamCity Artifacts
- TeamCity Project Monitors
- Deploying TeamCity Artifacts
- Special Build Names
- Branches in TeamCity
- Automatically Importing to BuildMaster after a CI Build

