Azure DevOps

Azure DevOps is a CI/CD service provided as part of Microsoft's Azure platform. Their pipelines support containers natively, so many shops building and deploying containers turn to Azure DevOps Pipelines. BuildMaster is designed to work alongside Azure DevOps to provide a self-managed CI/CD solution using BuildMaster's Git Integration, Issue Tracking, and Importing Builds.
Connecting to Azure DevOps
BuildMaster's Git Integration allows you to connect to Azure DevOps at application creation or through the application's settings page. To connect BuildMaster to Azure DevOps:
- Either create a new application or add a new connection on the application settings page, then select Git Repository
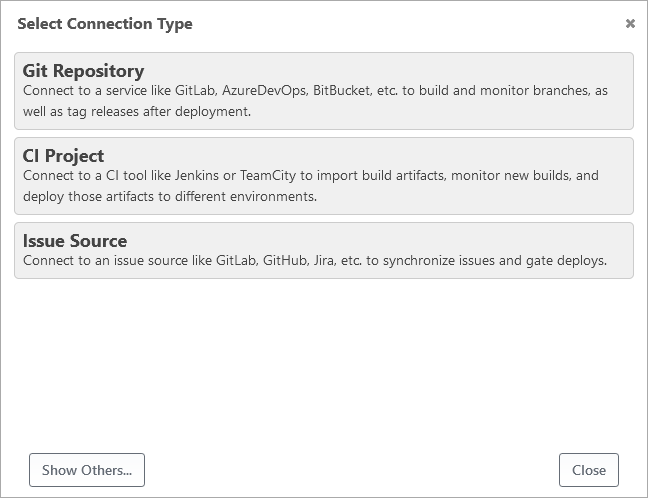
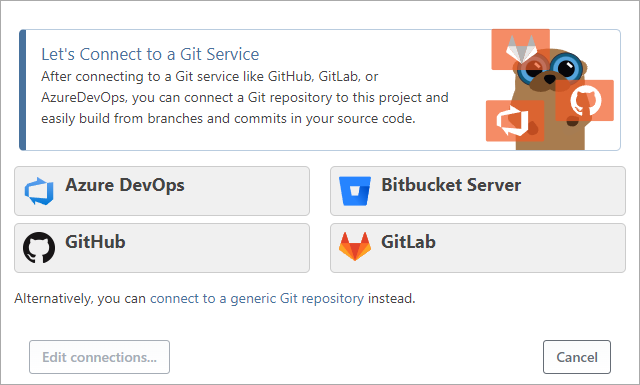
- Select the Azure DevOps connection type
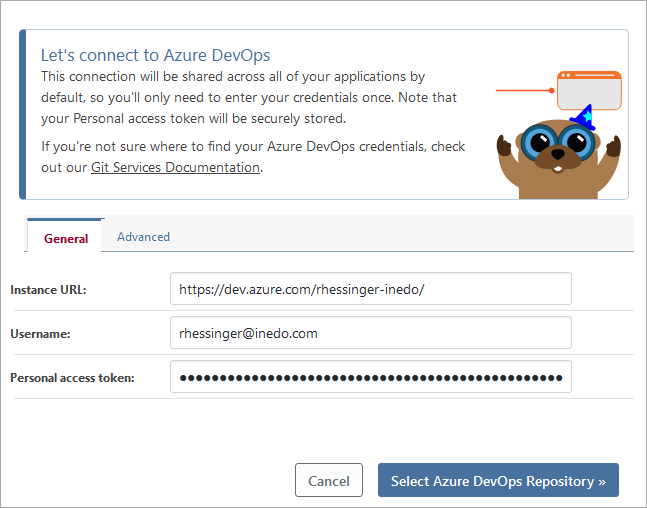
- Enter your Azure DevOps instance URL, user name, and [personal access token(#Generating-a-Azure-DevOps-Personal-Access-Token)] and click Select Azure DevOps Repository
- Select your Azure DevOps project and enter or select your repository and click Save Repository
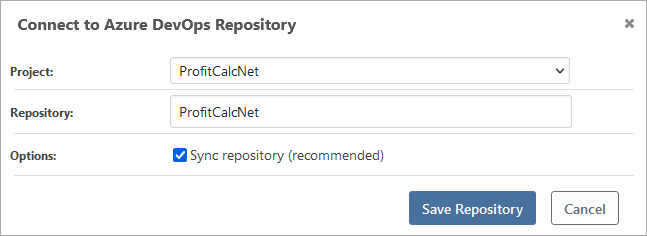
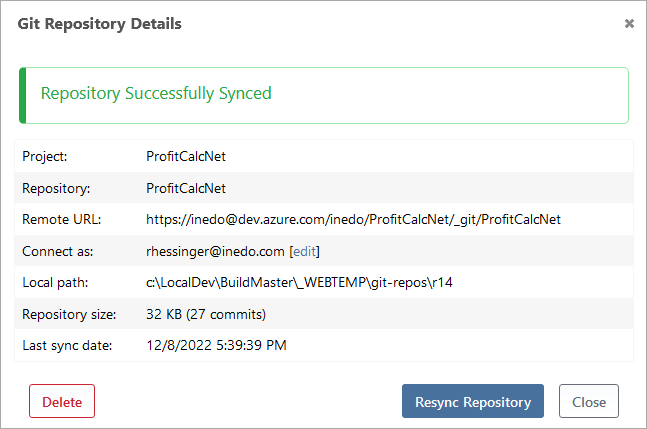
The Azure DevOps repository will then be synchronized to your server and you will see a successfully synced message.
Editing a Azure DevOps Connection
You can edit these items directly to enable advanced scenarios (such as a shared repository) by clicking View All on the Settings page, or by going to Admin > Credentials & Resources. See Credentials & Resources to learn more.
Generating a Azure DevOps Personal Access Token
When connection BuildMaster to Azure DevOps, you need to use a Azure DevOps Personal Access Token (PAT). To generate this token:
- Navigate to your Azure DevOps project
- In the upper right corner, click user settings icon, and then click Personal Access Token
- Click "+ New Token"
- Enter a Name, select your organization, enter an expiration, and select the following scopes
Work Items-Read & WriteCode-FullBuild-Read & execute(Only required if importing builds)Release-Read, write, & execute(Only required if importing builds)
- Click Create
Browsing Azure DevOps Repositories
After adding a synchronized Azure DevOps repository to an application, you'll be able to browse that repository's branches, source code, and commits—as well as the changes between builds/releases—directly from BuildMaster's web UI. See our synchronized git repositories documentation to learn more.
When viewing branch, tag, or commit details, you can also click the "browse on Azure DevOps" link to view details in Azure DevOps directly.
Issue Tracking
By connecting your BuildMaster application to an Azure DevOps issue tracker, your work items will be automatically synchronized with BuildMaster's issues. This will allow you to browse issues, tie them to specific releases, and block releases when there are untested or unresolved issues from within BuildMaster. See our Azure DevOps Issue Tracking documentation for more information.
BuildMaster also allows you create or update your work items using OtterScript operations.
Integrating Azure DevOps Builds
BuildMaster allows you to import artifacts from your Azure DevOps builds and deploy them to your server. BuildMaster includes a number of OtterScript operations for working with Azure DevOps Builds, see our Importing Builds from Azure DevOps for more information.
Azure DevOps and Scripting
If your application uses a synchronized Azure DevOps repository, you can create a build from any commit of the repository. When you create a build in this way, the selected commit—along with its branch and repository—will be associated with that build and displayed at UI.You can access those values in scripts with the $Commit, $Branch, and $Repository variable functions. See Git Build Scripts & Automations for more information.
Azure DevOps Git Operations
The Azure DevOps integration supports all standard BuildMaster Git operations, but there are a few things to keep in mind when using these operations. Azure DevOps credentials are tied to an organization and that organization consists of multiple projects, with each project having one or more Git repositories. This is different from other Git repositories because there is an additional project layer between your organization and your Git repository.
Using Other Git Repositories
By default, Git::Checkout-Code will use your Git Connection to connect to the repository. If you would like to select a repository that is different than what your Git connection specifies; find your Azure DevOps Repository URL, remove the user name from it (ex., use https://dev.azure.com/kramerica/Kramerica-Project/_git/Kramerica instead of https://sdennis@dev.azure.com/kramerica/Kramerica-Project/_git/Kramerica), then set the RepositoryUrl parameter to it in theGit::Checkout-Code operation.
In these cases, you can specify input parameters like this.
Git::Checkout-Code
(
    RepositoryUrl: https://dev.azure.com/kramerica/Kramerica-Project/_git/Kramerica,
    BranchOrCommit: master,
    To: c:\build\space\src,
    CommitHash => $CommitId
);
Log-Information Checked out at $CommitId from my-repo;
Git::Set-CommitStatus Operation
Azure DevOps allows you to set the "status" of a particular commit, as it relates to a successful build. This status is often displayed in Azure DevOps' UI when listing commits.
To set this status in BuildMaster, you can simply call the operation with the desired status. In general, you'll want to use a try..catch statement as follows:
Git::Checkout-Code;

Git::Set-CommitStatus pending;
try
{
    ... perform build operations...
    Git::Set-CommitStatus success;
}
catch
{
    Git::Set-CommitStatus error;
    throw;
}
Like the Git::Checkout-Code operation, the operation will use $Commit and $Repository if you don't specify them as parameters. The operation can also automatically determine the status, but you can override that by specifying the Status parameter:
pending- a build is about to start or is runningsucceeded- build completed successfullyfailed- execution didn't complete or there was an error unrelated to build compilation/testserror- execution completed but with a build errornotApplicable- the status is not applicable for that commitnotSet- sets the commit status back to its default stateauto- BuildMaster choosessucceededorerrorbased on current state
GitCreate-PullRequest and GitMerge-PullRequest
Just like Git::Checkout-Code, the Git::Create-PullRequest operation will use your Git Repository connection to create a pull request. Here is an example of using a repository that is different from the one specified in your Git Repository connection:
Git::Create-PullRequest
(
    Title: My New Thing,
    Target: main,
    Repository: https://dev.azure.com/kramerica/Kramerica-Project/_git/Kramerica
);
This operation will also record the ID of the Pull Request on the Build, so that you can later access it with $PullRequestId.
Azure DevOps Work Item Operations
AzureDevOps::Find-WorkItems
This operation allows you to find work items in Azure DevOps for use in your OtterScript.
To find all work items in the Kramerica project under iteration path 1.10.0, you can use this operation:
AzureDevOps::Find-WorkItems
(
    Credentials: AzureCredentials,
    Project: Kramerica,
    IterationPath: 1.10.0,
    Output => @workItems
);
Find-WorkItems will return a list of mapped objects. You can then convert each item to a map variable using a foreach in OtterScript.
foreach %item in @workItems
{
    Log-Debug %item[Id] %item[System.Description];
}
Each item must be converted to a map variable, not a scalar variable.
WIQL Filter
By default, BuildMaster will start with the following [WIQL query](https://docs.microsoft.com/en-us/azure/devops/boards/queries/wiql-syntax?view=azure-devops) to find work items.
SELECT [System.Id], [System.State], [System.Title], [System.Description]
FROM WorkItems
If the ProjectName and IterationPath are specified, BuildMaster will add WHERE [System.TeamProject] = 'PROJECT_NAME' AND [System.IterationPath] UNDER 'ITERATION_PATH' to the query. If the Filter parameter is included, it will also append that filter to the where clause of the query.
When there is a need to perform a more complex WIQL query, you can specify the entire query to the CustomWiql parameter. When using that parameter, ProjectName, IterationPath, and Filter will be ignored.
AzureDevOps::Create-WorkItem
Use this operation to create a new work item in Azure DevOps.
To add a new work item in the Kramerica project under the 1.10.0 iteration path, you can use this operation:
AzureDevOps::Create-WorkItem
(
    Credentials: AzureCredentials,
    Project: Kramerica,
    Type: Task,
    Title: QA Testing Required for $ApplicationName,
    IterationPath: 1.10.0,
    Description: This issue was created by BuildMaster on $Date
);
You can also access the ID of the recently created work item by assigning a variable to the WorkItemId parameter (e.g. WorkItemId => $WorkItemId).
AzureDevOps::Update-WorkItem
Use this operation to update an existing work item in Azure DevOps.
To update a work item in the Kramerica project, you can use this operation:
AzureDevOps::Update-WorkItem
(
    Credentials: AzureCredentials,
    Project: Kramerica,
    Id: $WorkItemId,
    State: In Progress
);
By default, you can update the following fields on a work item:
- Title
- Description
- Iteration Path
- State
If you would like to update a field that is not included out of the box, you can pass a map variable to the OtherFields parameter. The map variable must use the field name defined in WIQL. For example, if you want to upgrade the "Integration Build" field you would use the following OtterScript:
AzureDevOps::Update-WorkItem
(
    Credentials: AzureCredentials,
    Project: Kramerica,
    Id: $WorkItemId,
    OtherFields: %(Microsoft.VSTS.Build.IntegrationBuild:$ReleaseNumber.$BuildNumber)
);
Azure DevOps Build Operations
See our Importing Builds from Azure DevOps documentation for the available OtterScript operations.
Installing the Azure DevOps Extension
The Azure DevOps extension is installed by default when you install BuildMaster. You can upgrade the extension by simply navigating to the Admin > Extensions page in your instance of BuildMaster and clicking the update link to the right of the Azure DevOps extension. Once the Azure DevOps extension has been upgraded, it can be downgraded back to the built-in version by navigating to Admin > Extensions > Azure DevOps and then selecting the Change Version button in the upper right corner.
If your instance doesn't have Internet access, you can upgrade/downgrade it by manually install the Azure DevOps extension after downloading the Azure DevOps Extension Package.
Built-in extensions cannot be deleted or downgraded past the included version.