
- BuildMaster
- Getting Started with BuildMaster
- Builds and Continuous Integration
- What is a "Build" in BuildMaster?
- Git and Source Control
- Git Pipelines and Workflows
- Build Scripts & Templates
- Packages & Dependencies
- Build Artifacts
- Automated Testing & Verification
- Deployment & Continuous Delivery
- What is a “Pipeline” in BuildMaster?
- CI Server (Jenkins, TeamCity, etc.) Integration
- Deployment Scripts & Templates
- Automatic Checks & Approval Gates
- Manual Deployment Steps and Tasks
- Databases
- Configuration Files
- Rollbacks
- Advanced CD Patterns
- Applications & Releases
- Connecting to your Servers with BuildMaster
- Scripting in BuildMaster
- Configuring for Your Team
- Docker/Containers
- Development Platforms
- Deployment Targets
- Tools & Service Integrations
- Reference
- BuildMaster API Endpoints & Methods
- Extending BuildMaster
- Built-in Functions & Variables
- Applications
- Builds
- Configuration Files
- Containers
- Credentials
- Databases
- DotNet
- Environments
- Executions
- Files
- General
- Jira
- JSON
- Linux
- Lists
- Maps
- Math
- Nuget
- Packages
- Pipelines
- PowerShell
- Python
- Releases
- Servers
- Strings
- Windows
- XML
- Built-in Operations
- Batch
- BuildMaster
- Configuration Files
- Databases
- DotNet
- Files
- Firewall
- General
- Apply-Template
- Attach Package
- Concatenate-Files
- Copy-Files
- Create-Directory
- Create-File
- Create-Package
- Create-ZipFile
- Delete-Files
- Download-Asset
- Download-Http
- Ensure-Directory
- Ensure-File
- Ensure-HostsEntry
- Ensure-Metadata
- Ensure-Package
- Exec
- Get-Http
- Install-Package
- OSCall
- OSExec
- Post-Http
- Push-PackageFile
- Query-Package
- Remediate-Drift
- Rename-File
- Repackage
- Replace-Text
- Send-Email
- Set-FileAttributes
- Set-Variable
- Sleep
- Transfer-Files
- Upload-Assets
- Upload-Http
- Git
- GitHub
- IIS
- Jira
- Nuget
- PowerShell
- ProGet
- Python
- Registry
- Scripting
- Servers
- Services
- Shell
- Windows
- Administration
- Installation & Upgrading
- ProGet
- Getting Started with ProGet
- Packages: Managing & Tracking
- Feeds Types & Third-Party Packages
- What is a "Feed" in ProGet?
- What is a "Connector" in ProGet?
- NuGet (.NET)
- Universal Feeds & Packages
- PowerShell
- Chocolatey (Windows/Machine)
- RubyGems (ruby)
- Open VSX Extension (vscode)
- Visual Studio Extension (.vsix)
- Maven (Java)
- npm (Node.js)
- Bower (JavaScript)
- Debian (Apt)
- Helm (Kubernetes)
- PyPI (Python)
- Conda (Python)
- RPM (Yum)
- Alpine (APK)
- CRAN (R)
- pub (Dart/Flutter)
- Cargo (Rust)
- Terraform Modules
- Conan (C++)
- Composer (PHP)
- Other Feed Types
- Asset Directories & File Storage
- Docker and Containers
- Replication & Feed Mirroring
- Software Composition Analysis (SCA)
- Security and Access Controls
- Cloud Storage
- Administration
- Installation & Upgrading
- API Methods and CLI Commands
- Otter
- Getting Started with Otter
- Orchestration & Server Automation
- Connecting to your Servers with Otter
- Collecting & Verifying Configuration
- Drift Remediation / Configuration as Code
- Scripting in Otter
- Configuring for Your Team
- Installation & Upgrading
- Administration & Maintenance
- Reference
- Otter API Reference
- OtterScript Reference
- Built-in Functions & Variables
- Executions
- Files
- General
- JSON
- Linux
- Lists
- Maps
- Math
- PowerShell
- Python
- Servers
- Strings
- XML
- Built-in Operations
- Batch
- Docker
- DotNet
- Files
- Firewall
- General
- Apply-Template
- Collect Debian Packages
- Collect RPM Packages
- Collect-InstalledPackages
- Concatenate-Files
- Copy-Files
- Create-Directory
- Create-File
- Create-Package
- Create-ZipFile
- Delete-Files
- Download-Asset
- Download-Http
- Ensure-Directory
- Ensure-File
- Ensure-HostsEntry
- Ensure-Metadata
- Ensure-Package
- Exec
- Execute Python Script
- Get-Http
- Install-Package
- OSCall
- OSExec
- Post-Http
- Push-PackageFile
- PYCall
- PYEnsure
- Query-Package
- Remediate-Drift
- Rename-File
- Repackage
- Replace-Text
- Send-Email
- Set-FileAttributes
- Set-Variable
- SHEnsure
- Sleep
- Transfer-Files
- Upload-Assets
- Upload-Http
- IIS
- Otter
- PowerShell
- ProGet
- Python
- Registry
- Servers
- Services
- Shell
- Windows
- Installation & Maintenance
- Windows (Inedo Hub)
- Linux (Docker)
- High Availability & Load Balancing
- User Directories & Domains (LDAP)
- Logging & Analytics
- SAML Authentication
- When to Upgrade your Inedo Product
- Managing Agents and Servers
- Backing Up & Restoring
- Installation Configuration Files
- PostgreSQL & Inedo Products
- SQL Server & Inedo Products
- Inedo Agent
- What is the Inedo Agent?
- Installation & Upgrading
- Downloads & Release Notes
- Maintenance & Configuration
- Internal Architecture
- MyInedo
- OtterScript (Execution Engine)
- Reference
- OtterScript
- Inedo Execution Engine
- Romp (Discontinued)
- Using Romp
- Installing, Configuring, and Maintaining
- Romp CLI Reference
- Package Layout
- Downloads & Source Code
- Extensibility
- Inedo SDK
Deployment Windows

Deployment windows allow you to restrict the days and times that builds may be deployed. They can be used together with manual deployments to enforce existing policies, or as part of a continuous delivery pipeline to ensure deployments occur within specified times.
When multiple deployment windows are specified, a build will be deployed as long as it’s within one of the specified windows.
Combining windows lets you cover different needs at once. For instance, to avoid deploying during peak traffic, you might create a weeknight production window from 22:00 to 02:00 on Monday through Thursday, which carries over into the following morning. You could also restrict risky releases to weekends by creating separate windows for Saturday and Sunday. A build can be deployed in any of these windows, and will wait if it arrives outside all of them.
Configuring Deployment Windows
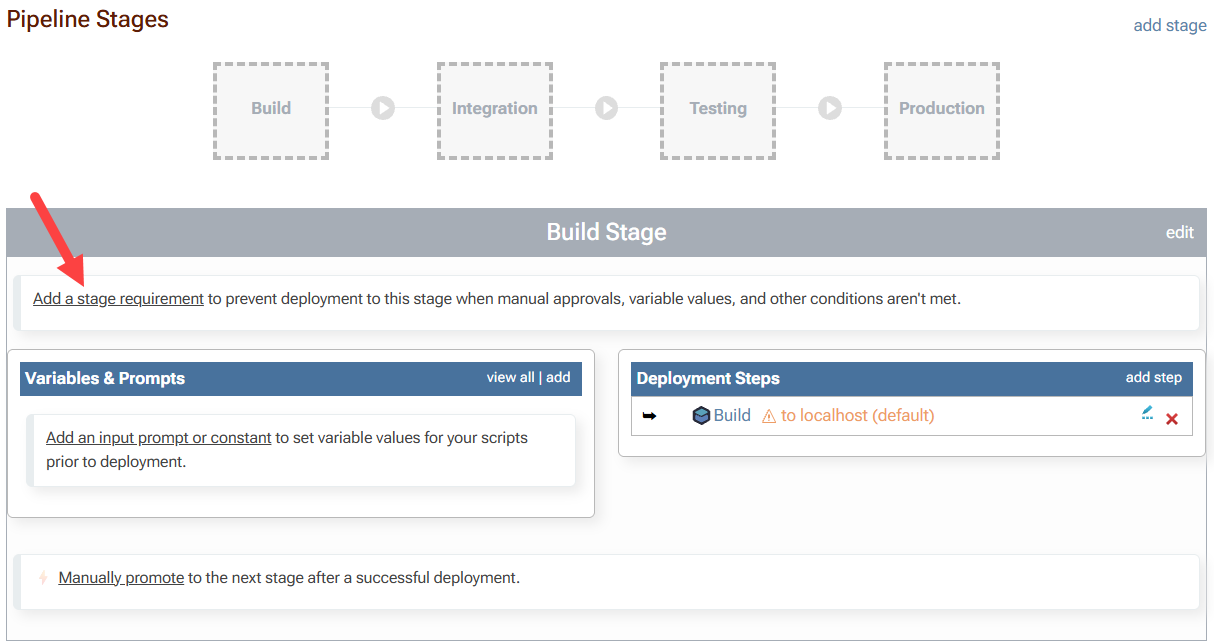
You can view the Deployment Windows function by navigating to the release's pipeline, then selecting "Add a stage requirement" under a pipeline stage.
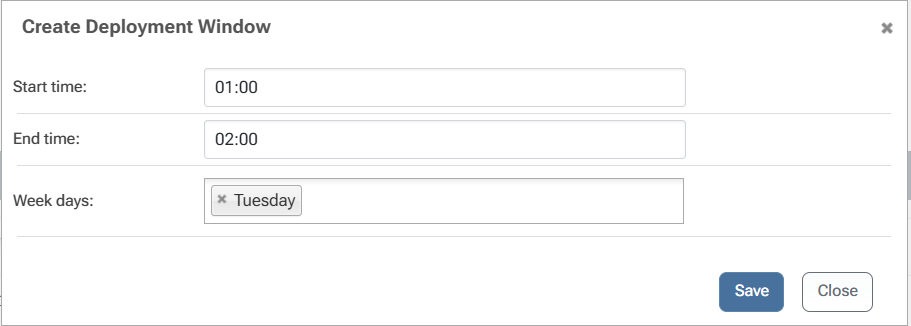
Select "Add Deployment Window" from the Stage Requirement Check window. From here, you can configure your deployment window.
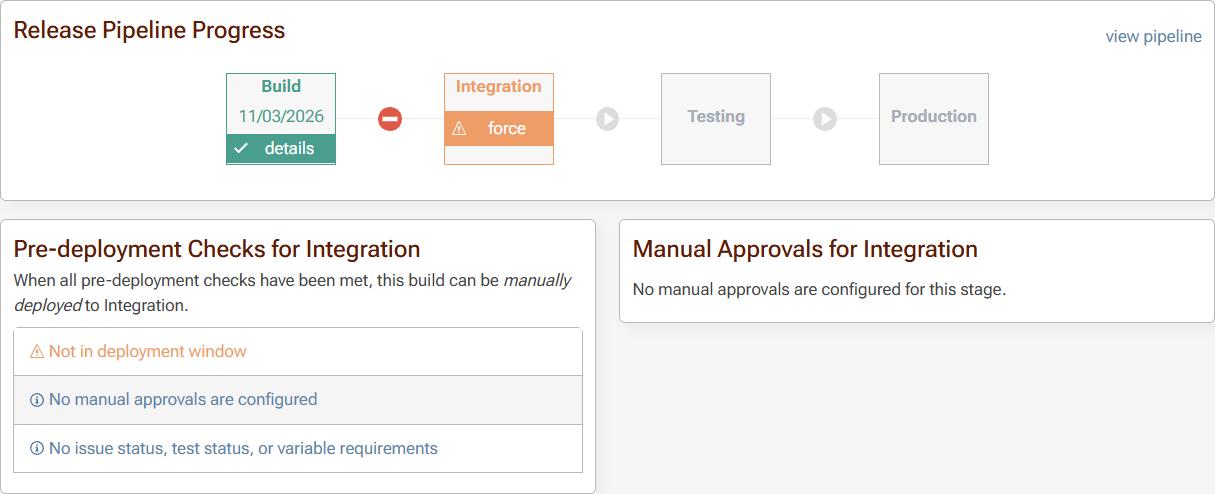
Afterwards, a commit prompt will appear at the top of the page. Select "Commit Changes" to create the deployment window. Now, when a deployment window is part of a stage in your build's pipeline, it can be seen under "Pre-Deployment Checks".
Note that if you set the end time earlier than the start time, the window will carry over to the following day. For example, specifying “Sundays after 11:00pm and before 2:00am” will create a three-hour window from Sunday at 11:00pm until Monday at 2:00am.
Deploying Outside a Deployment Window
Like user approvals, a build may be forced to a stage even if it's not within the specified window. You can "force" the deployment by navigating to the build, selecting the relevant build, and then selecting "force".
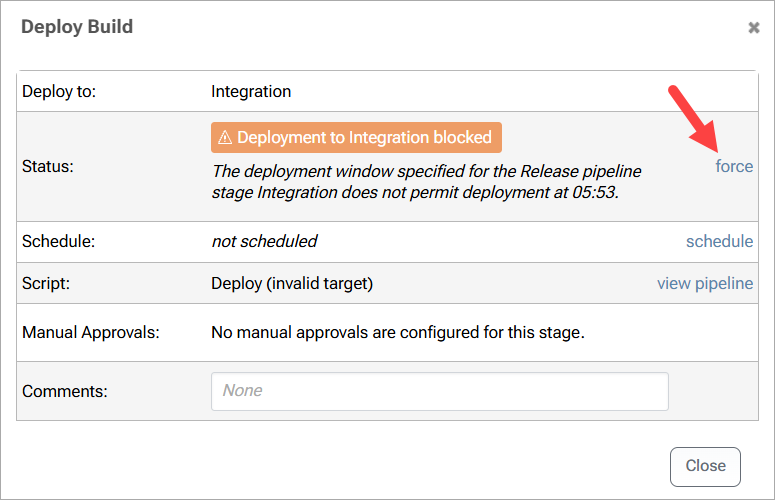
You can also leave a comment when forcing the deployment.