Build Scripts & Templates

Build scripts are used to create artifacts or packages for later deployment. Every build script is a little different, but they will all generally create these artifacts or packages by getting code from a source code repository like Git, then running a tool like MSBuild or gradle to compile and test the code.
A build script is run when a build is created, typically as the first stage of a pipeline. Although build scripts are created in OtterScript, they're easy to edit using Script Templates and the Visual-to-Text Editor.
Creating a Build Script
To create a Build Script, navigate to Settings > Scripts, then click Add Script. You'll be presented with several options:
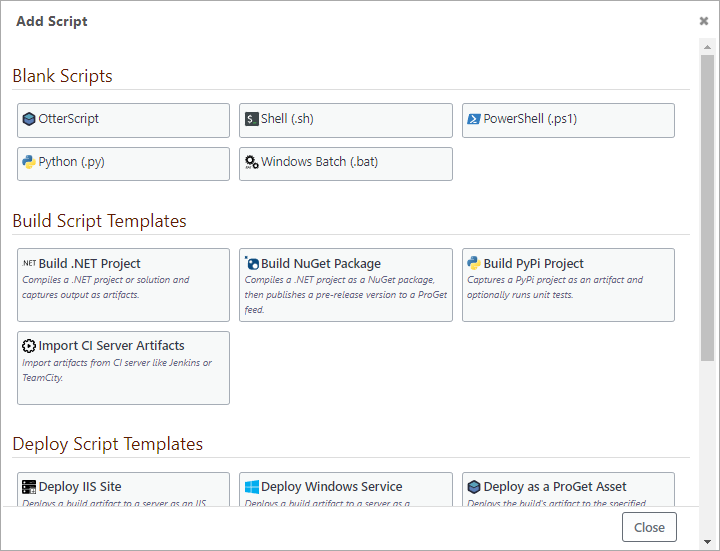
You can create a build script in any supported language, or use a Build Script Template that will do most of the work for you. As long as the script starts with "Build" (e.g. Build, BuildMyApp, Build-Net7), it will be considered Build Script and show up as a build option when you create new builds.
Build Script Templates
BuildMaster includes several Build Script Templates that are designed to handle most projects built on popular development platforms and targets, including:
- Build .NET Project; compiles a .NET project/solution, runs test, tracks NuGet package usage, captures build artifacts for later deployment
- Build NuGet Package; compiles a .NET project as a NuGet package, runs tests, then publishes a pre-release version to a ProGet feed.
- Build PyPI Project captures a PyPI project as an artifact and optionally runs unit tests.
Creating and editing a Script Template won't feel like you're writing a script at all. For example, a Build .NET Project script template will look something like this:
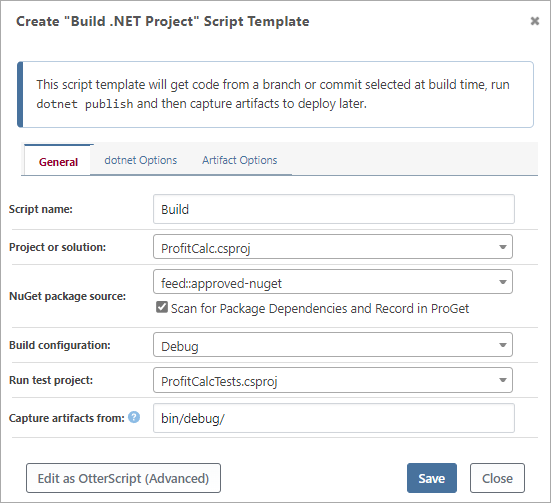
Despite not looking anything like a script, these are called script templates because they use OtterScript behind the scenes. The script template is simply modifying certain properties of various operations in a pre-defined OtterScript.
Converting Script Templates to OtterScript
To see or edit the underlying OtterScript in your script template, click the Edit as OtterScript button.
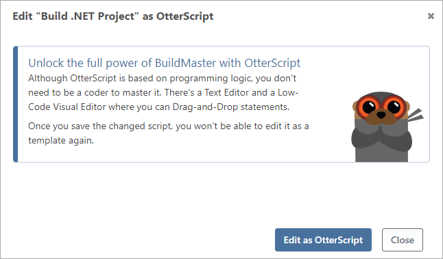
After clicking Edit as OtterScript, you'll be able to use the OtterScript Editor, and switch back-and-forth between text mode and low-code, visual-editor mode to drag-and-drop statements.
When you save the OtterScript (i.e. click Commit), you won't be able to edit it as a template again.
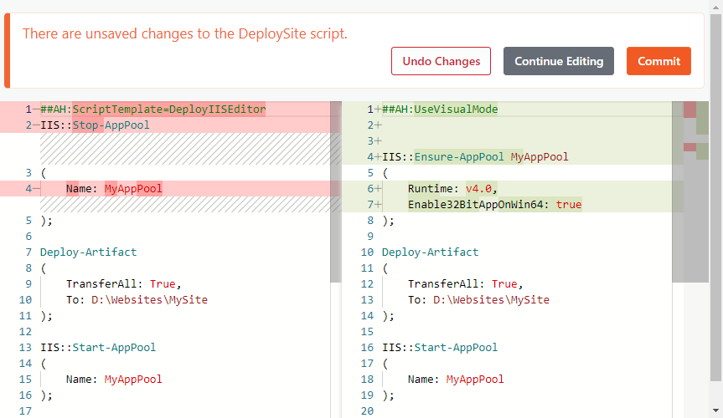
Undoing "Edit as OtterScript" Button
If you haven't clicked the Commit button to save the changes, you can simply click Review Changes, and then Undo Changes on the Comparison Page:
Build Scripts & Servers
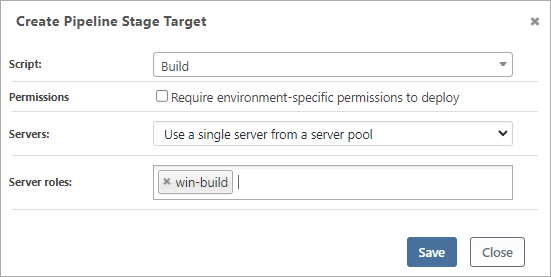
BuildMaster generally runs scripts using a deployment target that's specified in a pipeline stage (e.g. Build for build scripts). Deployment targets give you a lot of options including specifying servers by name or using a server pool.
In many cases, the deployment target will be one of a handful of build servers that you've created for different platforms (e.g. winbuildsvr, pythonbuildsvr, etc.). Or, it might be the same server that BuildMaster is running on (i.e. localhost) to run your builds.
You can also target build scripts against a server pool, which will allow you to use the next available server in a specified role. To use a build server pool, simply create a role that describes the platform you want to build (e.g. win-build or python-build), and add appropriate servers to that role.
Creating a Build Script from Scratch
Although every build script is a little different, most will follow five general steps.
1. Get Source
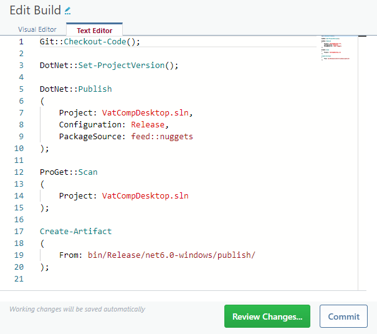
This step will generally fetch code changes from your source control system in order to build and run tests against them. There are a lot of options for doing this in BuildMaster, the simplest is to checkout code from the commit associated with the build, like this:
Git::Checkout-Code();
See Git & Source Control and Using SVN, TFS, etc. to learn more.
2. Compile Project
On some platforms, this step is the most complicated, as it involves preparing the source code for compilation by setting version numbers, pulling packages and libraries, and then running a build tool such as MSBuild, Maven, make, etc.
On other platforms, like PHP or Python, this step is very simple—and may not involve any operations at all. There's nothing to compile, after all.
For example, building a .NET project with a custom NuGet package source may look like this:
DotNet::Set-ProjectVersion();

DotNet::Publish ProfitCalc.csproj
(
    Configuration: Debug,
    PackageSource: feed::approved-nuget
);
3. Record Dependencies
This step involves performing some kind of analysis on the compiled code, such as running a static analysis tool like SonarQube or FxCop and scanning for dependency usage.
For example, scanning for open-source libraries and dependencies may look like this:
ProGet::Scan
(
    Project: ProfitCalc.csproj
);
See Build Packages & Dependencies to learn more.
4. Run Tests
This step involves performing executing unit tests, static analysis tools, or capture reports by running tools like SonarQube, FXCop, VSTest, XUnit, etc.
For example, testing a .NET project may look like this:
DotNet::Test
(
    Project: MyTestProject.scproj
);
See Unit Tests and Build Reports to learn more.
5. Capture Artifacts
The final step will capture build artifacts or packages from the build output once all tests pass.
For example, capturing the artifacts from a .NET project may look like this:
Create-Artifact
(
    From: bin/debug/
);
See Build Artifacts to learn more.