What is a "Build" in BuildMaster?

A build in BuildMaster is primarily used to take an application's code at a particular point in time (a "commit" in Git terms), build/compile it, and then deploy it to a series of test environments before it finally goes into production.
Builds can also be used to:
- import artifacts from a CI server
- build and publish packages for developer libraries (NuGet, Python, etc.)
- deploy Docker container images
- run scripts for general purposes or to control other applications
Because of the wide variety of use cases, builds have a lot of features including pipelines, releases, artifacts, unit tests, reports, variables, notes, etc.
This article will cover the high-level use cases of builds, including:
- Git & Source Control Integration
- CI Server (Jenkins, etc.) Integration
- Creating a Build
- Deploying a Build
- Build Lifecycle, Pipelines, and Releases
Git & Source Control Integration
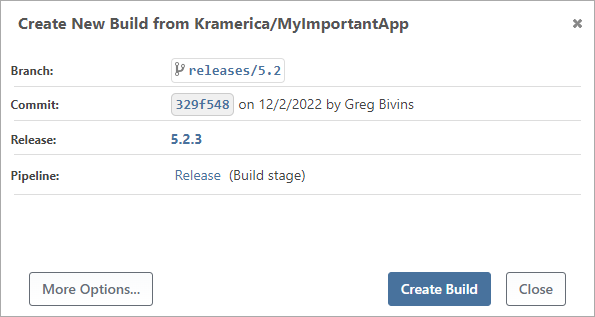
Builds can be tightly integrated with Git services such as GitHub, GitLab, Azure DevOps, and BitBucket. This makes it easy to create a build from any commit in a repository:
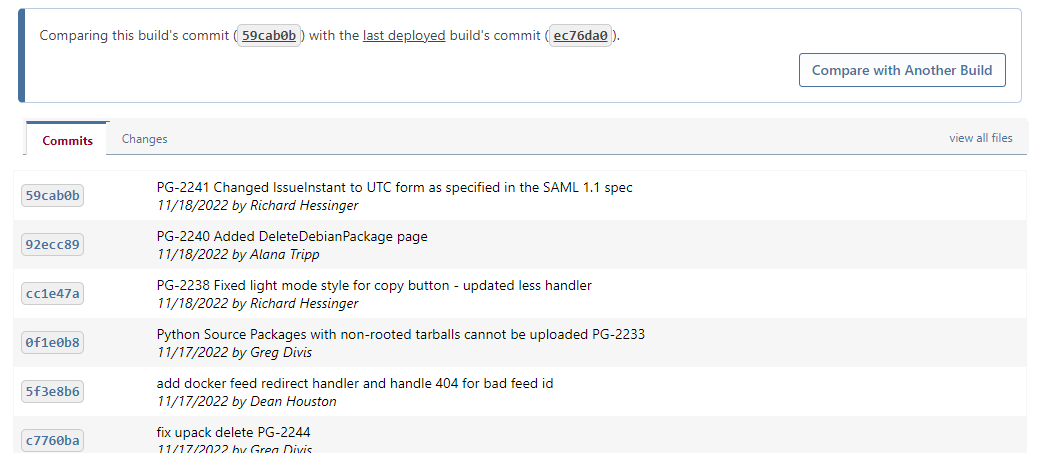
This also allows you to quickly compare changes between builds and navigate directly to individual commits or file changes. When you navigate to the Code tab of a build, you can see all commits made between that build and the previously deployed build:
See Git & Source Control to learn more.
SVN, TFS, and Other Source Control
BuildMaster also supports other source control providers; see Using SVN, TFS, etc. to learn more.
CI Server (Jenkins, etc.) Integration
Builds can be tightly integrated with CI servers like Jenkins or TeamCity, so you can "import" artifacts from a build on those servers and then deploy those artifacts later with BuildMaster.
For example, after integrating your application into a Jenkins project, a Jenkins tab becomes available showing the latest builds and their status:
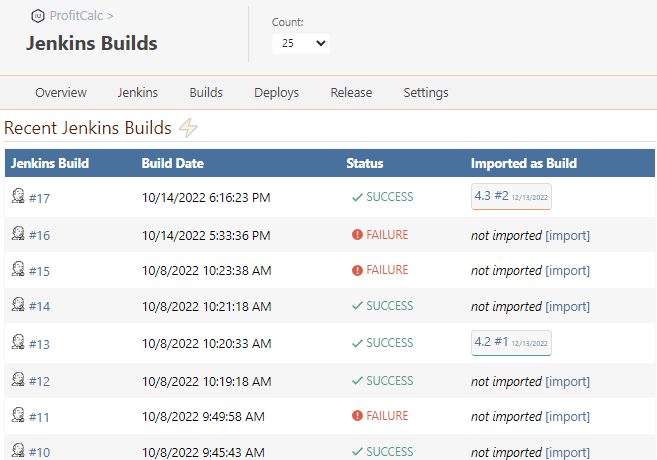
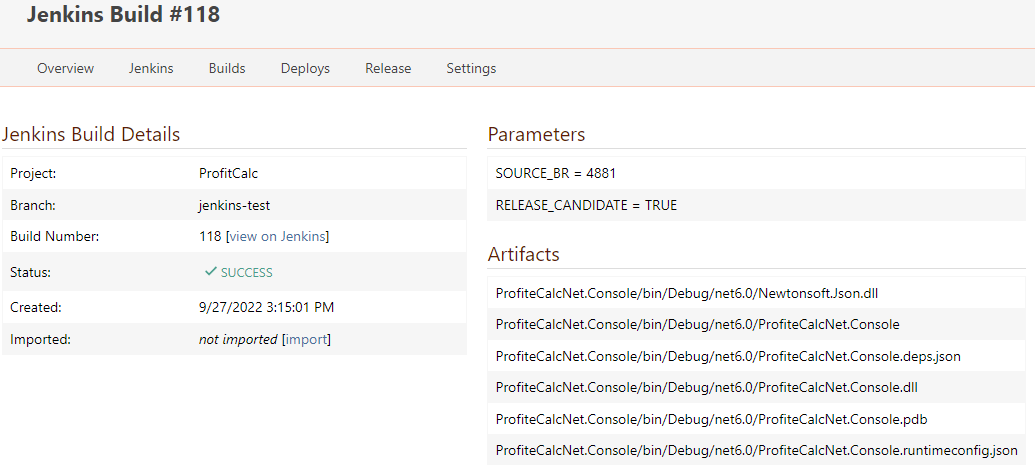
Clicking on an individual Jenkins build displays the Jenkins metadata for that build, including parameters and artifacts.
See CI Server (Jenkins, TeamCity, etc.) Integration to learn more.
Creating a Build
There are a several ways a build can be created in BuildMaster:
- using the Web UI (described below)
- automatically, with a Resource Monitor or Scheduled Job
- using the Release & Build Deployment API
- with the Create Build Operation in OtterScript
Creating a Build in the UI
When creating a build of your application in the UI, you may first be prompted to select a build type:
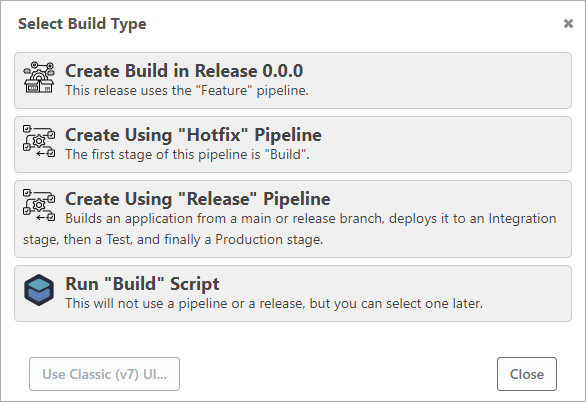
This option will appear if your application has multiple active releases, multiple pipelines, or multiple build scripts that could be used.
You may be also prompted to select a Git branch/commit to use when building your code and see variable prompts that were defined in the pipeline.
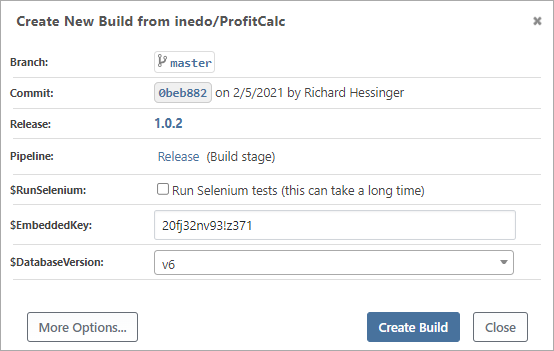
The Git options appear depending on how you navigated to the Build page. For example, if you navigated to Builds > Create New Build, you'll be prompted to select a branch. However, if you clicked the green Play button (▶) next to a branch at Git > Branches, you aren't prompted to select a branch.
Classic UI (BuildMaster 7.0 and earlier)
In BuildMaster 7.0 and earlier, the Create New Build page looks and behaves differently:
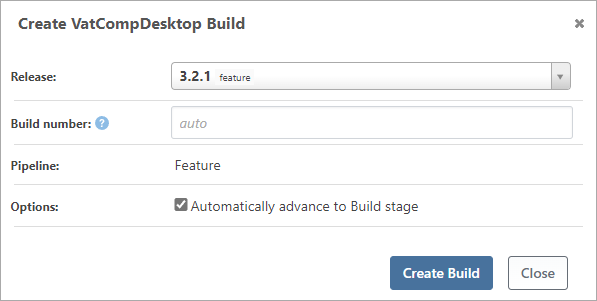
The most notable differences are
- Build numbers can be set manually; this can be approximated by using a variable prompt and the
Set-BuildNumberoperation - You can opt to not "Automatically advance to «first» stage"; this can be approximated by adding a manual approval to the first stage, or a "dummy stage" that has no deployment targets in the first stage
These options were removed in BuildMaster 2022 because they increased complexity and confused users; we also couldn't imagine why users would want to do this.
You can access this page in BuildMaster 2022 by clicking "More Options" on the Build page, and then clicking "Use Classic (v7) API". Please let's know if you use this page as it may be removed in a future version.
Deploying a Build
Similar to creating a build, there are several ways a build can be deployed in BuildMaster:
- using the Web UI (described below)
- using the Release & Build Deployment API
- with the Deploy Build Operation in OtterScript
Deploying a Build in the UI
The build's pipeline determines where the build will be deployed, as well as what approvals are required before deploying to each stage.
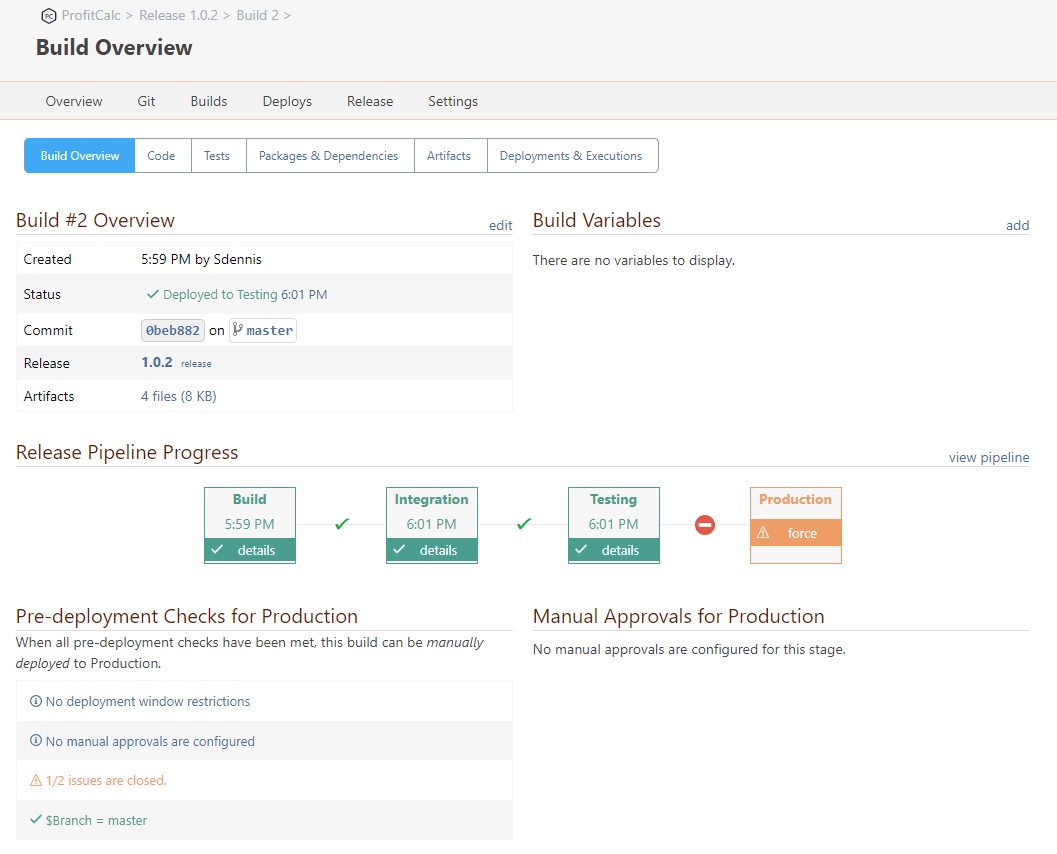
Clicking on one of the stages in the build's pipeline will display a Deploy Build dialog:
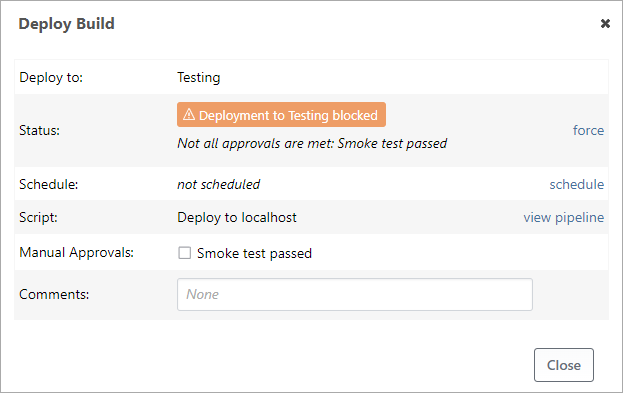
Assuming you have the appropriate access controls for the application and environment, you'll be able to do one of the following actions:
- Deploy Build ; if the build was successfully deployed at the previous stage and meets all approval requirements, you can deploy the build at this stage
- Override Status; if the deployment failed, you can override the failure to enable deployment
- Force Deploy Build; if the build wasn't successfully deployed in the previous stage (and the status wasn't overridden), or if the build doesn't have the required approvals, you can force deploy at this stage
- Re-deploy Build; if the build has already been successfully deployed to this stage, you can re-deploy it at any time; this is how you perform a rollback
Deployment of the build can also be scheduled:
- Immediately, when all approval requirements are met
- Once all approval requirements are met and the specified date and time have elapsed...
Build Lifecycle, Pipelines, and Releases
Builds are primarily used to build/compile your application's code and then deploy it to a series of testing environments before finally moving it into production. This build and deploy process is defined and enforced by the pipeline associated with the build. Builds can also be associated with a release.
Pipeline: First Stage
When creating a build with a pipeline, the build is "deployed" to the first stage of the pipeline. Usually, this stage is Build or Import.
However, if the user doesn't have permission to run in this environment, or if the first stage requires approvals or deployment windows, the build must be manually moved to the first stage after creation.
Builds and Releases
A release is used to group related builds, and each of those builds is an attempt to meet the requirements of that release. For example, you may create twelve different builds of Release 4.2.0 before the code changes are tested, accepted, and deployed to production. These builds are in different stages and environments throughout the release.
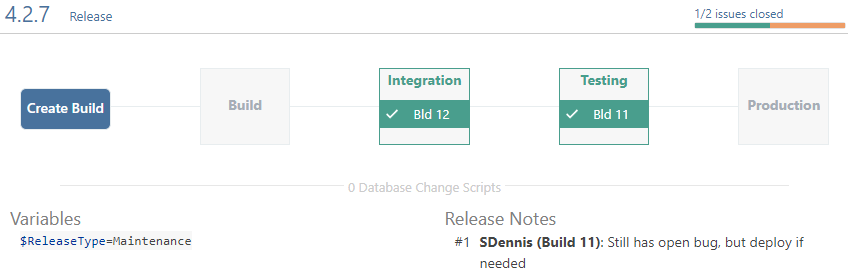
Releases are used to illustrate this process. When a build is associated with a release, there are some behavioral changes to note:
- Build numbers are unique to the release; by default, applications use a "sequential per release" build numbering scheme, meaning that the first build created for a release is number 1 and increments as new builds are created. This makes it easier to keep track of builds within a release.
- Builds from different releases can share a pipeline stage; by default, pipelines reject an earlier build if a newer build is deployed in the same environment and that build belongs to the same release
- The release pipeline is used; instead of selecting a pipeline for the build, the pipeline associated with the release is used
Builds associated with releases will also enable additional features, such as issue tracking synchronization and selecting specific configuration file versions to deploy.
Changing a Build's Release or Pipeline
You can change the release or pipeline that an active build is associated with at anytime.
Changing a build's release or pipeline may yield unintended consequences, such as having build numbers out of order or deployments to stages in a different pipeline/release.
Instead, we recommend creating a new build in the desired release or pipeline.
Using Builds without a Pipeline
Starting with BuildMaster 2022, you can create a build that is not associated with a pipeline or release. There are a few cases where this can be helpful.
- Writing a New Build Script; if you are building an application for the first time or want to write a new build script, this type of build can be handy for testing your script
- CI-only Builds; you may want to automatically create builds of specific branches that will never be deployed or that you will later add to a deployment pipeline
When creating a build without a pipeline, all other pipeline-less builds will be rejected.
You can also deploy a build that isn't linked to a pipeline, but the options are then much more limited than in a deployment pipeline. You can select only a single script and a single server on which to run that script. This is especially useful when writing new deployment scripts.
Build Status
A build has three possible statuses:
- Active - it passes through its pipeline with the possibility of being deployed in the final stage
- Deployed - successful deployment in the last phase of the pipeline
- Rejected - is not deployed in the final stage; instead, it is determined to be inadequate or otherwise unsuitable for the final stage
When a build has been successfully deployed to the final stage of its pipeline, both the release and build statuses are automatically changed to Deployed. This is controlled by the pipeline and can be configured to behave differently.
Users can manually reject builds, and depending on how the pipeline is configured, builds can be automatically rejected when another build enters the same stage. Administrators can also change the build status at any time. However, this should be done only in exceptional situations, for example, to override the rejection of an accidentally rejected build or to correct other errors.