- BuildMaster
- Getting Started with BuildMaster
- Builds and Continuous Integration
- What is a "Build" in BuildMaster?
- Git and Source Control
- Git Pipelines and Workflows
- Build Scripts & Templates
- Packages & Dependencies
- Build Artifacts
- Automated Testing & Verification
- Deployment & Continuous Delivery
- What is a “Pipeline” in BuildMaster?
- CI Server (Jenkins, TeamCity, etc.) Integration
- Deployment Scripts & Templates
- Automatic Checks & Approval Gates
- Manual Deployment Steps and Tasks
- Databases
- Configuration Files
- Rollbacks
- Advanced CD Patterns
- Applications & Releases
- Connecting to your Servers with BuildMaster
- Scripting in BuildMaster
- Configuring for Your Team
- Docker/Containers
- Development Platforms
- Deployment Targets
- Tools & Service Integrations
- Reference
- BuildMaster API Endpoints & Methods
- Extending BuildMaster
- Built-in Functions & Variables
- Applications
- Builds
- Configuration Files
- Containers
- Credentials
- Databases
- Environments
- Executions
- Files
- General
- JSON
- Linux
- Lists
- Maps
- Math
- Nuget
- Packages
- Pipelines
- PowerShell
- Python
- Releases
- Servers
- Strings
- XML
- Built-in Operations
- Batch
- BuildMaster
- Configuration Files
- Databases
- DotNet
- Files
- Firewall
- General
- Apply-Template
- Attach Package
- Build
- Checkout-Code
- Close-Issue
- Concatenate-Files
- Copy-Files
- Create-Directory
- Create-File
- Create-Issue
- Create-Issue
- Create-IssueComment
- Create-Package
- Create-ZipFile
- Delete-Files
- Download-Asset
- Download-Http
- Ensure-Directory
- Ensure-File
- Ensure-HostsEntry
- Ensure-Metadata
- Ensure-Milestone
- Ensure-Package
- Ensure-Release
- Ensure-Tag
- Exec
- Execute Python Script
- Execute VSTest Tests
- Get-Http
- Install-Package
- OSCall
- OSExec
- Post-Http
- Push-PackageFile
- PYCall
- PYEnsure
- Query-Package
- Remediate-Drift
- Rename-File
- Repackage
- Replace-Text
- Send-Email
- Set-FileAttributes
- Set-Variable
- SHEnsure
- Sleep
- Transfer-Files
- Transition-Issues
- Upload-Assets
- Upload-Http
- Upload-ReleaseAssets
- Git
- IIS
- Nuget
- PowerShell
- ProGet
- Python
- Registry
- Servers
- Services
- Shell
- Windows
- Administration
- Installation & Upgrading
- ProGet
- Getting Started with ProGet
- Packages: Managing & Tracking
- Feeds Types & Third-Party Packages
- What is a "Feed" in ProGet?
- What is a "Connector" in ProGet?
- NuGet (.NET)
- Universal Feeds & Packages
- PowerShell
- Chocolatey (Windows/Machine)
- RubyGems (ruby)
- Visual Studio Extension (.vsix)
- Maven (Java)
- npm (Node.js)
- Bower (JavaScript)
- Debian (Apt)
- Helm (Kubernetes)
- PyPI (Python)
- Conda (Python)
- RPM (Yum)
- Alpine (APK)
- CRAN (R)
- pub (Dart/Flutter)
- Cargo (Rust)
- Terraform Modules
- Conan (C++)
- Composer (PHP)
- Other Feed Types
- Asset Directories & File Storage
- Docker and Containers
- Replication & Feed Mirroring
- Software Composition Analysis (SCA)
- Security and Access Controls
- Cloud Storage
- Administration
- Installation & Upgrading
- API Methods and CLI Commands
- Otter
- Getting Started with Otter
- Orchestration & Server Automation
- Connecting to your Servers with Otter
- Collecting & Verifying Configuration
- Drift Remediation / Configuration as Code
- Scripting in Otter
- Configuring for Your Team
- Installation & Upgrading
- Administration & Maintenance
- Reference
- Otter API Reference
- OtterScript Reference
- Built-in Functions & Variables
- Executions
- Files
- General
- JSON
- Linux
- Lists
- Maps
- Math
- PowerShell
- Python
- Servers
- Strings
- XML
- Built-in Operations
- Batch
- Docker
- DotNet
- Files
- Firewall
- General
- Apply-Template
- Collect Debian Packages
- Collect RPM Packages
- Collect-InstalledPackages
- Concatenate-Files
- Copy-Files
- Create-Directory
- Create-File
- Create-Package
- Create-ZipFile
- Delete-Files
- Download-Asset
- Download-Http
- Ensure-Directory
- Ensure-File
- Ensure-HostsEntry
- Ensure-Metadata
- Ensure-Package
- Exec
- Execute Python Script
- Get-Http
- Install-Package
- OSCall
- OSExec
- Post-Http
- Push-PackageFile
- PYCall
- PYEnsure
- Query-Package
- Remediate-Drift
- Rename-File
- Repackage
- Replace-Text
- Send-Email
- Set-FileAttributes
- Set-Variable
- SHEnsure
- Sleep
- Transfer-Files
- Upload-Assets
- Upload-Http
- IIS
- Otter
- PowerShell
- ProGet
- Python
- Registry
- Servers
- Services
- Shell
- Windows
- Installation & Maintenance
- Windows (Inedo Hub)
- Linux (Docker)
- High Availability & Load Balancing
- User Directories & Domains (LDAP)
- Logging & Analytics
- SAML Authentication
- When to Upgrade your Inedo Product
- Managing Agents and Servers
- Backing Up & Restoring
- Installation Configuration Files
- PostgreSQL & Inedo Products
- SQL Server & Inedo Products
- Inedo Agent
- What is the Inedo Agent?
- Installation & Upgrading
- Downloads & Release Notes
- Maintenance & Configuration
- Internal Architecture
- MyInedo
- OtterScript (Execution Engine)
- Reference
- OtterScript
- Inedo Execution Engine
- Romp (Discontinued)
- Using Romp
- Installing, Configuring, and Maintaining
- Romp CLI Reference
- Package Layout
- Downloads & Source Code
- Extensibility
- Inedo SDK
Build PyPI Project

A script template is a simple, no-code solution for performing common build or deployment operations and can be converted to OtterScript at any time.
The Build PyPI Project script template will:
- check out out code from Git
- install packages using pip
- optionally run tests
- track package usage
- capture build artifacts for later deployment
This article will detail the options for these steps, as well as how they're performed.
Using This Script Template
A synchronized Git repository is required for this template. If your application does not have one, you will not be able to add or edit this script template.
To add this script template to your application, navigate to Scripts, click Add Script, and select Build PyPI Project from the list of Build Script Templates. After doing so, you'll see a dialog like this:
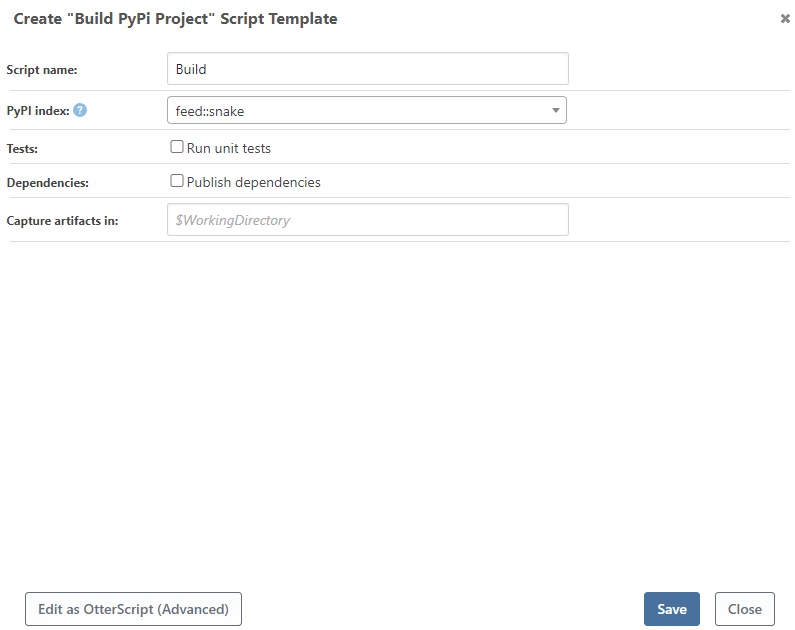
This article will discuss how these options are used in different steps of the build process.
Checking Out from Git
First, the script template checks out code from a Git repository. The branch (or specific commit) is selected when the build is created, before the script is even run. The script will then check out code from that exact commit.
This step uses the Git::Checkout-Code operation without any parameters.
Install PyPI Packages
PyPI Index
Select where to fetch the PyPI packages needed for your project. This list will typically contain PyPI feeds from your connected ProGet instance, and an option for Not Specified, which will use the default repository.
Run PyUnit Tests
Select whether to run PyUnit unit tests for this project.
This step uses the Python::Execute-PyUnit operation without any parameters.
Other Options
Settings for other common operations using dotnet build/publish are also included:
- Output directory: Build output will be copied here instead of the default output directory
- Framework: Framework version to build, typically only used for multi-targeted projects. Uses common .NET monikers such as net6.0, net452, netstandard2.0, etc
- Runtime: When publishing an executable, specifies the runtime/platform to target such as win-x64, linux-x64, etc
- Self-contained: When publishing, include the entire .NET runtime and all required dependencies in the output
- Additional arguments: These are passed to
dotnetexactly as specified
This step uses the DotNet::Build or DotNet::Publish operation, depending on the Command you selected. The parameters will depend on the options you've entered.
Record Dependencies to ProGet
When a ProGet feed is selected for a NuGet package source, a checkbox to scan for package dependencies will appear. If checked, the PyPI dependencies for this build will be recorded in your ProGet instance.
This step uses the ProGet::Scan operation with the Project parameter set to requirements.txt.
Capturing Build Artifacts
As the last step, BuildMaster will capture artifacts from a path within the working directory that you specify. These are the files that you will deploy later.
Finding the Right Subpath
Usually, the easiest way to find the path you want is:
- Create a build using this template
- Inspect the build's artifacts
- Find the subpath you want within the artifact
- Enter that in the "Capture artifacts from:"
The build artifact going forward will only contain those files. To learn about more options with artifacts, see the Build Artifacts documentation.
This step uses the Create-Artifact operation, with the parameters depending on the options you've entered.